
Overview
In typical scenarios, we need to create a constructor if we want to send data from one widget or one screen to another. Let’s say we are building an e-commerce app and we have the following screens in our application.
- main.dart (Main Screen)
- products_screen.dart (Products Screen)
- product_item_screen.dart (Product Item Screen)
- product_details_screen.dart (Product Detail Screen)
Let’s dive deep…

Assume we have few images on the Grid Tile in Products Screen. When we click one of the image, users will be sent to Product Detail Screen. When we want to send data to Product Detail Screen, the typical method is to create a constructor and then pass the data.
child: GestureDetector(
          onTap: () {
            Navigator.of(context).push(
              MaterialPageRoute(
                builder: (ctx) => ProductDetailScreen(title, price),
              ),
            );
          },
          child: Image.network(
            imageUrl,
            fit: BoxFit.cover,
          ),
        ),
This method is called on the fly route. This method is perfectly fine but it has some downside.
Named Route
When the application grows, as requirements increases, we need to create many such on the fly route which is difficult to maintain. Specially new developers may face difficulty to understand which routes and screens the app has.
To solve this problem we have to use Named route in Main Screen. It will be easier to find all the routes and screens that the application has.
Another problem of having on the fly route is often unnecessary data has to be passed through multiple pages or screens. We have different navigations within multiple screens and we sometime want to pass data within these screens. In this case we have to pass unnecessary data in every widget down in the tree. The problem is, sometime all the screens not necessarily need those data in the widget itself to display data. These screens simply want to forward data to another widget. To understand the concept better see the following example below.
Let’s say we want to add price field in the Product Detail Screen. So we create a constructor.
import 'package:flutter/material.dart';

// Product Detail Screen
class ProductDetailScreen extends StatelessWidget {

  final String title;
  final double price;

  ProductDetailScreen(this.price, this.price);
  @override
  Widget build(BuildContext context) {
    return Scaffold(
      appBar: AppBar(
        title: Text(title),
      ),
      body: Center(
        child: Text(price),
      ),
    );
  }
}
We make a GestureDetector widget on Product Item Screen and make the image clickable. When we click the image, user will then be routed to Product Detail Screen. Value for price will be passed into the ProductDetailScreen as shown.
// Product Item Screen
child: GridTile(
        child: GestureDetector(
          onTap: () {
            Navigator.of(context).push(
              MaterialPageRoute(
                builder: (ctx) => ProductDetailScreen(title, price),
              ),
            );
          },
          child: Image.network(
            imageUrl,
            fit: BoxFit.cover,
          ),
        ),
        footer: GridTileBar(
          backgroundColor: Colors.black87,
          title: Text(
            title,
            textAlign: TextAlign.center,
          ),
        ),
      ),
Remember we don’t directly display the price value in Product Item Screen. We only need to pass the value to Product Detail Screen. Because of this method unnecessary data will be used in different pages or widgets.
Unnecessary rebuilds of the major parts of the widgets causes performance issues. So no need to rebuild the entire app when just simple tiny widget needs an update.
Therefore we need a better approach. This is where Named route and State management come into play.
How to Use Named Route?
To make Named routes, first create a route table in the Main Screen. Register route name and then import corresponding files.
import 'package:flutter/material.dart';

import './screens/product_detail_screen.dart';
import './screens/products_overview_screen.dart';

void main() => runApp(MyApp());

class MyApp extends StatelessWidget {
  // This widget is the root of your application.
  @override
  Widget build(BuildContext context) {
    return MaterialApp(
      title: 'Shop App',
      theme: ThemeData(
        primarySwatch: Colors.blue,
      ),
      home: ProductOverviewScreen(),
      routes: {
        ProductDetailScreen.routeName: (ctx) => ProductDetailScreen(),
      },
    );
  }
}
Use pushNamed route in the Product Item Screen. Then use id as argument. This value is important because, it will be used to retrieve data in the Product Detail Screen. You may have noticed, we are passing only id value. But in the previous method (On the fly route method, we need to pass all the required field as argument).
class ProductItem extends StatelessWidget {
  final String id;
  final String title;
  final double price;
  final String imageUrl;

  ProductItem(
    this.id,
    this.title,
    this.price,
    this.imageUrl,
  );

  @override
  Widget build(BuildContext context) {
    return ClipRRect(
      borderRadius: BorderRadius.circular(10),
      child: GridTile(
        child: GestureDetector(
          onTap: () {
            Navigator.of(context).pushNamed(
              ProductDetailScreen.routeName,
              arguments: id,
            );
          },
          child: Image.network(
            imageUrl,
            fit: BoxFit.cover,
          ),
        ),
Now simply remove the constructor in the Product Detail Screen that we created earlier and then use route path. Then extract id value so that we can use all the required data for each corresponding id.
import 'package:flutter/material.dart';

class ProductDetailScreen extends StatelessWidget {
  static const routeName = '/product-detail';

  @override
  Widget build(BuildContext context) {

    final productId = ModalRoute.of(context).settings.arguments as String;
    return Scaffold(
      appBar: AppBar(
        title: Text('title'),
      ),
      body: Center(
        child: Text('price'),
      ),
    );
  }
}
State Management

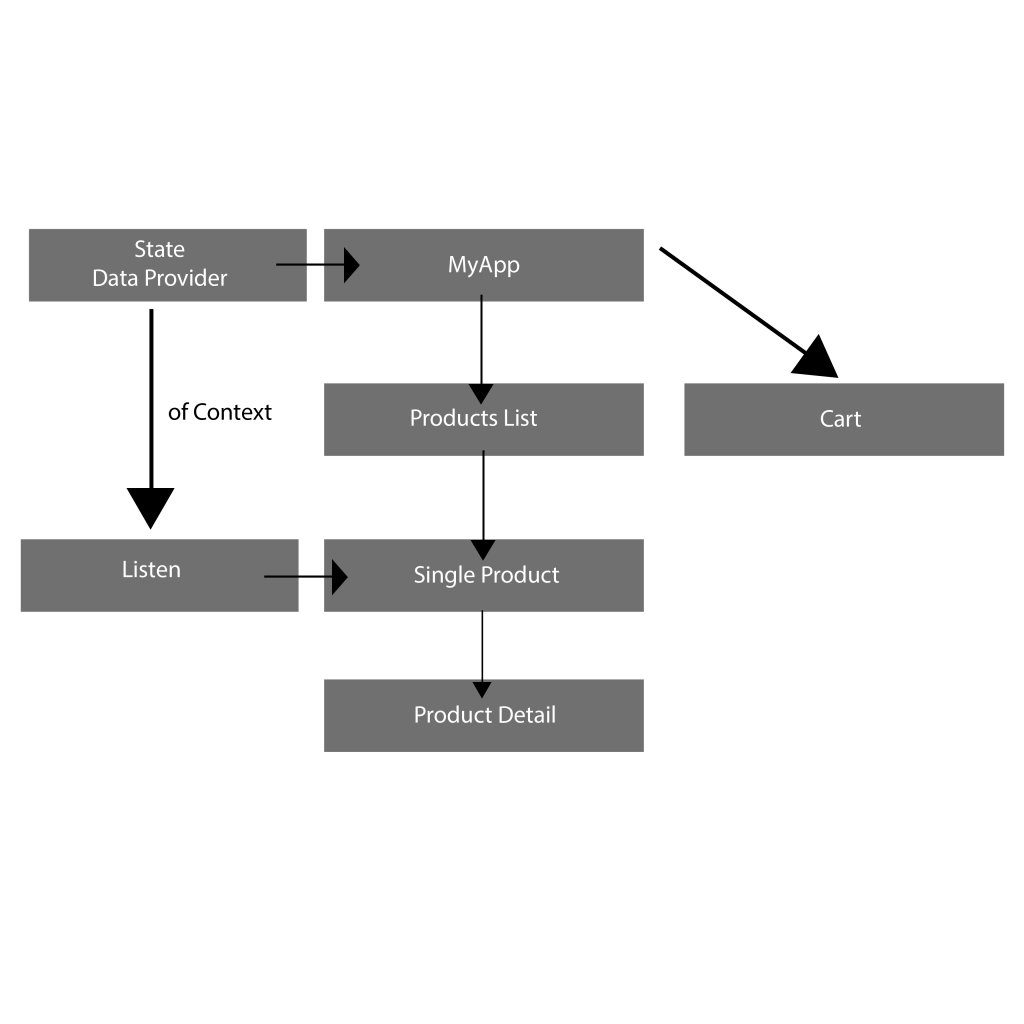
When we add Data provider in MyApp widget, all child widgets will be able to listen to that provider. For that we need to listen by placing a listener on any widget we want to listen. By doing so, only that widget gets rebuild as data get update.
Install provider package and add in the pubspec.yaml file. Now we are able to use provider package which give access to provider and state management.
dependencies:
  flutter:
    sdk: flutter
  provider: ^4.0.5+1
Now create products provider. This is just dummy data but, you can use your own data.
class Products with ChangeNotifier {
  List<Product> _items = [
    Product(
      id: 'p1',
      title: 'Red Shirt',
      description: 'A red Shirt- Bitch',
      price: 34.99,
      imageUrl:
                   'https://live.staticflickr.com/4043/4438260868_cc79b3369d_z.jpg',
    ),
    Product(
      id: 'p4',
      title: 'Pad',
      description: 'A red Pad',
      price: 19.99,
      imageUrl:
          'https://live.staticflickr.com/4043/4438260868_cc79b3369d_z.jpg',
    ),
  ];

  List<Product> get items {
    return [..._items];
  }

  void addProduct() {
    //_items.add(value);
    notifyListeners();
  }
}
Now we start listening by providing in different widgets of our app. Simply import it and provide it at the highest possible point of the widgets. In this case, we provide it is in MyApp widgets.
void main() => runApp(MyApp());

class MyApp extends StatelessWidget {
  // This widget is the root of your application.
  @override
  Widget build(BuildContext context) {
    return MultiProvider(
      providers: [
        ChangeNotifierProvider(
          create: (ctx) => Products(),
        ),
      ],
      child: MaterialApp(
        title: 'Shop App',
        theme: ThemeData(
          primarySwatch: Colors.blue,
        ),
        home: ProductOverviewScreen(),
        routes: {
          ProductDetailScreen.routeName: (ctx) => ProductDetailScreen(),
        },
      ),
    );
  }
}
Here we are using ProductsGrid class simply to make 2 column grid for the products.
class ProductsGrid extends StatelessWidget {
  @override
  Widget build(BuildContext context) {
    final productsData = Provider.of<Products>(context);
    final products = productsData.items;

    return GridView.builder(
      padding: const EdgeInsets.all(10.0),
      itemCount: products.length,
      itemBuilder: (ctx, i) => ChangeNotifierProvider.value(
        value: products[i],
        child: ProductItem(),
      ),
      gridDelegate: SliverGridDelegateWithFixedCrossAxisCount(
        crossAxisCount: 2,
        childAspectRatio: 3 / 2,
        crossAxisSpacing: 10,
        mainAxisSpacing: 10,
      ),
    );
  }
}
Now create ProductItem class which use Product provider. When we click the GestureDetector button, the ProductDetailScreen will show up.
class ProductItem extends StatelessWidget {
  @override
  Widget build(BuildContext context) {
    final product = Provider.of<Product>(context, listen: false);
    // final cart = Provider.of<Cart>(context);
    return ClipRRect(
      borderRadius: BorderRadius.circular(10),
      child: GridTile(
        child: GestureDetector(
          onTap: () {
            Navigator.of(context).pushNamed(
              ProductDetailScreen.routeName,
              arguments: product.id,
            );
          },
          child: Image.network(
            product.imageUrl,
            fit: BoxFit.cover,
          ),
        ),
        footer: GridTileBar(
          backgroundColor: Colors.black87,
          leading: Consumer<Product>(
            builder: (ctx, product, child) => IconButton(
              icon: Icon(
                  product.isFavorite ? Icons.favorite : Icons.favorite_border),
              onPressed: () {
                product.toggleFavoriteStatus();
              },
            ),
          ),
          title: Text(
            product.title,
            textAlign: TextAlign.center,
          ),
        ),
      ),
    );
  }
}
Here is code for ProductDetailScreen. In this class we have to use Products model so that we can use each product properties such as name, title and description.
class ProductDetailScreen extends StatelessWidget {
  static const routeName = '/product-detail';

  @override
  Widget build(BuildContext context) {
    final productId = ModalRoute.of(context).settings.arguments as String;
    final loadedProduct = Provider.of<Products>(context).items.firstWhere(
          (prod) => prod.id == productId,
        );

    return Scaffold(
      appBar: AppBar(
        title: Text(loadedProduct.title),
      ),
      body: Center(
        child: Text(loadedProduct.description),
      ),
    );
  }
}
Conclusion
There you go. Now you know how to create named routes in flutter. This is just small app with just only few screens. But named routes could be more beneficial in large apps with multiple screens. So hope you understand something from this tutorial.