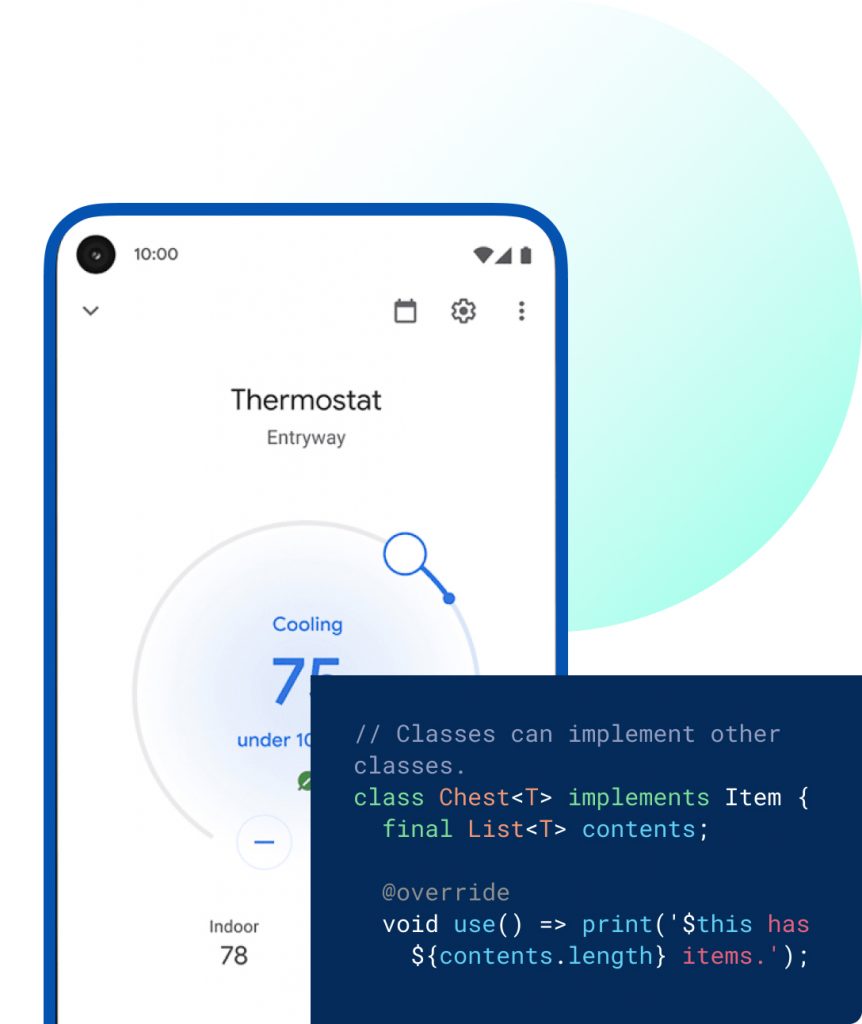
Google announces Flutter 3. We all have been waiting forMaterial 3, Games Toolkit, macOS, Linux Support and Fordable Phone Support. Wait is over, finally it has arrived. Google and the open source community has put a lot of hard works to Flutter 2.0 and now they have released Flutter 3.0 with much more exciting features. Today we look into the new features that Flutter has in this major changes!
1. Flutter Firebase
A collection of tools is always necessary to have when building and launching applications. Data storage, cloud functions, authentication and app testing for different platform requires comprehensive third-party tools such as Firebase, AWS Amplify and AppWrite.
For example, Firebase is an amazing back-end platform backed by Google which accelerate app development process providing powerful backend infrastructure for the applications.
Flutter and Firebase work hand-in-hand to help you build web and mobile apps. This is not a surprise for any of us as we know both these products are belongs to one company, Google.
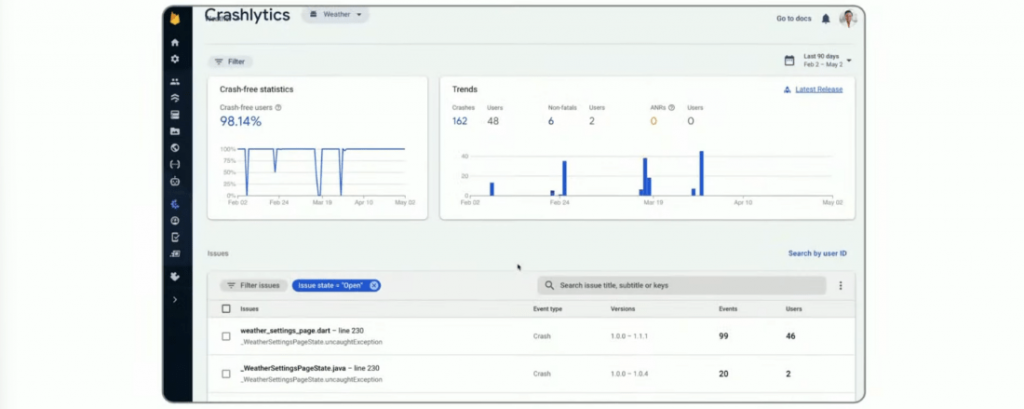
Majority of Flutter developers use Firebase in their apps. Over the last few releases Flutter team have been working with Firebase to expand and provide better integration for Flutter as a first-class integration. Flutter Crashlytics plugin helps to track real-time fatal errors with the same set of features through Firebase’s real-time crash reporting service. Firebase Crashlytics is a lightweight, realtime crash reporter that helps you track, prioritize and fix stability issues that erode your app quality.
2. macOS and Linux Support
According to a 2021 developer survey, Flutter is the most popular cross-platform mobile framework used by majority of global developers. Flutter desktop support is still far behind compared to mobile support specially in its early releases.
Flutter was stable for Windows in previous versions and now it supports both linux and macOS as well. Now you can build apps for all desktop platforms without ever worrying of breaking your code. You can build production ready applications for all platforms using flutter.
3. Mobile Updates
Smoother experience
Flutter apps now contribute 120Hz refresh rates that were previously limited to only 60Hz on iOS devices. This increase helps to have a smoother experience on iOS devices specially during animations.
Fordable Phone Support
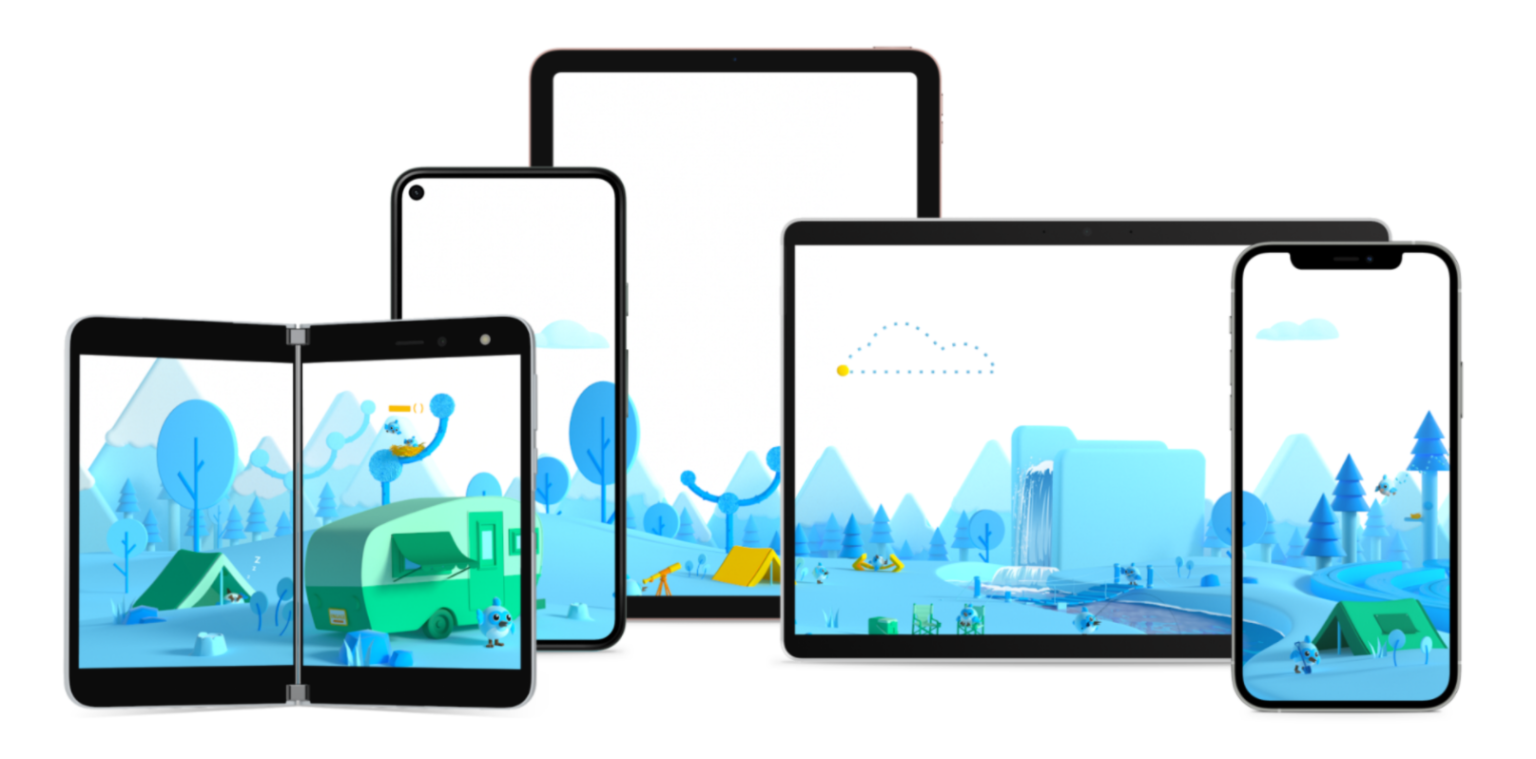
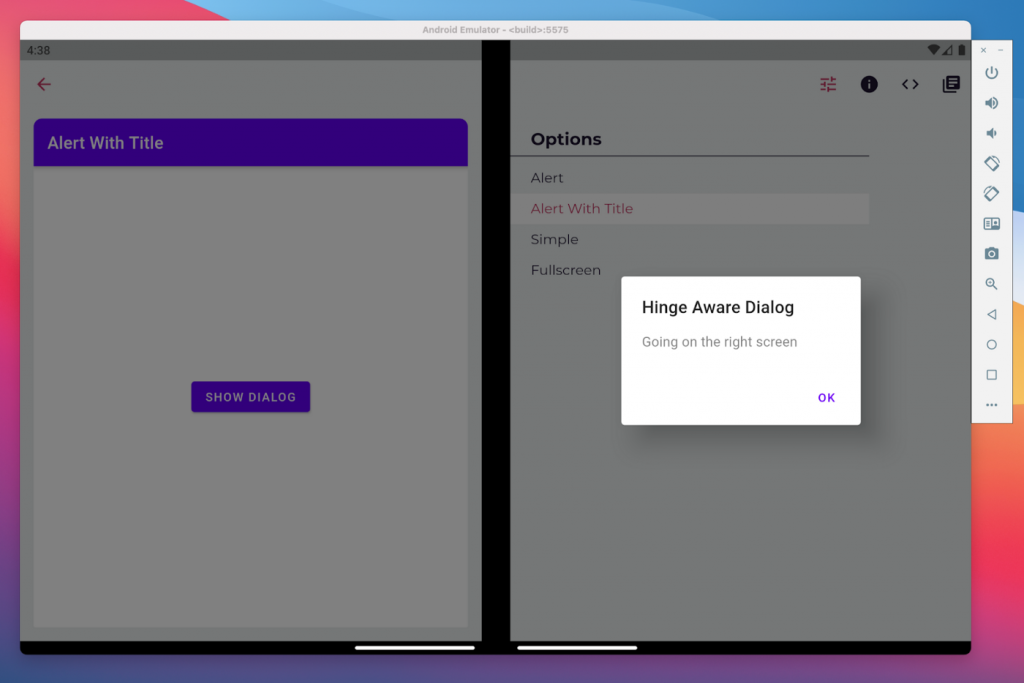
Finally the newest release supports for fordable mobile devices. The new widgets and its core features will bring more natural experiences to fordable devices.
4. Web updates
Faster image decoding and scrolling
Flutter web now automatically detects and uses the ImageDecoder API in browsers that support it. As of today, most common browsers have added this API. Because of ImageDecoder API the image rendering for web is more efficient and the speed is twice faster than the previous versions. In overall the performance is major improvement for new update.
App lifecycle API
The new lifecycle API provides you flexibility to control over the Flutter framework. Now you can run Flutter apps in headless mode on the web. This gives you the flexibility to control the bootstrap process of your app from hosting HTML page, and check Lighthouse analysis for the performance of your app. For example you could preload the content while showing a login screen or a progress bar! You can get more information, Customizing web app initialization on docs.flutter.dev.
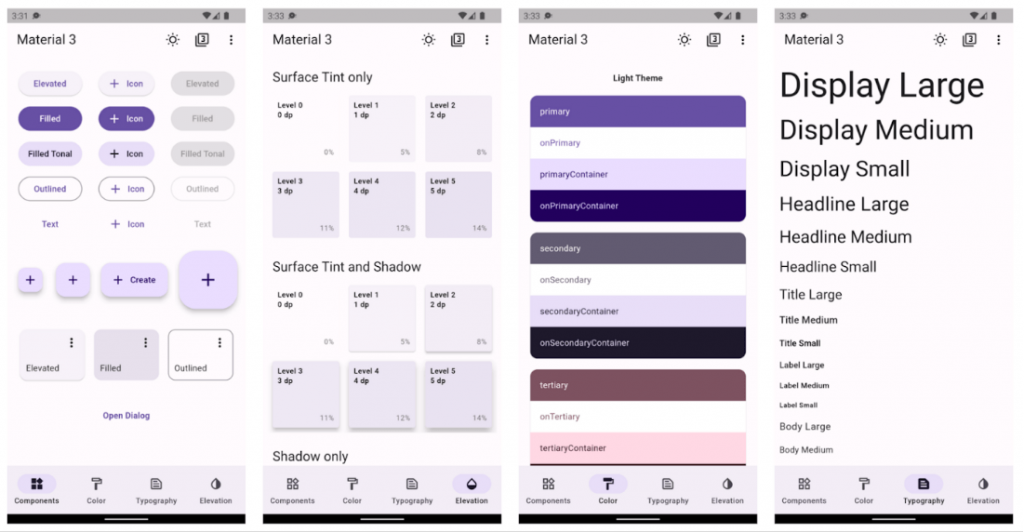
5. Material 3
Material 3 is known as the next generation of Material Design. Flutter 3 does not have full support for material 3 yet, only certain widgets support material 3. Flutter 3 provides opt-in support for Material 3. Maybe in future release, all the widgets might have material 3 support and could be the standard default for flutter.
6. Theme Extensions
Theme extension feature enable themes more convenient. It enables customizing theme by adding custom colors and custom color names to the flutter theme. You are not stuck with default colors that comes with flutter anymore. It is now much easier than ever to add our own color to flutter apps.
7. Flutter’s Games Toolkit
The Flutter team has released an easy-to-use casual games tool kit for casual gamers. It is a specialized starter kit of various templates which mean you can write your game code with Flutter casual Games Toolkit.
Now you can deploy casual games much quickly on multiple platforms. Flutter game repo has pre-integrated modules for in-app purchases, Ads & more. However if you want to develop 3D games, then flutter is not the right choice rather you want to go for Unity 3D.
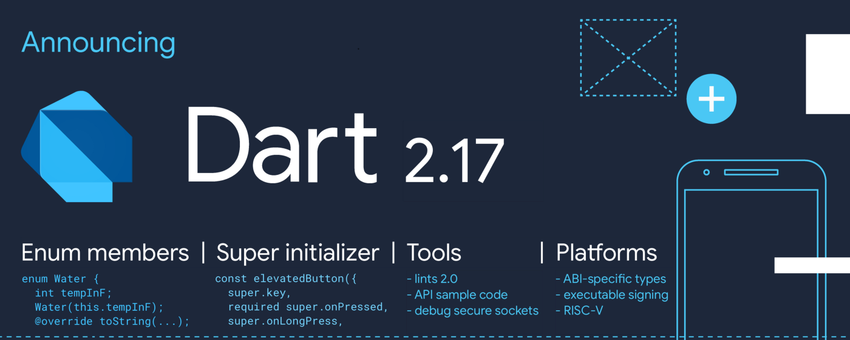
8. Dart 2.17
Dart 2.17 stable was announced along with Flutter 3.0 with many long-awaited features that developers have been waiting for. Dart is the secret sauce behind Flutter, and any improvements in Dart would help improve Flutter’s development.
According to Dart and Flutter team, Dart 2.17 adds major new support for members on enums, refines how you can use named arguments in constructors, and makes code for forwarding parameters to superclasses much less verbose and repetitive. We will look into the new features of Dart 2.17 in more details in the coming articles.
Flutter is a powerful choice for web and mobile apps development. In Flutter, we can create a fully responsive designs for several platforms using one code base. As we all know a responsive design ensures the appeal of our application is consistent and gives users a seamless experience, no matter the size of the device. For example, when the screen size of the browser extends to a certain width the layout of the app will be changed.
In this short article, we’ll be covering how to create responsive designs in Flutter for web and mobile devices.
Getting Started
To begin, we’ll simply use the app we created in previous tutorial that looks like something like this👇.
💡 For simplicity we are using fixed numbers for screen resolution but when designing user interfaces for mobile apps, always avoid hardcoding numbers for widget sizes and instead utilize percentages. The MediaQuery class in Flutter may be used to do this.
Let’s work on coding…
Make a folder named layout and inside that create new file called layout.dart. Create a stateless widget for now, later we can use a stateful widget when we fetch dynamic contact from backend. We want to return a widget named ResponsiveLayout which helps in creating responsive layout. LayoutBuilder will give us a builder function which then return to us a context and constraints. Using constraints we can get the screen width.
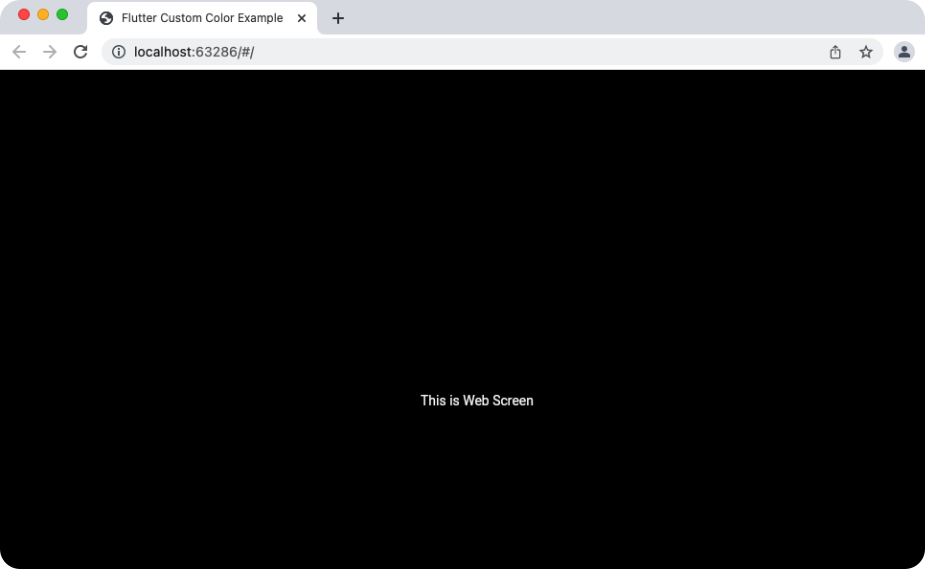
Now create a file named dimensions.dart in the utils folder. Our web screen size starts at 600 resolutions so we will display web layout when the screen size is at 600 and above.
Now we want to create webScreenLayout and mobileScreenLayout widgets and accept these two widgets using a constructor as shown.
class ResponsiveLayout extends StatelessWidget {
  final Widget webScreenLayout;
  final Widget mobileScreenLayout;
  const ResponsiveLayout(
      {Key? key,
      required this.webScreenLayout,
      required this.mobileScreenLayout})
      : super(key: key);
We have accepted those two widgets via a constructor and we want to return those two widgets.
Now go to main.dart file and replace Center widget with ResponsiveLayout. We then import layout.dart file top of the main.dart file. Then pass both mobileScreenLayout and webScreenLayout as shown below.
It is time to create mobile_screen_layout.dart and web_screen_layout.dart file, so we can use these two widget on main.dart.
Learning Flutter is a great idea. Flutter is great if you want to build a career in mobile app development. I’ve planned to write short series based articles on the things I learned about flutter.
In this article, you will explore how to change the overall look across your apps with Flutter themes.
Step 1 — Setting Up the Project
To create a new flutter application simply run the following command. Oh do not forget to complete the installation process of flutter SDK, its prerequisites and the environment setup.
flutter create flutter_custom_theme_example
Flutter create command will give us a demo application that will display a simple clickable button which increment the numbers as we click the button. Now navigate to the new project directory that we just have created.
cd flutter_custom_theme_example
We need to see how our code looks like on the simulators. For that simply run the following code below. We want to enable hot reloading so it reflects the changes as we make to our code.
open -a simulator
Now that you have a working boilerplate Flutter application. It is the time to add customization to the app.
Step 2 — Customize Global Themes
Create a new folder named utils inside lib folder. Create a new file colors.dart inside utils.
Now we have created a color style globally for our application which can be used anywhere in our app. Open main.dart file and remove all the code given by flutter by default.
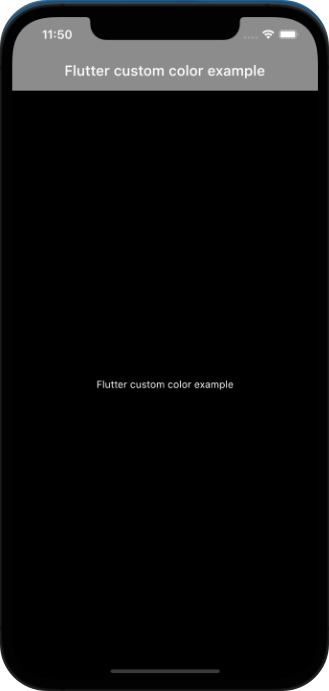
We want add dark theme to our app, therefore add dark theme using themeData given by flutter. Next add Scaffold widget to the main.dart file. Now we can see it has changed to default dark color provided by flutter team.
import 'package:flutter/material.dart';

void main() {
  runApp(MyApp());
}

class MyApp extends StatelessWidget {
  // This widget is the root of your application.
  @override
  Widget build(BuildContext context) {
    return MaterialApp(
      debugShowCheckedModeBanner: false,
      title: 'Flutter Custom Color Example',
      theme: ThemeData.dark(),
      home: Scaffold(body: Text('Flutter custom color example')),
    );
  }
}
We want a different colors, so this is the point we want to use colors.dart file created earlier so that we can use our own dark theme colors. Import colors.dart file inside our main.dart file. Then add our custom color to themeData shown below code.
import 'package:flutter/material.dart';
import 'package:flutter_custom_theme_example/colors.dart';

void main() {
  runApp(MyApp());
}

class MyApp extends StatelessWidget {
  // This widget is the root of your application.
  @override
  Widget build(BuildContext context) {
    return MaterialApp(
      debugShowCheckedModeBanner: false,
      title: 'Flutter Custom Color Example',
      theme: ThemeData.dark().copyWith(
          scaffoldBackgroundColor: mobileBackgroundColor,
          primaryColor: secondaryColor),
      home: Scaffold(
        appBar: AppBar(
          title: const Text('Flutter custom color example'),
        ),
        body: Center(
            child: Text(
          'Flutter custom color example',
        )),
      ),
    );
  }
}
Thats it! Now we have added our own custom colors to the flutter app. Yes this is very basic styling however in future tutorial we can add more styles and colors to flutter apps. You can find full code in this Github repo.
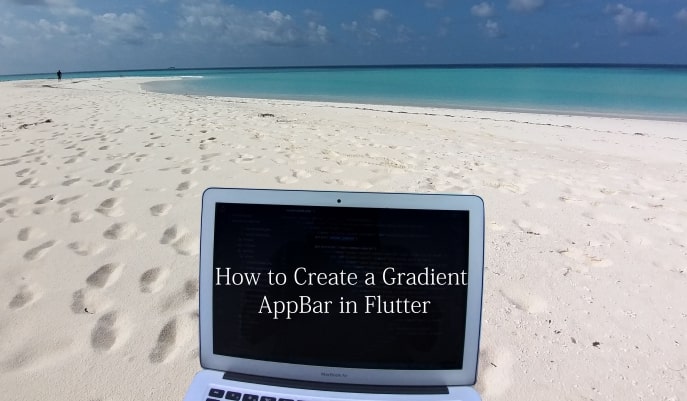
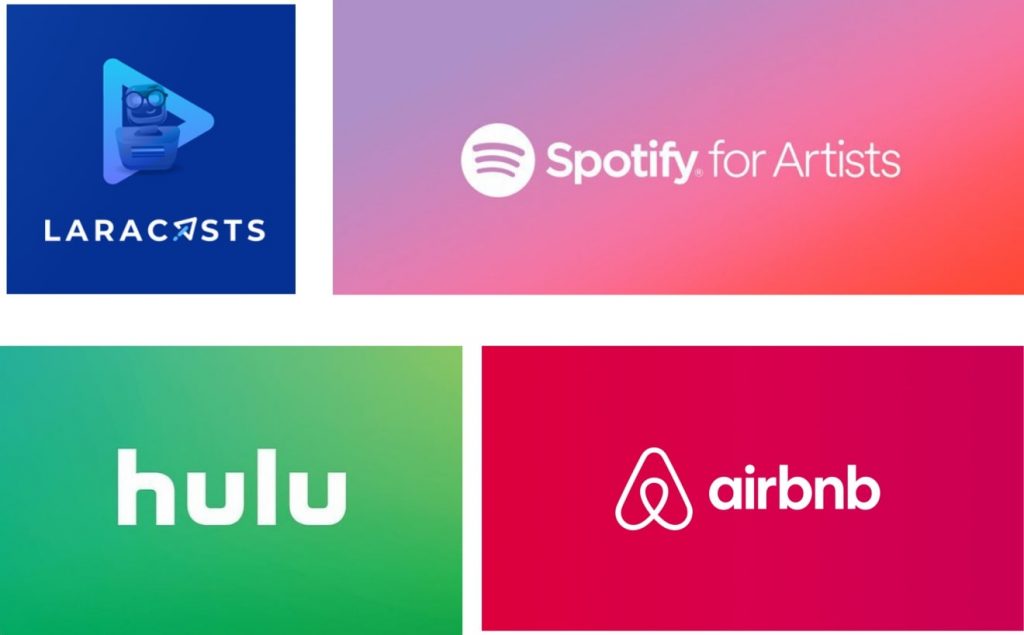
If you want to feel a different and modern look in your apps then the go for choice is gradient color. The blend of different shades of color, gradient creates a completely unique feelings to the modern designs. Companies such as ,Hulu, Spotify, Airbnb and Laracast often use gradient colors in their products.
This article will teach you how to add and customize these gradient designs into your Flutter app. There are plugins for this to achieve, however we want to implement same exact feature without using any third-party plugins.
So lets begin…
Step 1 — Setting Up the Project
To create a new flutter application simply run the following command. Please make sure to complete the Prerequisites for any flutter project if you are running this command for the first time.
flutter create flutter_gradient_example
Navigate to the project directory you just created:
cd flutter_gradient_example
Step 2 — Using LinearGradient
Open main.dart with your code editor and modify the boilerplate code provide by flutter team. We write most of the our code on this file. We are using simple statelessWidget since there is not state management that we need to take care of.
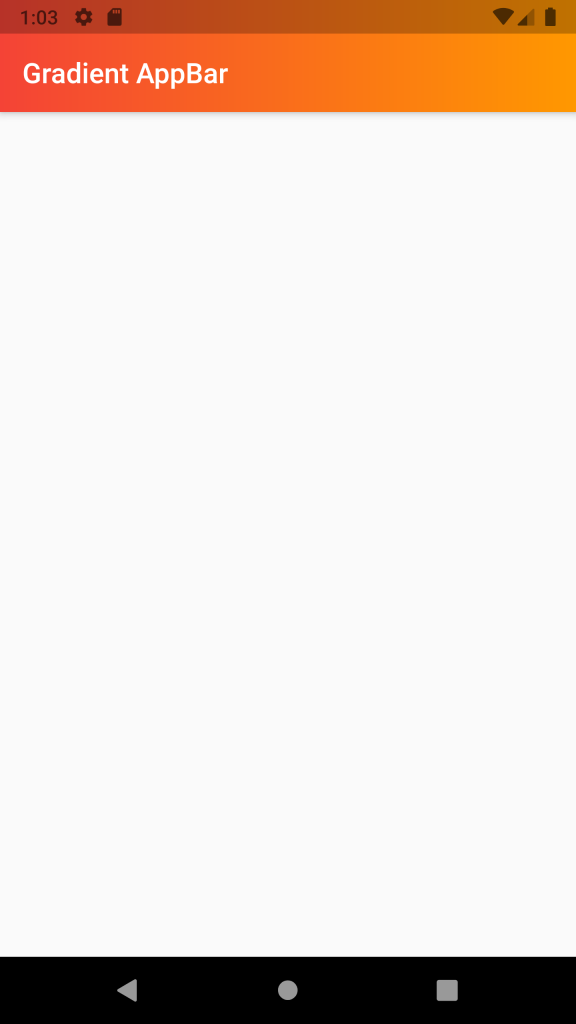
In the code below, you will notice we have used Scaffold and AppBar widgets. With these two widgets we are able to create an AppBar on top of our app.
Now use flexibleSpace property, so we can use a Container widget for a gradient layout. There are various kind of gradient but in this case we will use linear gradient method. It is also possible to have additional colors but in this example we are using only red and orange color.
Building high quality cross-platform mobile app is extremely difficult technical challenge. If you are building a cross-platform mobile application, there are two popular option to choose.
They are React Native from Facebook and Flutter from Google. These two frameworks are mature enough to achieve same fundamental goals, builds apps for multi platforms such as iOS, Android and the Web from a single code base.
In this tutorial we look into the detailed side-by-side comparison of these two popular technology. The key areas we look in this tutorial are:
Features
Tooling
Developer experience
Performance
The code structure
Let’s start by comparing the programming languages that have been used in these two frameworks.
Programming Language
React Native
In React Native we code apps in Javascript. Basically React Native is just an extension of Javascript language. It also support TypeScript incase if you want add type system on top of the Javascript.
Flutter
Dart is the programming language used in Flutter. Dart is a client-optimized language which helps quickly develop apps on any platform. Flutter runs in the Dart virtual machine, which features just-in-time execution engine. Flutter apps are compiled with ahead-of-time (AOT) compilation therefore it has a better performance.
Ecosystem
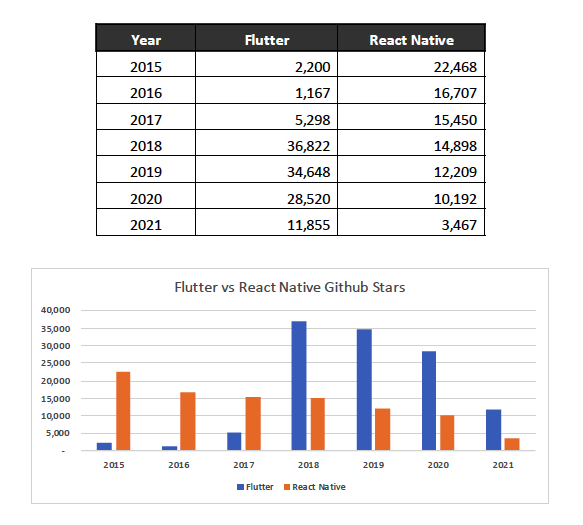
Now let’s look at the ecosystem of both these frameworks. According to recent Github stats, these two frameworks have the most active repositories as of 2021.
Development Philosophy
A complete React Native project basically needs bunch of third party plugins and dependencies, however React Native comes with minimal bare bone architecture. In most of cases the open source community develop and maintain the those plugins and dependencies for React Native apps.
Flutter on the other hand comes with huge set of widget library. It consists of large number of plugins and packages developed by flutter team. Dart also has package manager called pub and there is huge ecosystem of open source packages for flutter as well.
Architecture
Now let’s discuss the underlying architecture of these two technologies. First, how React Native works?
Under the hood React Native runs two separate javascript threads. One is the main thread to run the app on whatever native platform and the other is a thread to run the business logic of your application. These threads are isolated from each other but sometimes they need to interact so there is a bridge in the middle where they can pass serialized messages back and forth.
Because of this architectural design, it allows Javascript to communicate with native platform. When React Native renders a component it is a truly native component on the corresponding platform. It is not just a react website bundled as a mobile app but it’s truly rendering native components. That means the user interface of the application looks exactly like native components.
Instead of rendering native UI components, Flutter has its own high performance rendering engine built with C++ and Skia graphics library that renders its own custom pixel to the screen with compile native code that allows it to render pixel perfect versions of iOS and Android widgets while also making it to possible to paint your own custom pixels to the screen.
Developer Experience
Now we look into the developer experience for both technologies. Starting with initial setup, for React Native we can generate new app by running the following command.
After installing SDK for flutter, we can run the following command to create a flutter project.
flutter create my_app
You might have noticed, creating a flutter project is considerably faster, because it doesn’t reached out to npm to download bunch of npm packages. In flutter project we can find pubspec.yaml file instead of package.json. Pubspec.yaml file is used to register and install all the necessary packages for the application.
Project structure for flutter is more simplified when compared to React Native project. The main config file for flutter is pubspec.yaml while in React Native is package.json file.
Tooling
Now we can look into the common tools used in each technology. Having a really good tool set is important when we develop cross-platform mobile apps because without good tooling development life cycle will be miserable. It is possible to run mobile apps locally using emulators to see changes we make during development phase.
To run a React Native app locally we need to follow these steps. First run the following command to connect application locally.
adb devices
Using adb command we can connect to the application locally. From there we can run npm start command to watch the changes in the background. To enable development server we simply run the following command.
npm start
Now we can build android app using the command below. This command helps to install the app on emulator and will listen to the code changes then update the application as we make changes. React Native comes with fast refreshing effect which is extremely useful as it preserve the state of the application while reflecting the changes we make to the apps realtime.
npm run android
In addition to emulator tool, we can also use so many open source tools since React Native is Javascript development environment. For example, we can use tools such as Typescript, Ignite UI CLI and Expo to build React Native apps more quickly and efficiently to give you more starting point to the project.
When it comes to flutter, we can achieve the same simplicity. For example we can launch emulator using Visual Studio Code itself. The same hot reload feature is also available in flutter project because dart programming language support just in time compilation. To run a flutter project simply run the given command below.
flutter run
Performance
React Native uses Javascript to connect native components via a bridge. Flutter avoids bridge to interact with native components resulting a better performance for app run time and also for the whole development process.
Flutter uses Skia Graphics Library that means the UI is redrawn each time when any view changes. In flutter, most of the work is handle by GPU (graphics processing unit) resulting smooth and fast UI rendering. This is why flutter delivers animation run time speed of 60fps (frames per second).
However redrawing the whole view instead of just those widgets that change, can affect the performance and speed of the application. Therefore developers need to be very careful when they design and structure the widgets for the application, specially for large apps where views often changes.
Conclusion
Both technology is perfect for cross-platform app development, specially you want release your app on both android and iOS environment more quickly. If your team have is familiar with JavaScript, React Native is the framework for your choice.
If you want a powerful cross platform app with amazing look and feel and strong documentation backing it, Flutter should be your framework of choice.
In typical scenarios, we need to create a constructor if we want to send data from one widget or one screen to another. Let’s say we are building an e-commerce app and we have the following screens in our application.
Assume we have few images on the Grid Tile in Products Screen. When we click one of the image, users will be sent to Product Detail Screen. When we want to send data to Product Detail Screen, the typical method is to create a constructor and then pass the data.
This method is called on the fly route. This method is perfectly fine but it has some downside.
Named Route
When the application grows, as requirements increases, we need to create many such on the fly route which is difficult to maintain. Specially new developers may face difficulty to understand which routes and screens the app has.
To solve this problem we have to use Named route in Main Screen. It will be easier to find all the routes and screens that the application has.
Another problem of having on the fly route is often unnecessary data has to be passed through multiple pages or screens. We have different navigations within multiple screens and we sometime want to pass data within these screens. In this case we have to pass unnecessary data in every widget down in the tree. The problem is, sometime all the screens not necessarily need those data in the widget itself to display data. These screens simply want to forward data to another widget. To understand the concept better see the following example below.
Let’s say we want to add price field in the Product Detail Screen. So we create a constructor.
We make a GestureDetector widget on Product Item Screen and make the image clickable. When we click the image, user will then be routed to Product Detail Screen. Value for price will be passed into the ProductDetailScreen as shown.
Remember we don’t directly display the price value in Product Item Screen. We only need to pass the value to Product Detail Screen. Because of this method unnecessary data will be used in different pages or widgets.
Unnecessary rebuilds of the major parts of the widgets causes performance issues. So no need to rebuild the entire app when just simple tiny widget needs an update.
Therefore we need a better approach. This is where Named route and State management come into play.
How to Use Named Route?
To make Named routes, first create a route table in the MainScreen. Register route name and then import corresponding files.
import 'package:flutter/material.dart';

import './screens/product_detail_screen.dart';
import './screens/products_overview_screen.dart';

void main() => runApp(MyApp());

class MyApp extends StatelessWidget {
  // This widget is the root of your application.
  @override
  Widget build(BuildContext context) {
    return MaterialApp(
      title: 'Shop App',
      theme: ThemeData(
        primarySwatch: Colors.blue,
      ),
      home: ProductOverviewScreen(),
      routes: {
        ProductDetailScreen.routeName: (ctx) => ProductDetailScreen(),
      },
    );
  }
}
Use pushNamed route in the Product Item Screen. Then use id as argument. This value is important because, it will be used to retrieve data in the Product Detail Screen. You may have noticed, we are passing only id value. But in the previous method (On the fly route method, we need to pass all the required field as argument).
Now simply remove the constructor in the Product Detail Screen that we created earlier and then use route path. Then extract id value so that we can use all the required data for each corresponding id.
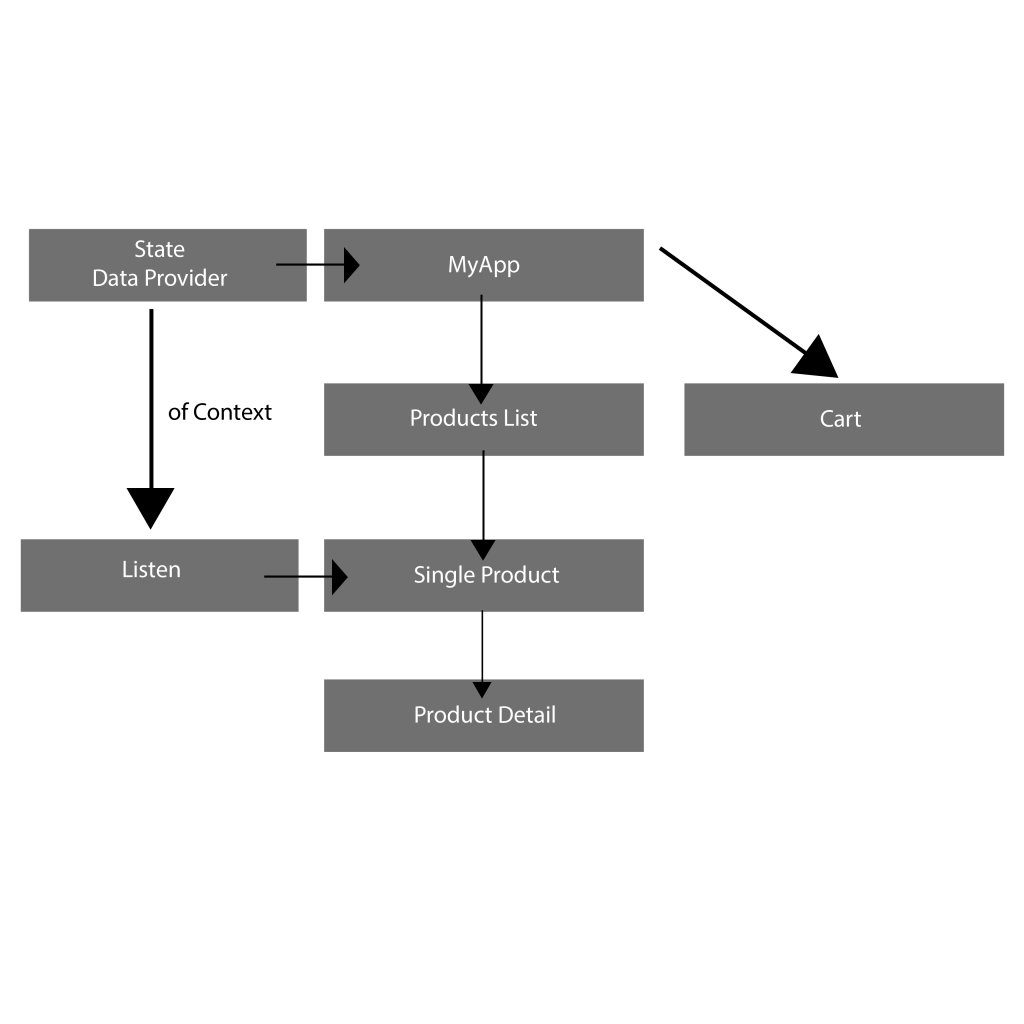
When we add Data provider in MyApp widget, all child widgets will be able to listen to that provider. For that we need to listen by placing a listener on any widget we want to listen. By doing so, only that widget gets rebuild as data get update.
Install provider package and add in the pubspec.yaml file. Now we are able to use provider package which give access to provider and state management.
Now create products provider. This is just dummy data but, you can use your own data.
class Products with ChangeNotifier {
  List<Product> _items = [
    Product(
      id: 'p1',
      title: 'Red Shirt',
      description: 'A red Shirt- Bitch',
      price: 34.99,
      imageUrl:
                   'https://live.staticflickr.com/4043/4438260868_cc79b3369d_z.jpg',
    ),
    Product(
      id: 'p4',
      title: 'Pad',
      description: 'A red Pad',
      price: 19.99,
      imageUrl:
          'https://live.staticflickr.com/4043/4438260868_cc79b3369d_z.jpg',
    ),
  ];

  List<Product> get items {
    return [..._items];
  }

  void addProduct() {
    //_items.add(value);
    notifyListeners();
  }
}
Now we start listening by providing in different widgets of our app. Simply import it and provide it at the highest possible point of the widgets. In this case, we provide it is in MyApp widgets.
void main() => runApp(MyApp());

class MyApp extends StatelessWidget {
  // This widget is the root of your application.
  @override
  Widget build(BuildContext context) {
    return MultiProvider(
      providers: [
        ChangeNotifierProvider(
          create: (ctx) => Products(),
        ),
      ],
      child: MaterialApp(
        title: 'Shop App',
        theme: ThemeData(
          primarySwatch: Colors.blue,
        ),
        home: ProductOverviewScreen(),
        routes: {
          ProductDetailScreen.routeName: (ctx) => ProductDetailScreen(),
        },
      ),
    );
  }
}
Here we are using ProductsGrid class simply to make 2 column grid for the products.
Here is code for ProductDetailScreen. In this class we have to use Products model so that we can use each product properties such as name, title and description.
There you go. Now you know how to create named routes in flutter. This is just small app with just only few screens. But named routes could be more beneficial in large apps with multiple screens. So hope you understand something from this tutorial.
Firebase is simple but great backend for flutter apps. Firebase is now a product of Google which comes with countless of features such as authentication, firestore and real time database. Dart and flutter framework is also from Google hence it has official support for Firebase with FluterFire set of libraries.
The initial setup of flutter
app integration with Firebase is simple and seamless. In this tutorial we will learn
how to integrate Firebase backend with a flutter app.
So let’s begin…
To begin we need to create a flutter app. To create a flutter app simply enter the following command in VS code terminal
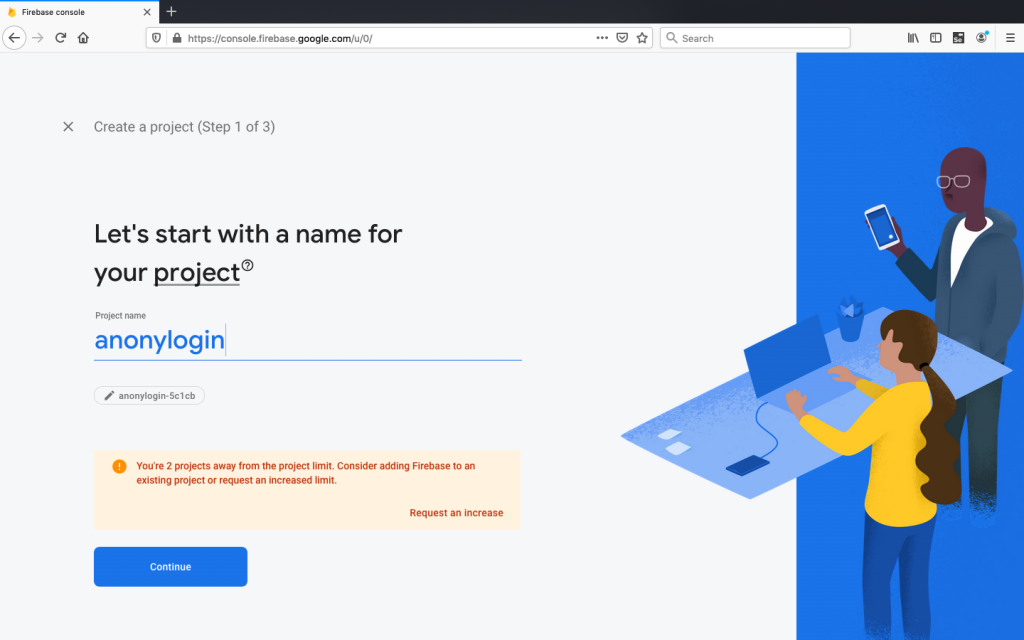
In Firebase dashboard, select Create new project and give a name for your project.
Add project name
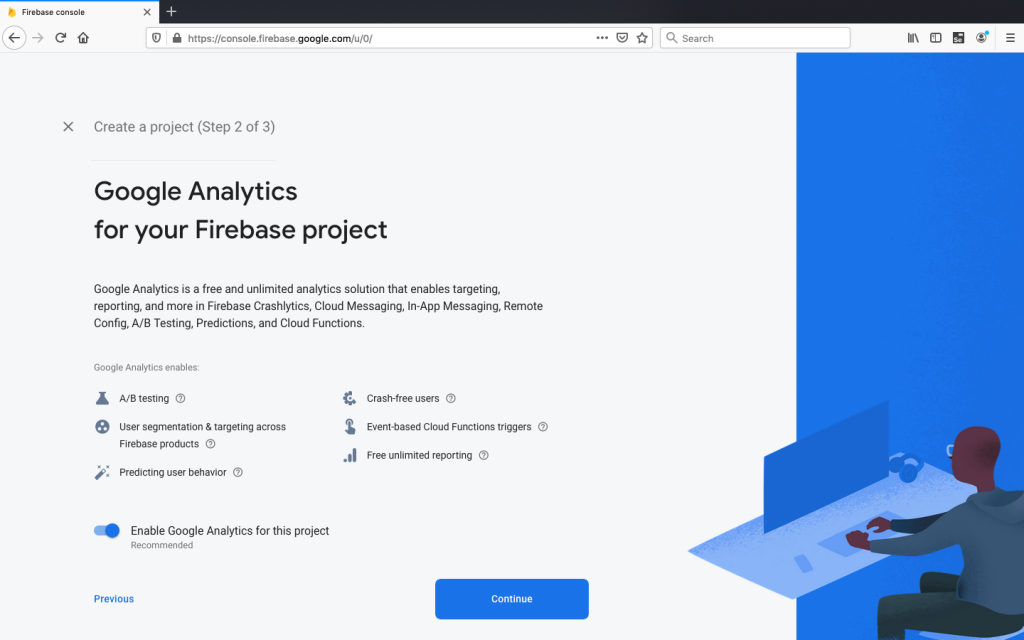
Firebase asks for analytics. For this project we will not enable Google analytics. Now select Create Project
Disable Google analytics and continue
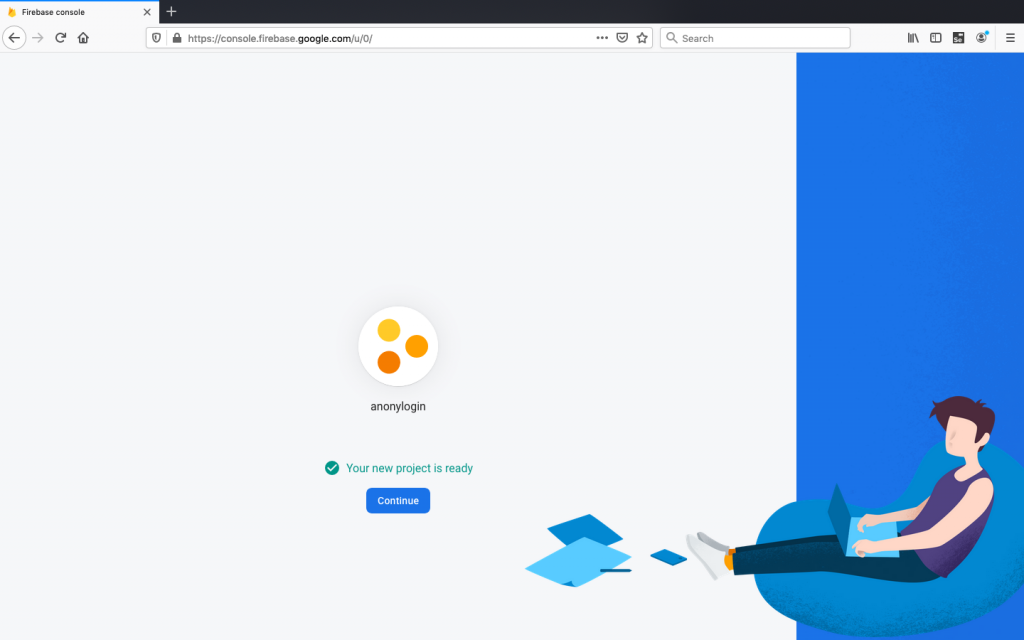
Firebase will continue the process in the background and make the project ready for us.
Firebase will run background to make our project ready
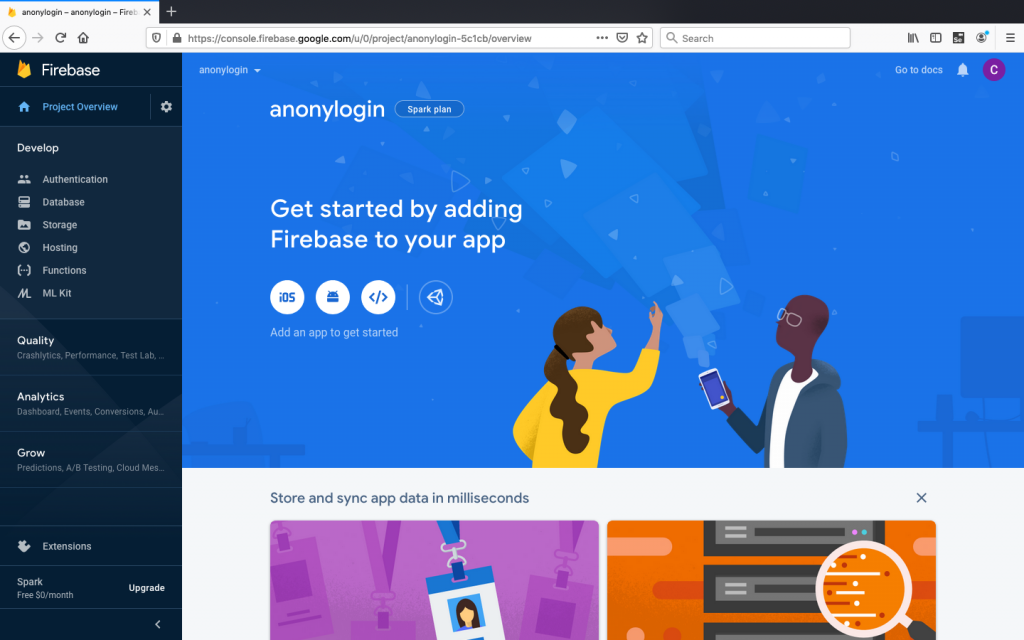
Click Continue and then go back to Firebase dashboard. Select any app either iOS or Android. In this case, we will start with android app and will go for iOS later.
Firebase dashboard
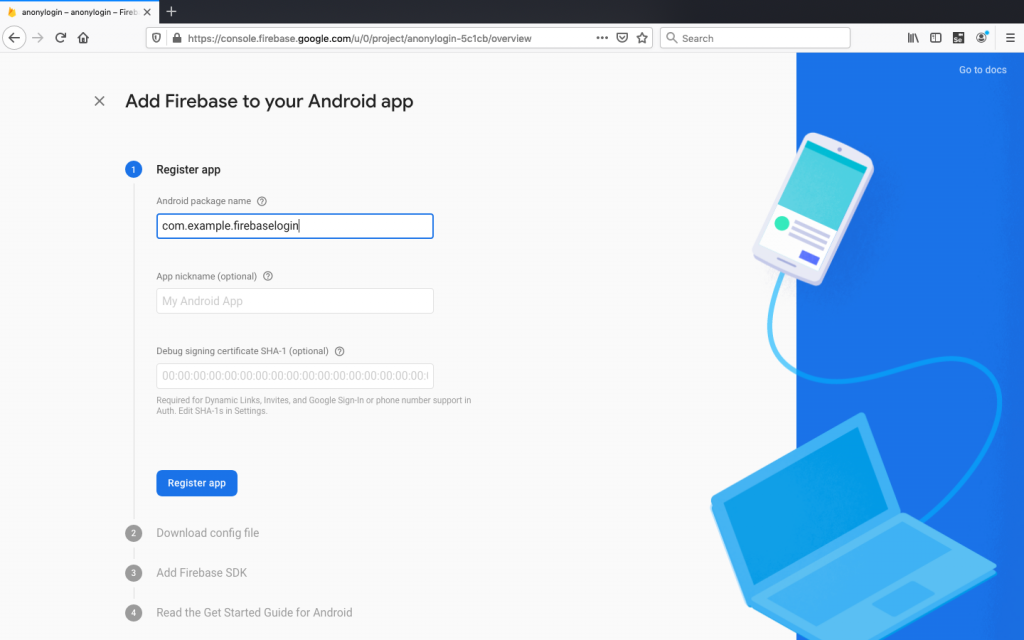
Now
go to your project in VS code. Navigate to android/app/build.gradle. You can
see the applicationId similar as com.example.firebaselogin.
You
can also find the name in AndroidManifest.xml file in android folder.
Android package name and the applicationId must be same. Simply add same name for your project. It is very important. Remember that! We will leave app nickname as blank for simplicity then Register app.
Register app
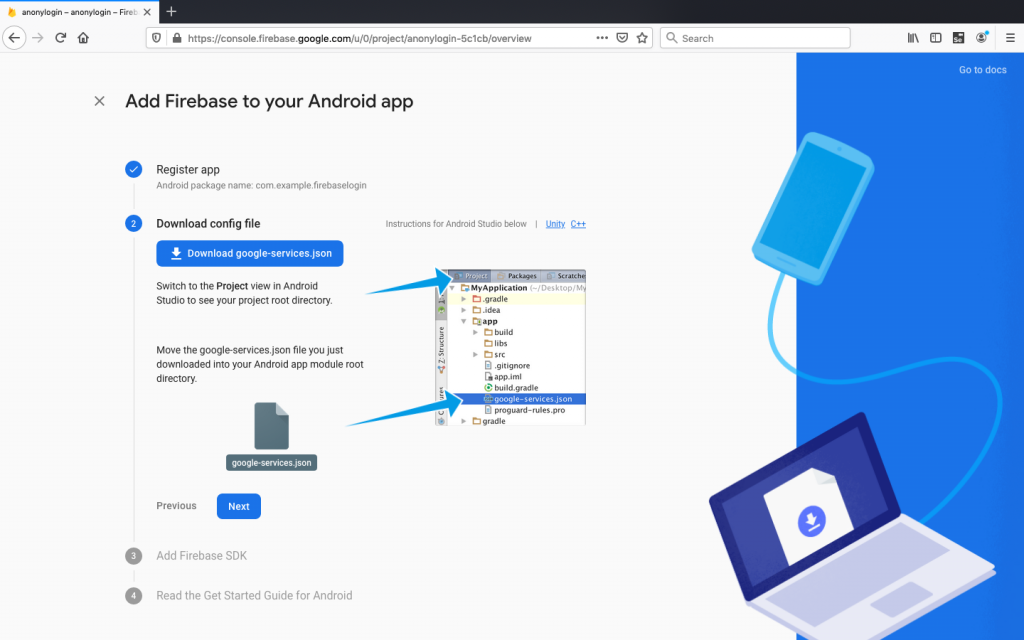
Step 2: Downloading config file
Now downloadconfig file and then store it in the flutter app. The location is important as it has API keys and other important information for Firebase to use. Location: ~flutter app/android/app folder.
Download json file
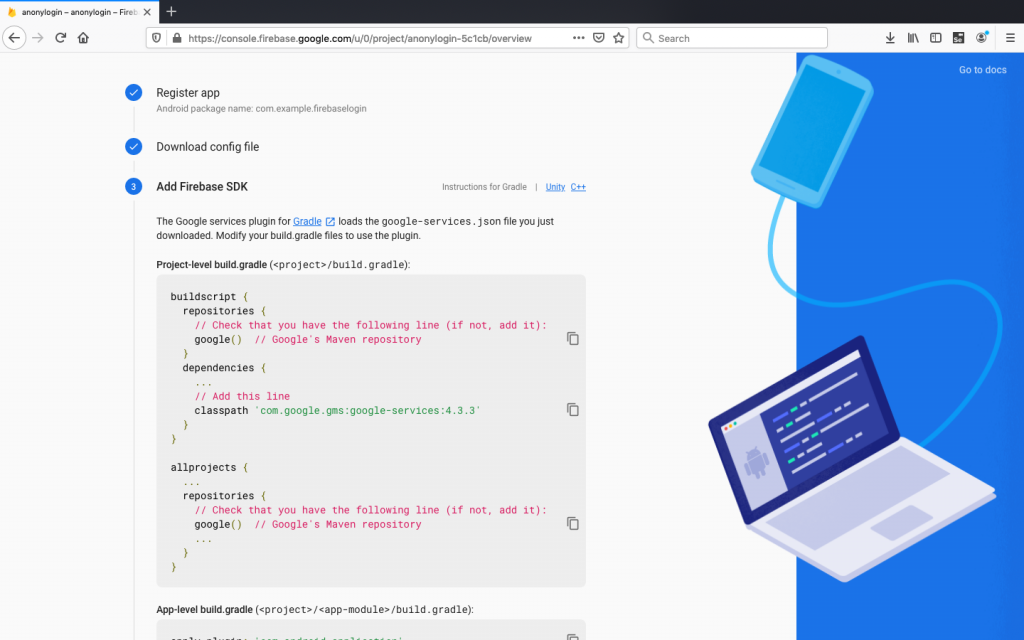
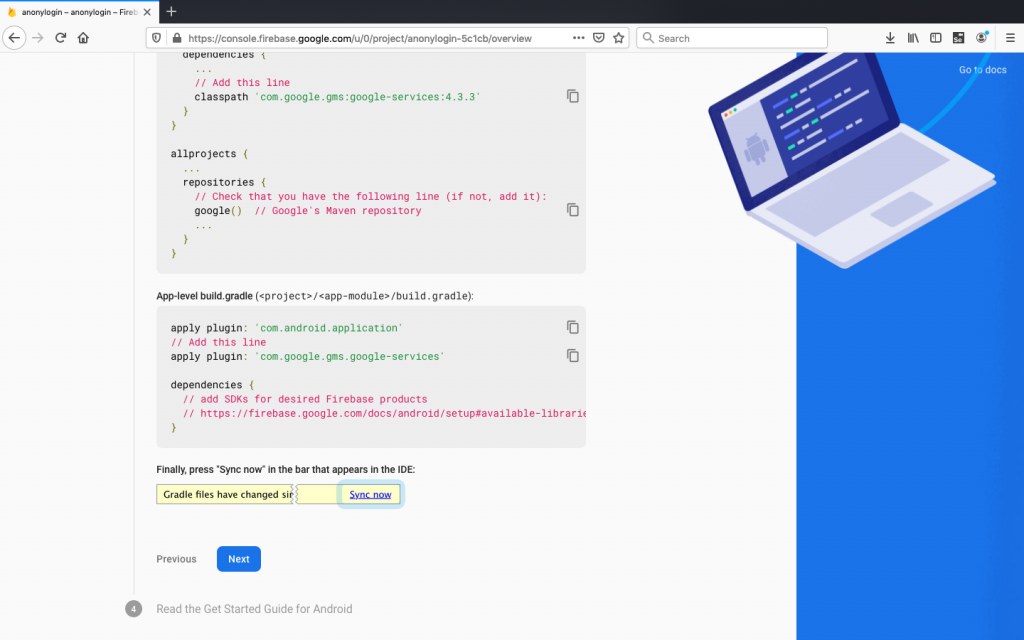
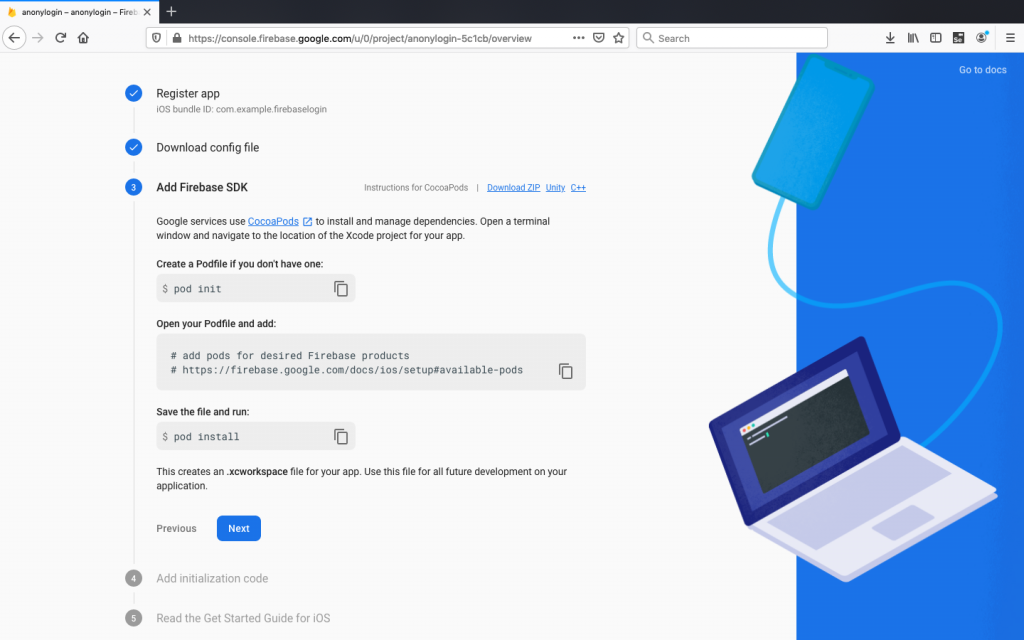
Now it is time to add Firebase SDK. Modify build.gradle file to add classpath. Remember to open project-level build gradle (<project>/build.gradle)
Add dependencies
Step 3: Modify Gradle file
Add all plugins and click Next
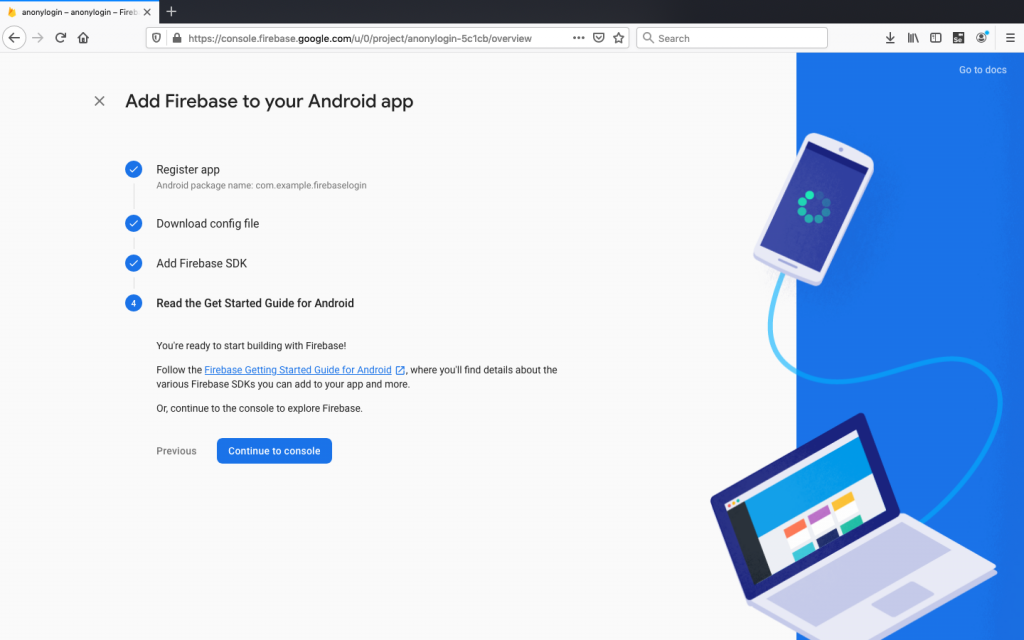
Now we have successfully implemented Google service plugin in our project. We need to uninstall the app and build it again to run the app on a simulator or on a mobile device.
Go to console
Ok! Now it’s time to add iOS app
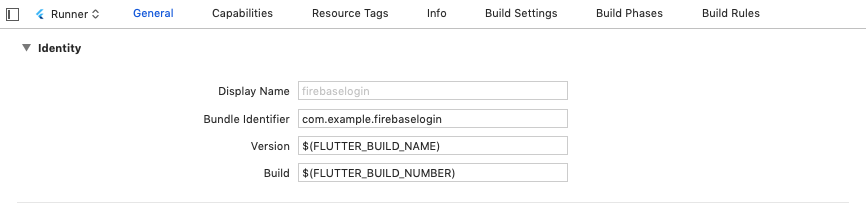
iOS has similar step. Open the iOS project in Xcode at ios/Runner/Runner.xcodeproj and copy the Bundle identifier under General:
Runner file
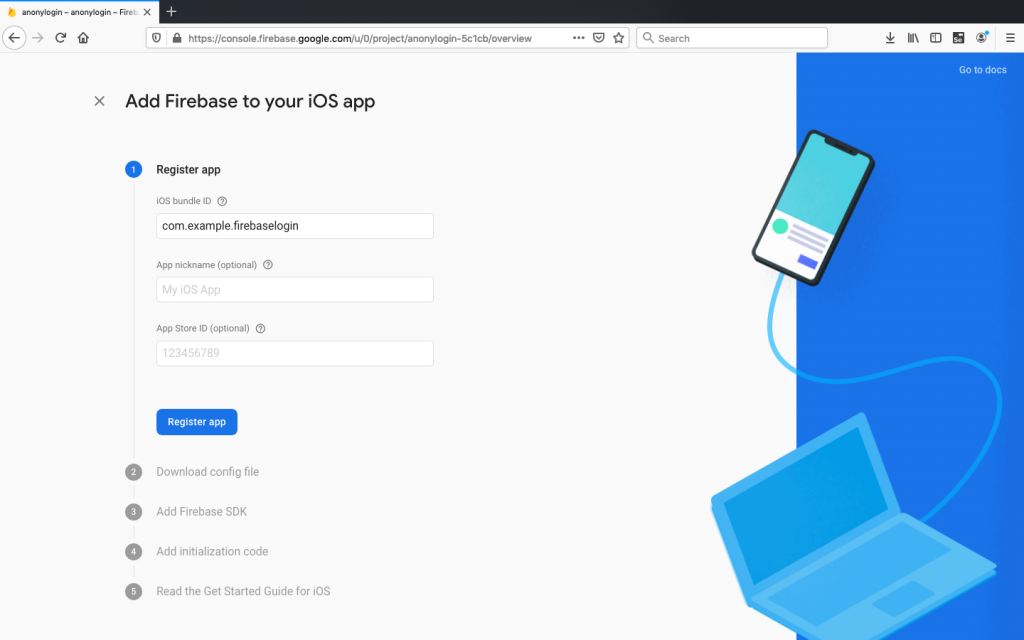
Select iOS platform from Firebase dashboard. You will see a similar screen where we add an iOS Bundle ID. By default both android and iOS bundle name will be same. It is better to keep same name for consistency: leave all the optional fields blank and click Register app to move next step.
Register iOS app
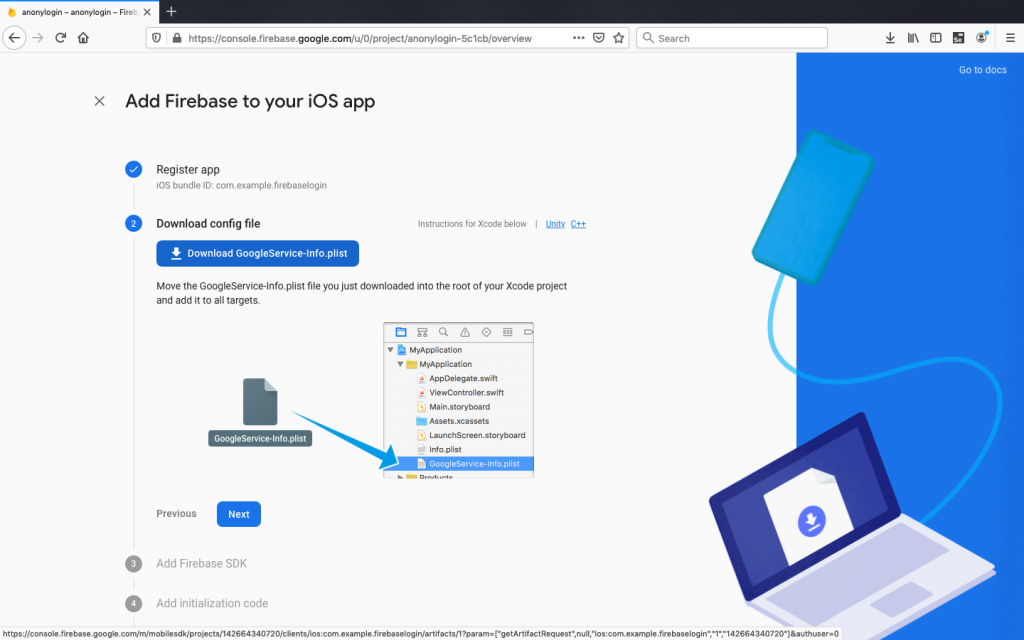
Download GoogleService-Info.plist and drag this file into the root of your Xcode project within Runner: Again remember path is important.
Download plist file
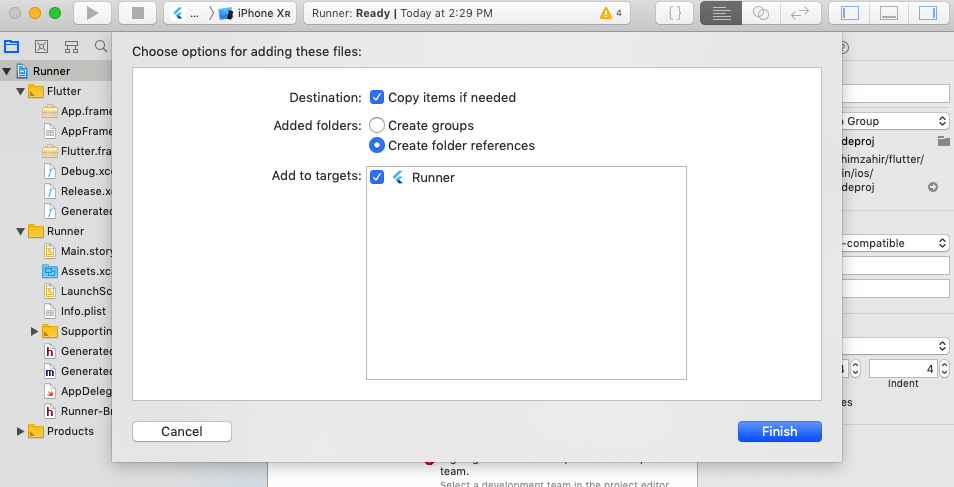
It’s important to use Xcode to put the GoogleService-info.plist file, as this will not work otherwise.
Use Xcode to move plist file
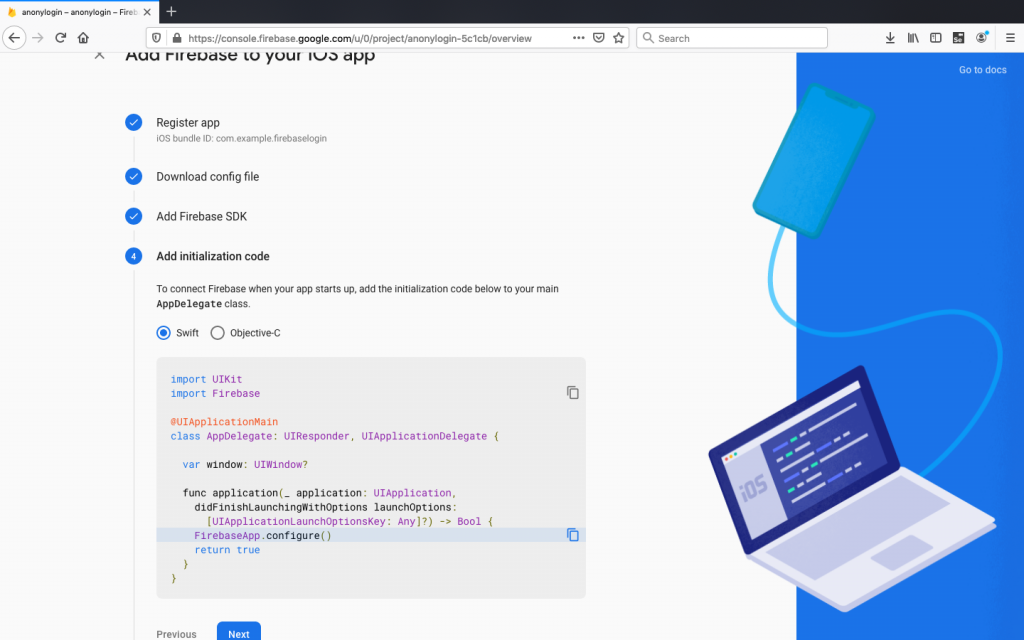
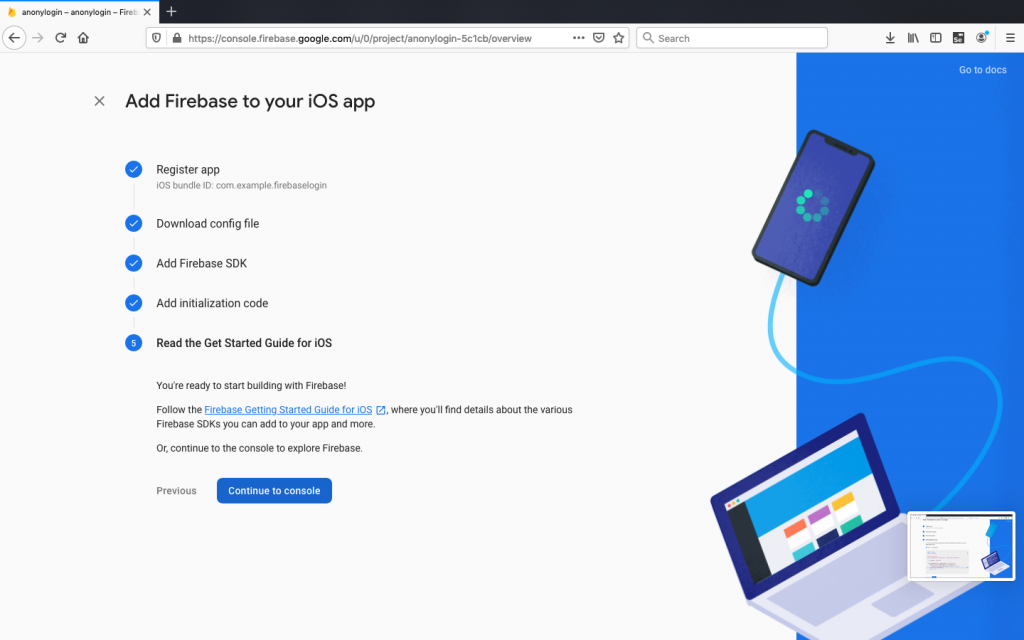
Click Next
Click Next
Click Continue to console
Conclusion
We’ve learned how to hook a flutter application with Firebase backend. We have created both android and iOS app on Firebase backend and then configured to connect with our application by downloading GoogleService-Info.plist file.
If you have large records of data, entering each record into cloud Firestore database manually is time consuming. Not to mention that it is going to be a tedious as well. In this tutorial you will learn an easy method to import large CSV file to Google Cloud Firestore using GCP and Node.js. Therefore you need Google account and valid CSV format file. Before that, let’s know what GCP and Cloud Firestore is all about.
let’s start…
GCP
Google provide seamless cloud computing services to various clients across the world using Google Cloud Platform (GCP). They provide series of modular services such as hosting services, data storage, data analytics and Machine Learning (ML) and many more which use Google Hardware infrastructure to run.
Cloud Firestore
When you look for a fast NoSQL document database, then there is nothing better than Cloud Firestore provided by Google. It is serverless, meaning it simplifies data storing, syncing, and data querying for developers. It also supports real time synchronization and offline support. Security is another feature where developers spend less time on security of the application, therefore time requires to develop a mobile application is significantly reduced.
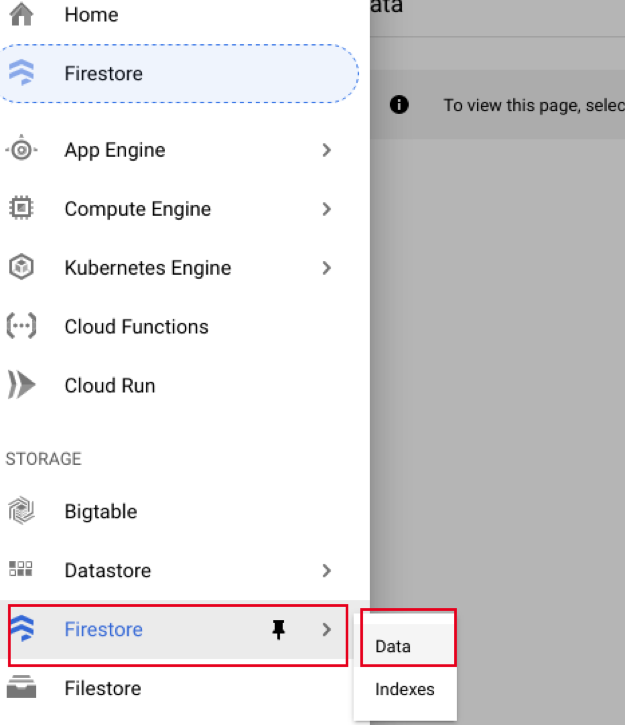
GCP setup
Create new project in Google Cloud Platform (GCP). In this case concilsVote (you can give a name as your wish). This is how the main menu looks like. Click Firestore and then Data.
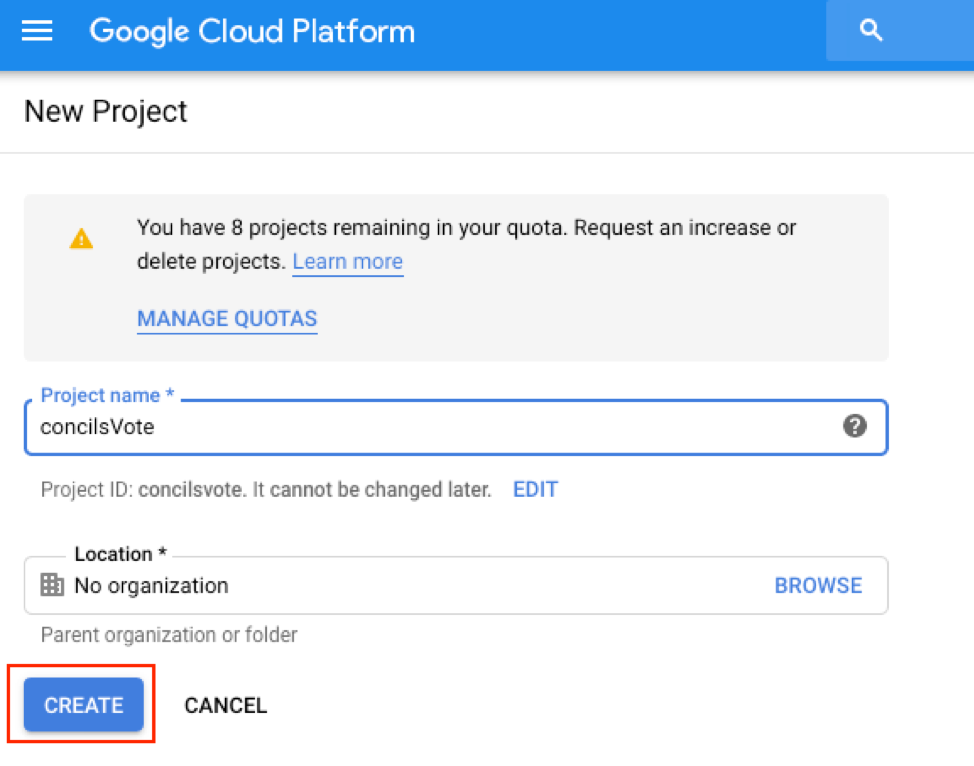
Then create new project by clicking NEW PROJECT or CREATE PROJECT as shown. If you have existing project you may search the project and then use it.
Fill the form and enter CREATE. (You need to enter suitable project name and Location).
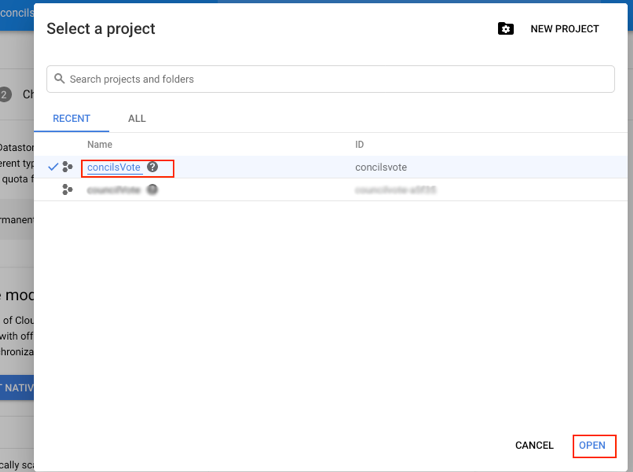
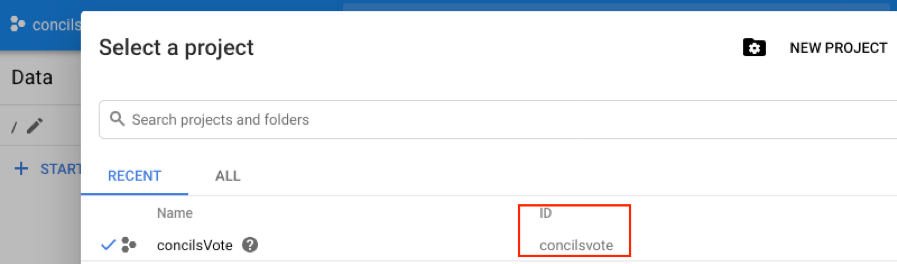
Now, select the project you just created from the drop down and then click OPEN.
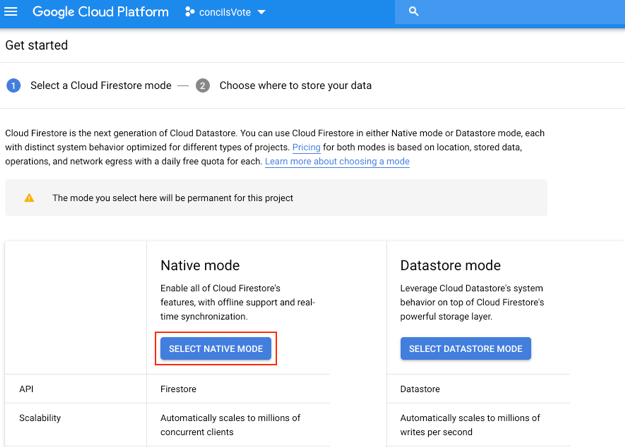
You will see the following screen. Choose SELECT NATIVE MODE from the options given.
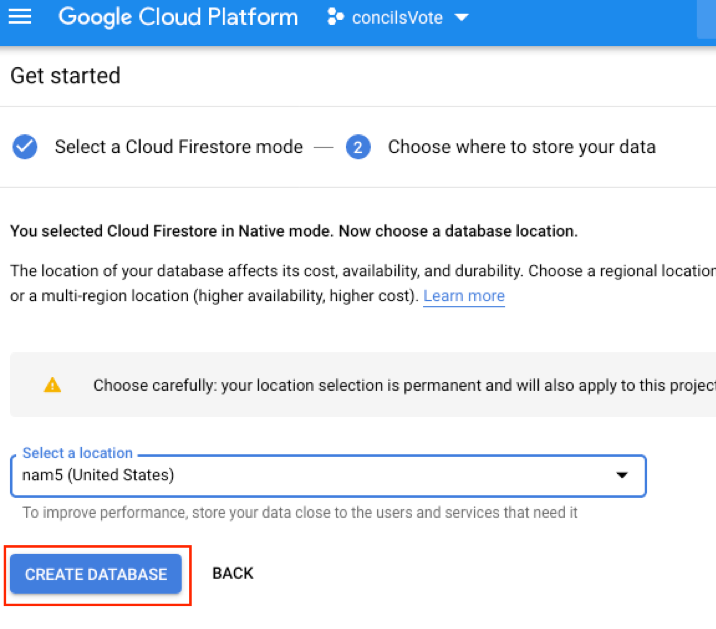
Then choose, the nearest location where to store the data and CREATE DATABASE. Please select the location carefully because we are unable to change the location once it’s being created.
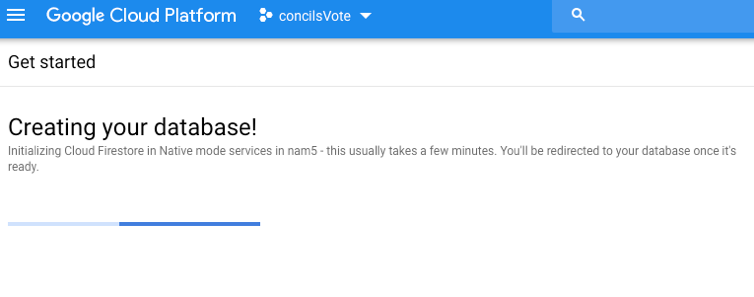
You will see process of database creation process running in the background.
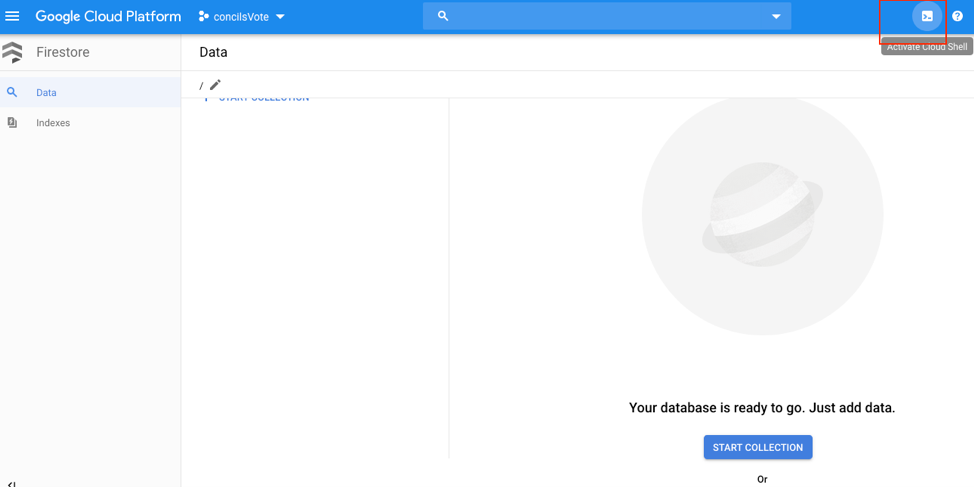
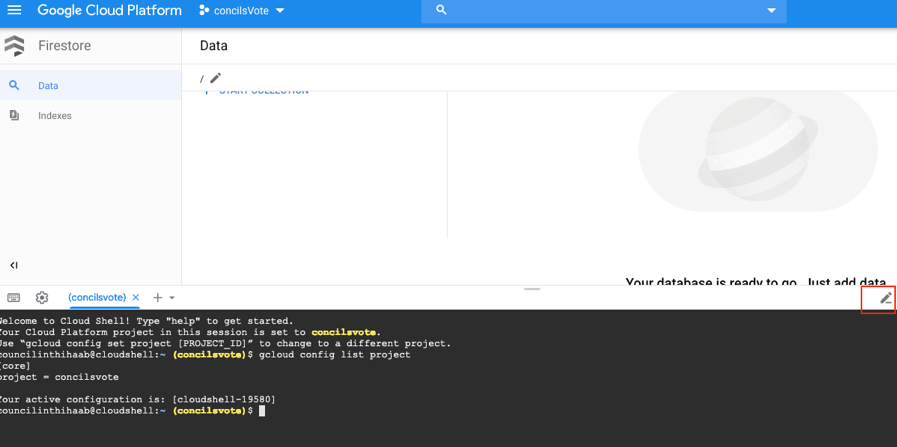
Now you will see a screen like this. It says Your database is ready to go. Just add data. It is time to Activate Cloud Shell.
Enter the following command below to check whether the project is configured or not.
gcloud config list project
Now set the project ID using the below command. You may see the project ID from the list.
gcloud config set project PROEJCTID
gcloud config set project concilsVote
Now write some logic to read CSV data and import it to Firestore.
Create a new directory named concilsVote in the terminal and then change the directory.
mkdir concilsVote
cd concilsVote
Initialize npm using the below command in the terminal and fill the details.
npm init
Press Yes, and enter for all the options, until package.json file is get created with the details below.
{
"name": "rainfallcsvexport",
"version": "1.0.0",
"description": "Rainfall Data conversion",
"main": "index.js",
"scripts": { "test": "echo "Error: no test specified" && exit 1" },
"author": "Your name",
"license": "ISC"
}
Now you need to install the following dependencies. Just run the following npm commands.
Create a new file named concilVote.js using the command in the terminal (Any name is fine). Copy the below code and paste in the file.
const {readFile}  = require('fs').promises;
const {promisify} = require('util');
const parse       = promisify(require('csv-parse'));
const {Firestore} = require('@google-cloud/firestore');
if (process.argv.length < 3) {
  console.error('Please include a path to a csv file');
  process.exit(1);
}
const db = new Firestore();
function writeToFirestore(records) {
  const batchCommits = [];
  let batch = db.batch();
  records.forEach((record, i) => {
    var docRef = db.collection('rainfall').doc(record.SUBDIVISION);
    batch.set(docRef, record);
    if ((i + 1) % 500 === 0) {
      console.log(`Writing record ${i + 1}`);
      batchCommits.push(batch.commit());
      batch = db.batch();
    }
  });
  batchCommits.push(batch.commit());
  return Promise.all(batchCommits);
}
async function importCsv(csvFileName) {
  const fileContents = await readFile(csvFileName, 'utf8');
  const records = await parse(fileContents, { columns: true });
  try {
    await writeToFirestore(records);
  }
  catch (e) {
    console.error(e);
    process.exit(1);
  }
  console.log(`Wrote ${records.length} records`);
}
importCsv(process.argv[2]).catch(e => console.error(e));
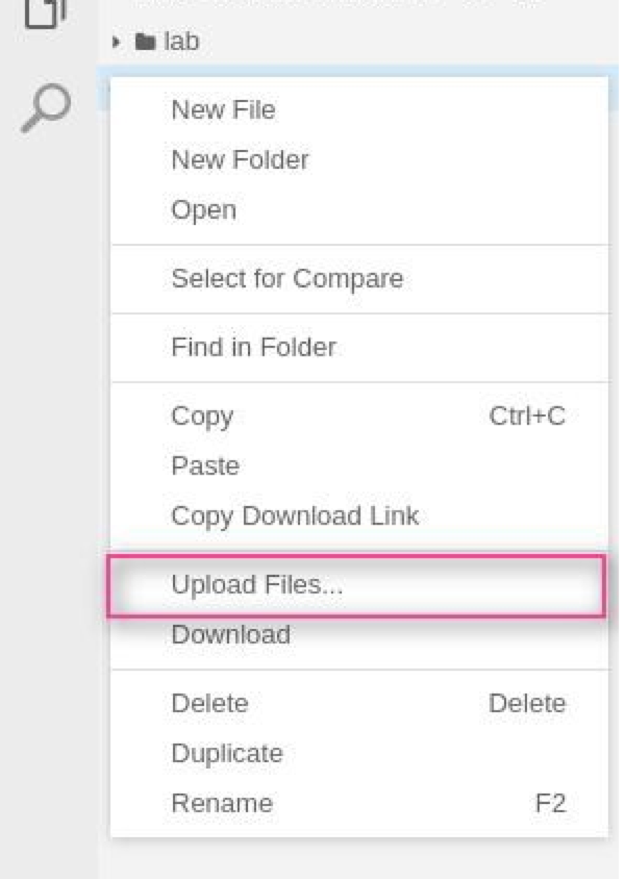
Now we will upload the CSV file. Upload the CSV file to the concilVote folder by right-clicking the folder name.
To import data to Firestore simply run the following command.
node concilVote.js concilVote.csv
Click Enter, and now you are able to see the data getting imported. If everything goes well, you will see a message like below, in the console. Now just refresh the Firestore console page and you will see the data.