Tag Archives: webdevelopment

Understanding Rendering Methods for Web Apps

server-side-rendering-in-vue-js-1-1639122317

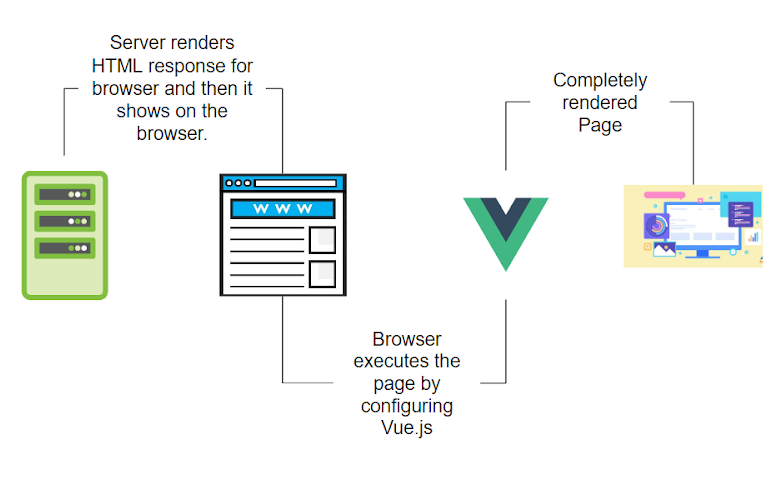
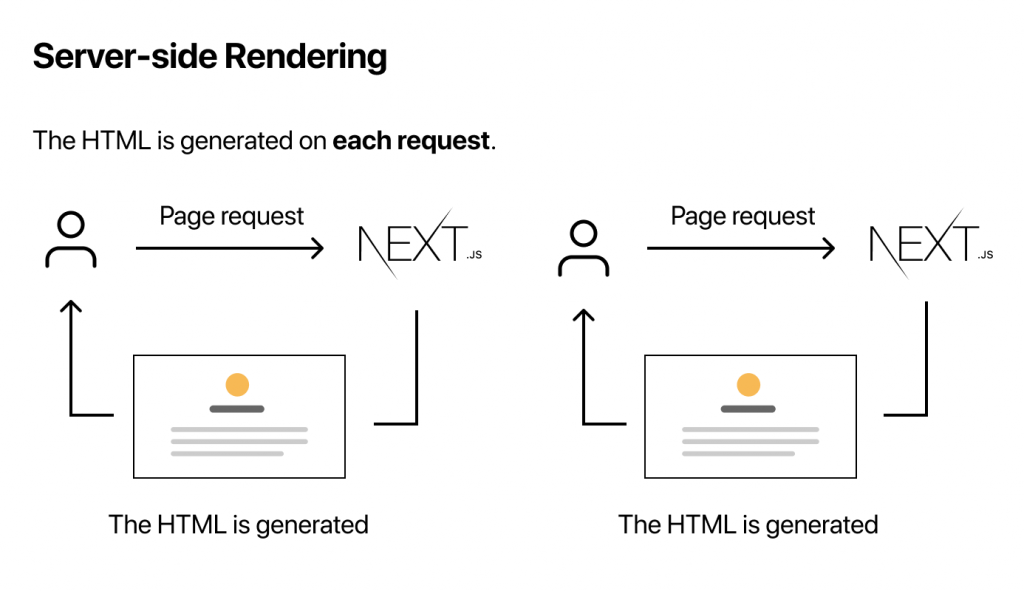
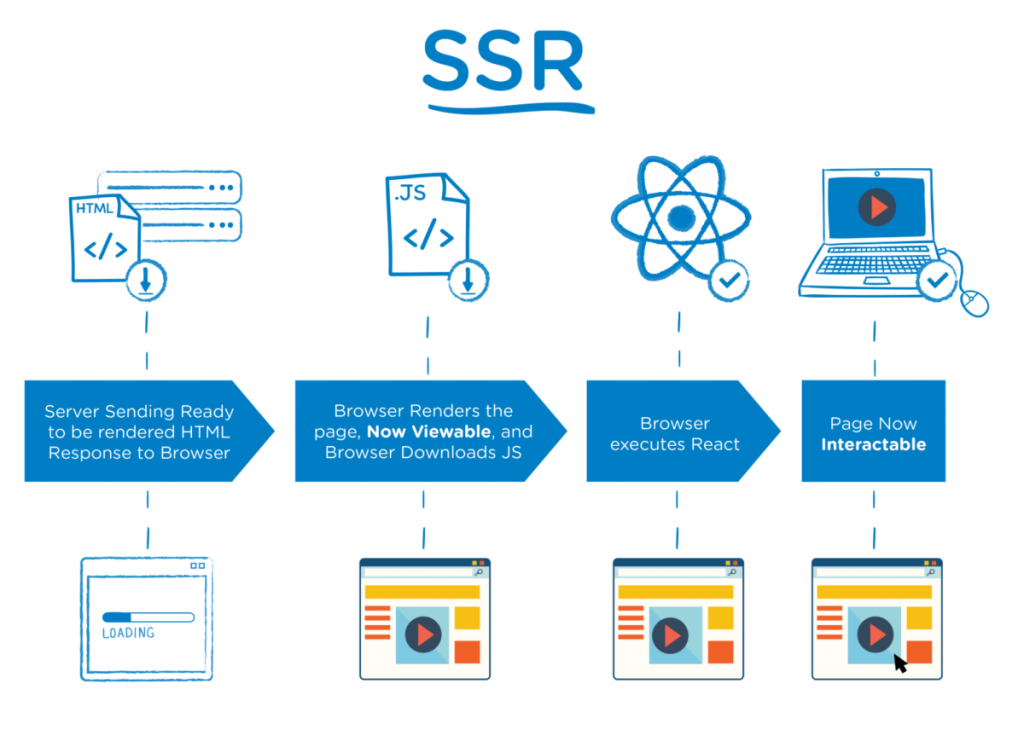
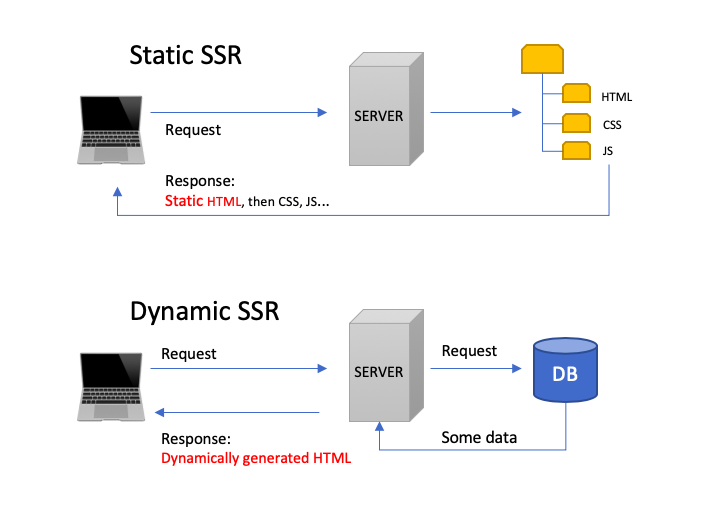
Server side rendering

Server-side rendering (SSR) is a technique for rendering a client-side JavaScript application on the server, and then sending the fully rendered page to the client. This can improve the performance of the application by reducing the amount of work that needs to be done by the client, and it can also improve the search engine optimization (SEO) of the application by allowing search engines to crawl the rendered pages.

next.js
rockcontent

Client side rendering

Client-side rendering (CSR) is a technique for building web applications where the majority of the rendering is done on the client-side, using JavaScript. In this approach, the web page is initially loaded with a minimal markup and styles, and then JavaScript is used to dynamically generate the rest of the content and update the page as the user interacts with it. This is the opposite of server-side rendering, where the server generates and sends the full HTML markup of the page to the client.

rockcontent

CSR has the advantage of providing a fast and seamless user experience, as the browser can update the page dynamically without requiring a full page reload. However, it can also have some disadvantages, like poor SEO, as search engines may have difficulty indexing the dynamically generated content, and also can have a slow initial load time as the JavaScript needs to be downloaded, parsed and executed before the content is shown.

Universal rendering

It is a technique for building web applications where the same code is used to render the initial HTML on the server, as well as to update the content dynamically on the client-side. This approach allows the application to be rendered on the server and then “rehydrated” on the client, providing a fast initial load time, improved SEO, and better accessibility.

Static-Site Generation

Static site generation (SSG) is an efficient technique for building websites as it retrieves data only during the build process. SSG offers improved performance as the generated pages can be easily cached by a Content Delivery Network (CDN) without the need for additional configuration, resulting in faster loading times. As the pages are pre-built, they load quickly and perform well, making SSG suitable for pages that have static content such as sales pages and blogs.

nextjs

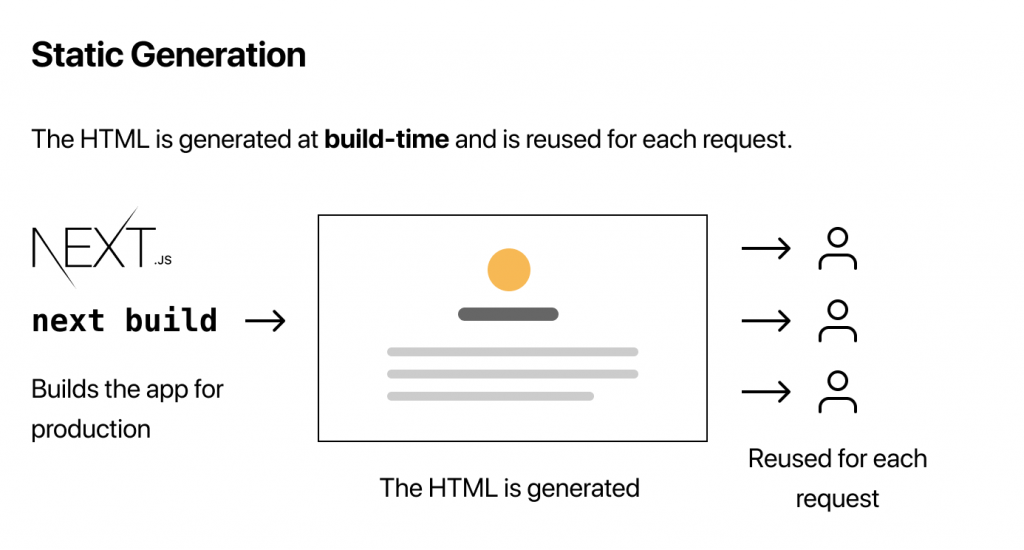
Static site generation creates static HTML pages that are served directly to users. These pages can be hosted on any web server or Content Delivery Network (CDN) without the need for a backend. Because there are no servers involved in the process, it is highly secure. Hackers often target servers and databases to gain access to systems, but with static site generation, these vulnerabilities are eliminated.

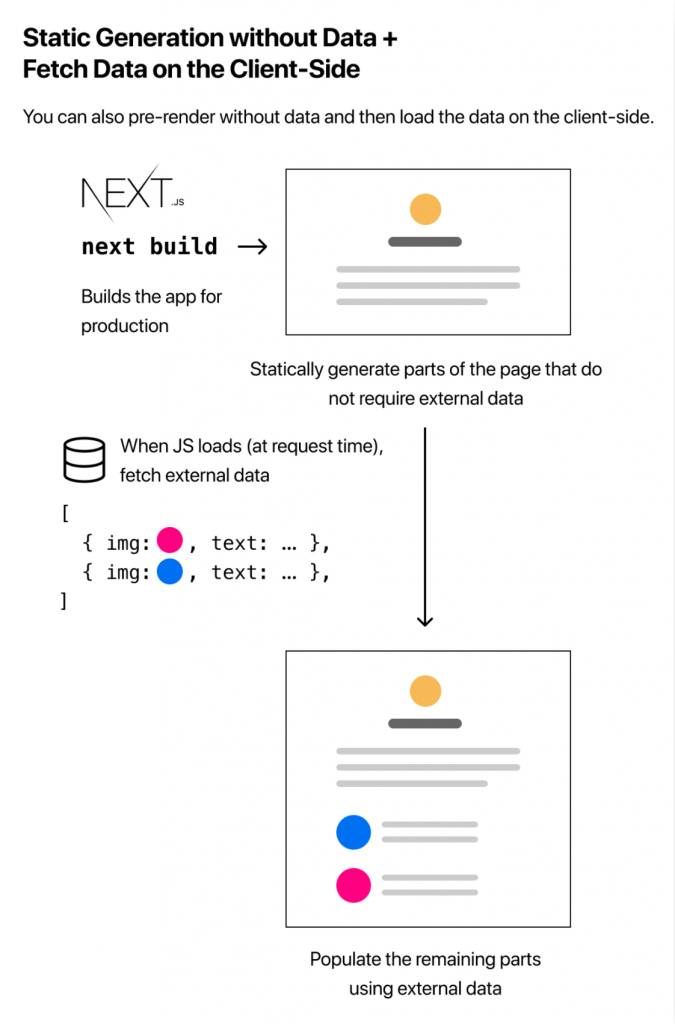
Static sites are generally considered to be faster, more secure, and more scalable than dynamic sites, since they don’t require server-side processing for each request. They are also well-suited for sites that don’t require frequent updates or user interaction, such as blogs or documentation sites.

itnext-josé

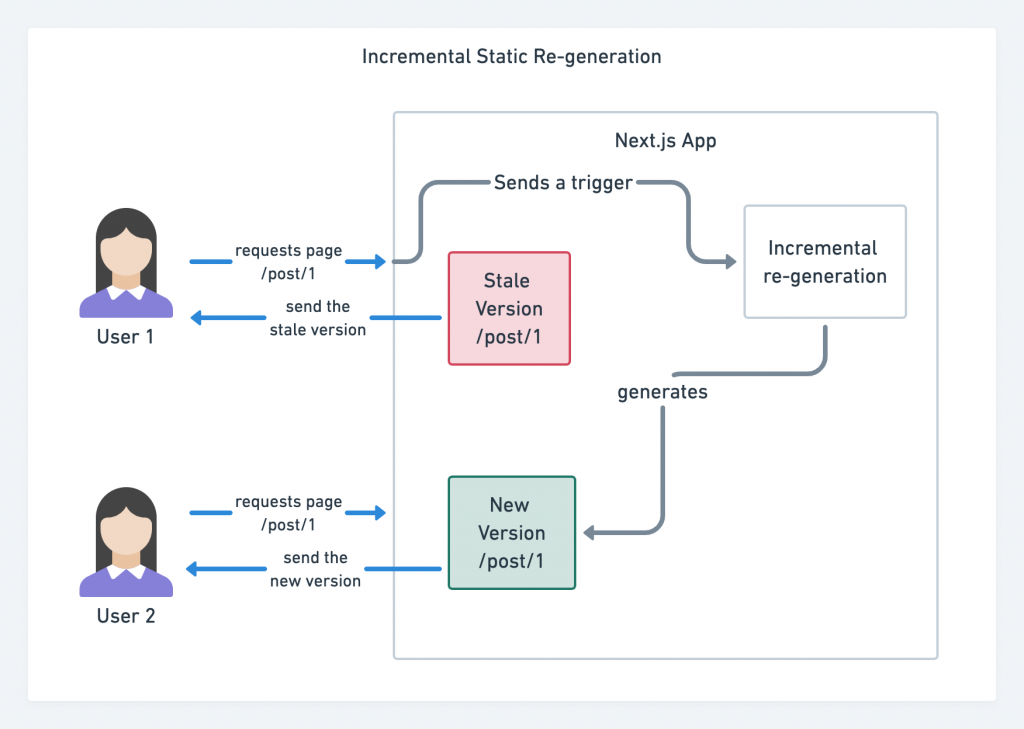
Incremental Static Generation

Incremental static generation (ISG) is a technique that allows for regularly updating content on a website while still using a static site generator (SSG). With ISG, only the pages that have been updated are regenerated, rather than regenerating the entire site each time. This can improve the performance and scalability, and make the process of updating content more efficient.

ceojournals

Incremental Static Regeneration (ISR) allows developers to update or create content without the need to redeploy their site. This feature offers three main advantages for developers which include enhanced performance, increased security, and faster build times.

devsblog

12 Top Youtube Channels to Learn ReactJS

12 top youtube channels to learn reactjs

My top channels to learn ReactJS

Hello everyone, today I am going to share my favorite Youtube channels to learn ReacJS from scratch. These channels are so popular and you might already know. If you are new to these youtube channel, then check out once and if you like the content subscribe for future videos.

1. Codevolution

This channel has tutorials on various topics related programming. It contains large number of different kind of playlists regarding ReactJs covering almost all the topics that are beneficial for any developer who wants to master as ReactJS developer. The playlists cover beginner levels to more advance concept such as React router, React with Typescript and state management, Redux and etc.

Stats as of today (20/10/2022)

Joined Nov 20, 2015

430K subscribers 76,468,938 views

Playlists can be found here: Codevolution

2. The Lean Programmer

Creator of this channel Madhav, who has contributed a lot to the programming community and currently working as a Software Engineer at Microsoft. This channel teaches you React from beginner to advanced level by building projects. You can learn React from scratch, state management and React with Typescript by doing the projects on the channel.

Stats as of today (20/10/2022)

Joined Jan 12, 2012

10.4K subscribers 271,051 views

Playlists can be found here: TheLeanProgrammer

3. Academind

If you want to learn programming then this is a go to channel. It contains courses and tutorials that teach you everything related to web development. No matter if it’s programming languages like JavaScript, runtimes like NodeJS or popular frameworks like ReactJS, Angular or VueJS, this channel covers everything. Max is one of the creator of academind, probably best known for his Udemy courses which covers concept more in-depth and providing plenty of information related to programming.

Stats as of today (20/10/2022)

828K subscribers

Joined Dec 4, 2015 67,262,671 views

Playlists can be found here: Academind

4. freeCodeCamp.org

freeCodeCamp.org have lengthy tutorials on various technologies. You’ll find videos on practically anything web development related, from React and JavaScript to Python, Machine Learning, Neural Networks, PenTesting, and more.

Stats as of today (20/10/2022)

6.51M subscribers

Joined Dec 17, 2014 443,968,255 views

Playlists can be found here: Freecodecamp

5. Traversy Media

This is another useful channel you can find on Youtube. Brad Traversy created this channel aimed to provide web development and programming tutorials to everyone for free. You can find latest web technologies from the building blocks of HTML, CSS & JavaScript to frontend frameworks like React and Vue to backend technologies like Node.js, Python and PHP. These videos consists of both short and long videos. The long videos can go up to two hours. In his channel, you’ll find everything related to JavaScript.

Stats as of today (20/10/2022)

1.96M subscribers

Joined Oct 31, 2009 185,480,333 views

Playlists can be found here: TraversyMedia

6. The Net Ninja

Shaun Pelling is a creator of this YouTube channel and you can find videos on various areas includes JavaScript, HTML, Node.js, CSS, Python, Django, Angular, Vue, Git, React, MongoDB, Bootstrap, PHP, WordPress and more. This channel covers basic ReactJS concepts for beginners level to real projects with more advance concepts. You can learn how to develop ReactJs projects with APIs integration such as Firebase backend and Contentful headless CMS.

Stats as of today (20/10/2022)

1.01M subscribers

Joined Apr 9, 2015 128,178,951 views

Playlists can be found here: The Net Ninja

7. Simplilearn

This channel is one of the best channels on YouTube if you want to learn anything related to programming. Simplilearn is an award-winning Bootcamp channel that has wide range of tutorials. The website and channel offer tutorials from experts and cover various topics, including data science, cyber security, and cloud computing, along with brushing up the basics in programming languages and coding.

This channel offers videos that help any learner to begin the journey with the React JS.

Stats as of today (20/10/2022)

2.49M subscribers

Joined Oct 29, 2009 254,531,580 views

Playlists can be found here: Simplilearn

8. Techsith

This channel is making easy to understand tutorials on front-end and mobile technologies using Javascript programming language. The instructor in this channel is a teacher knowing teaching skills and making complex stuffs easy to digest for new learners. The channel provides tips and tricks that help many developers to make their interviews easier.

Stats as of today (20/10/2022)

148K subscribers

Joined Jun 17, 2014 13,242,566 views

Playlists can be found here: Techsith

9. Quentin Watt Tutorials

This channel have videos about learning the basics of Javascript tutorials for beginners.

The tutorials are easy to follow and remember. The React JS playlist has all the basics concepts for any beginner level programmers.

Stats as of today (20/10/2022)

162K subscribers

Joined Aug 20, 2011

20,093,020 views

Playlists can be found here: Quentin Watt Tutorials

10. JavaScript Mastery

If you want improve your development career with project-based coaching, then this is a go-to channel. This channel helps to improve your skills with practical development experience by building or cloning real world applications. You will not regret to spend hours on this channel to learn new techs related stuffs.

Stats as of today (20/10/2022)

427K subscribers

Joined Dec 25, 2018 21,571,276 views

Playlists can be found here: JavaScript Mastery

11. Web Dev Simplified

Web Dev Simplified is all about teaching web development skills and techniques in an efficient and practical manner. If you are just getting started in web development, Web Dev Simplified has all the tools you need to learn the newest and most popular technologies to convert you from a no stack to full stack developer. Web Dev Simplified also deep dives into advanced topics using the latest best practices for you seasoned web developers.

Stats as of today (20/10/2022)

1.09M subscribers

Joined May 24, 2018 80,446,471 views

Playlists can be found here: Web Dev Simplified

12. Sonny Sangha PAPA React

My current favorite channel for ReactJs. I simply love the way teaches complex topics such as state management and Typescript. He build clones which helps to learn new things much faster. Sonny will deliver a Full Stack Mastermind coaching call which many describe as ‘Worth more than a University Degree itself. His program, Zero to Full Stack Hero is constantly changing new developers lives.

Stats as of today (20/10/2022)

175K subscribers

Joined Oct 16, 2011 9,359,888 views

Playlists can be found here: Sonny Sangha

Thats it! Hope you find these information useful. Feel free to share more similar channels with us.

6 Free Beautiful Color Gradients For Your Next Design Project

6-Free-Beautiful-Color-Gradients-For-Your-Next-Design-Project

Color is the most powerful design tool. It can evoke a mood, convey a message, or set a tone. Color is used to make people feel things and it’s important to understand how this works in order to use it effectively in your designs.

Gradient colors are a simple way to add depth and dimension to a design. They can be used as backgrounds, for borders, or to highlight important text.

You can use gradient colors in any kind of design: web design, print design, logo and branding design, illustration or photography. Here are some gradient color generate tools that you can use for your next project.

1. Color Hunt

Color Hunt is an open collection of beautiful color palettes, created by Gal Shir. It has various beautiful color combinations. The collection is open, and anyone can create and submit their own color combination. It provides you a Chrome extension.

2. Gradient generator

This free web tool is created by Moe Amaya a product designer based in San Francisco  who creates resources for the design and development community. One of the best gradient color generator tool allows you to explore, try and choose from hundreds of beautiful blended color palettes. This is a free and open platform for color inspiration with thousands of trendy hand-made color gradients.

3. CSS-Gradient

CSS-gradient is a free css gradient generator tool, which helps you create a colorful gradient background for your website, blog, or social media profile. It displays smooth transitions between two or more specified colors. You can get CSS code for the color you generated on the website and directly use those code in your web programming applications.

4. Colorsinspo

This tool is all in one resource for finding everything about colors with extreme ease. Also, you will get Freebies, Inspirations, Color Tools, Gradients and thousands of trendy hand-picked color palettes.

5. Mycolor

With this tool, you can find the perfect matching color scheme for your next project! Generate nice color palettes, color gradients and much more! You do not have to waste hours on finding the perfect color palette again. You just need to enter a color and generate nice color palettes using this tool.

6. Colorable

You can choose a set color palette to produce contrast values for every possible combination with the help of Colorable. This is powerful tool for finding safe color combinations with predefined colors and includes pass/fail scores for the WCAG accessibility guidelines.

Thats all for now! Thanks for reading. If you have more tools, share more amazing websites.

7 websites that will change the way you do web development

7 website

In this article, we are going to take a look at 7 of the best web development websites that will change the way you do web development. This is helpful for people who are developing websites and have to test out each version of their website with different data, pages, and designs. Web development is constantly changing due to the rapid evolution of technologies. A website is never a one-man job, but there are many individuals that can help you with it. But with the help of these technology development process has become easier than ever. So let’s begin to explore.

1. Jam

Report bugs in few seconds, without disrupting your workflow. Capture your screen plus developer logs in one click. It’s so easy and Integrates tightly with most of the issue trackers & tools. Jam auto-magically creates bug reports with all the info engineers need, including:

  • Console logs
  • Network requests
  • Browser info
  • Device details
  • Repro steps
  • Comments

jam.dev

2. Blackbox

The AI powered tool extract Code from Any Video. Simply select the code you want to copy from any video you are watching and paste it in your text editor. You can extract codes from any video on Youtube, coursera, udemy or on a live coding session on zoom. It supports all programming languages, keeps the proper indentation of the code.

You can easily find the right code snippet to use without you having to jump from your environment, open multiple tabs, and scroll through pages of documentation and resources. It works with every Text Editor, IDE, Web Browser.

useblackbox.io

3. Figstack

Another AI powered tool. Figstack is trained with billions of lines of code it will supercharges your ability to read and write code across languages. You can understand and document code lightning fast using this powerful tool.

If you need to convert Python to Go or Ruby to Javascript then this is the go for tool. The Language Translator function lets you reliably swap from one language to another. It can easily automate documentation for your functions.

figstack.com

4. CodinGame

With CodinGame, programmers able to improve coding skills by solving the challenging problems, learn new concepts, and get inspired by the best developers. It helps to build and strengthen your developer profile and prove your worth as a developer on most top companies in the industry.

codingame.com

5. Locofy

Turn your Figma designs to production-ready frontend code for mobile and web apps. Develop and deploy your apps 3-4x faster with your existing design tools, tech stacks & workflows. Locofy integrates seamlessly to go from Designs to Code to Deploy. Export your code or push to Github in your preferred settings (CSS Modules, Tailwind, CSS, Typescript, JavaScript). You could also deploy with Netlify or Vercel.

locofy.ai

6. SourceAI

SourceAI is a tool that can generate code for you in any language from a plain text description. Just describe what your application needs to do in plain text (English, French, German, Spanish, etc.) and start using it in a few seconds. You can generate code in any programming language. The underlying technology used by SourceAI is based on the GPT-3 language model. Development process is complex and time consuming, with SourceAI:

  • Save time in development
  • Generate your code in one-click
  • Use your time more efficiently

sourceai.dev

7. Wappalyzer

Find out the technology stack of any website. Create lists of websites that use certain technologies, with company and contact details. Its APIs provide instant access to website technology stacks, company and contact details, social media profiles, email verification and more. Empower your sales and marketing teams:

  • Website profiling and Browser extension
  • Lead generation
  • Competitor analysis
  • API access and Security recon

wappalyzer.com

Thats it! Hope you find these information useful. Feel free to share more similar websites.

Top 6 FREE Web Hosting sites for Developers

Top 6 FREE Web Hosting sites for Developers

In this short article, I will look at the best 6 free web hosting sites for developers options. These are my choices for 2022 to host websites quickly as possible. If you have any other hosting services on your list feel free to share with us.

1. Vercel

Vercel is a platform for static sites and frontend frameworks, built to integrate with your headless content, commerce, or database. Vercel combines the best developer experience with an obsessive focus on end-user performance. Our platform enables frontend teams to do their best work. Vercel has rating of 9.3k stars on Github.

Checkout Vercel official website for more details.

2. Netlify

Netlify is a remote-first cloud computing company that offers a development platform. It provides various services including serverless backend services for web applications and dynamic websites. The platform is built on open web standards, making it possible to integrate build tools, web frameworks, APIs, and various web technologies into a unified developer workflow.

Netlify builds, deploys and hosts your front-end. It is one of the fastest method to combine your favorite tools and APIs to build the website sites, stores, and apps for the web. Netlify has 271 repositories available.

Checkout Netlify official website for more details.

3. Heroku

Heroku is a platform as a service (PaaS) that enables developers to build, run, and operate applications entirely in the cloud. It supports several programming languages including Java, PHP, Scala and G. It provides services and tools to build, run, and scale web and mobile applications. Heroku has 842 repositories available on Github.

Checkout Heroku official website for more details.

4. Render

Render is a unified cloud to build and run all your apps and websites with free TLS certificates, global CDN, private networks and auto deploys from Git. It has lightning-fast CDN and provides huge amount of bandwidth. It is the fast method to host all your web apps, static sites, APIs, containers, jobs and databases.

Checkout Render official website for more details.

5. Railway

Railway is an infrastructure platform where you can provision infrastructure, develop with that infrastructure locally, and then deploy to the cloud. It is made for any language, for projects of any size. Railway is the cloud that takes the complexity out of shipping software. It provides huge amount of bandwidth.

Checkout Railway official website for more details.

6. GitHub Pages

You can use GitHub Pages to host a website about yourself, your organization, or your project directly from a repository on GitHub.com. It is a static site hosting service that takes HTML, CSS, and JavaScript files straight from a repository on GitHub, optionally runs the files through a build process, and publishes a website.

Checkout GitHub Pages official website for more details.

There you go. One quick note, these service providers also have different paid services, in addition to free services. So if you want to upgrade, then it is highly recommended.

How to Add Custom Fonts to NextJS and Tailwind CSS Application

Add Custom Fonts to NextJS and Tailwind CSS Application

Tailwind CSS offers powerful capabilities to build visually appealing websites in a short time frame. To give your website a unique look and feel, you can choose to add custom fonts to NextJS project using Tailwind configuration.

Setting up a custom font in Next.js using Tailwind CSS is fairly easy. It needs 3 easy steps.

  • Installation and setting up _document.js
  • Declaring custom font family in tailwind.config.js
  • Using it in your components and pages.

For this tutorial, we will use Montserrat, a free Google Font. So let us begin installation process.

Create Your NextJs Project

The quickest way to start using Tailwind CSS in your Next.js project is to use the Next.js + Tailwind CSS Example. This will automatically configure your Tailwind setup based on the official Next.js example. If you’d like to configure Tailwind manually, continue with the rest of this guide.

Create your project

Start by creating a new Next.js project if you don’t have one set up already. The most common approach is to use Create Next App.

npx create-next-app nextjs-tailwind-tips
cd nextjs-tailwind-tips

If everything has goes well, you will see something like this on your terminal.

Install Tailwind CSS

Install tailwindcss and its peer dependencies via npm, and then run the init command to generate both tailwind.config.js and postcss.config.js.

npm install -D tailwindcss postcss autoprefixer
npx tailwindcss init -p

Configure your template paths

Add the paths to all of your template files in your tailwind.config.js file.

module.exports = {
  content: [
    "./pages/**/*.{js,ts,jsx,tsx}",
    "./components/**/*.{js,ts,jsx,tsx}",
  ],
  theme: {
    extend: {},
  },
  plugins: [],
}

Add the Tailwind directives to your CSS

Add the @tailwind directives for each of Tailwind’s layers to your ./styles/globals.css file.

@tailwind base;
@tailwind components;
@tailwind utilities;

Add Google Font to _document.js File

A custom Document can update the <html> and <body> tags used to render a Page. This file is only rendered on the server, so event handlers like onClick cannot be used in _document.

To override the default Document create a new custom document file _document.js in your pages folder next-project/pages/ and set it up with the following code:

Go to Google Fonts and search for the specific font you like. For this tutorial, we will use Montserrat, a free Google Font. Select the style variants from thin (100) to bold (900). Copy the link provided by Google and past in between the Head tags.

import Document, { Html, Head, Main, NextScript } from "next/document";

function MyDocument() {
  return (
    <Html>
      <Head>
        <link
          href="https://fonts.googleapis.com/css2?family=Montserrat:wght@100;200&display=swap"
          rel="stylesheet"
        />
      </Head>
      <body>
        <Main />
        <NextScript />
      </body>
    </Html>
  );
}

export default MyDocument;

Now, it’s time to configure the tailwind.config.js file. Go to Add tailwind.config.js and add Montserrat as the font family for your app. Also remember to add defaulTheme for the app as shown below.

/** @type {import('tailwindcss').Config} */
const defaultTheme = require("tailwindcss/defaultTheme");

module.exports = {
  mode: "jit",
  purge: ["./pages/**/*.{js,ts,jsx,tsx}", "./components/**/*.{js,ts,jsx,tsx}"],
  darkMode: false, // or 'media' or 'class'
  theme: {
    extend: {
      fontFamily: {
        Montserrat: ["Montserrat", ...defaultTheme.fontFamily.sans],
      },
    },
  },
  variants: {
    extend: {},
  },
  plugins: [],
};

Start Using Custom Font

Go to your Components or Pages, in this case for simplicity we are using _app.js file to custom font. Add className=”font-fontname” to the element. The fontName here refers to the name we gave to the font family in the previous step in this case Montserrat.

import Head from "next/head";
import Image from "next/image";

export default function Home() {
  return (
    <div>
      <Head>
        <title>Create Next App</title>
        <meta name="description" content="Generated by create next app" />
        <link rel="icon" href="/favicon.ico" />
      </Head>

      <main>
        <h1 className="w-full text-center py-12 font-Montserrat text-3xl font-bold">
          Hello world! Im Montserrat Font
        </h1>
      </main>
    </div>
  );
}

Now you will be able to see the custom font you just added to your app.

Code is available on GitHub repo.

How to Build a Multiselect Dropdown Component Using React-select

React select dropdown tutorial using react-select. (1)

In this tutorial, you will learn how to use react-select library to create a dropdown selection in your React app. Before that, let’s first understand what React-select is and why should you use this library in your React.js project.

React-select

React-select is an easy to use dropdown library create by Jed Watson and few other awesome contributors. It is a powerful library, offers various features such as multi-select, autocomplete and many more. This is a perfect choice for your next Reactjs project, providing numerous dynamic functionalities to the dropdown components including search and filter functionality, animation, easy accessibility and faster loading time.

Features provided by React-select package include:

  • Flexible approach to data with customizable functions.
  • It handle large number of dataset.
  • Simple customization with API support.
  • Controllable state props and modular architecture.
  • Manage component state easily.
  • CSS styling with emotion support. Provide CSS animation support for components.
  • Long-requested features like option groups, portal support, animation, and more

Step 1: Install React and other libraries

Dependencies used for this project.

  • React-Select Library
  • TailwindCSS for CSS and styling (optional- you can use any styling library)

Run the following command to install a brand new React project. You can either use yarn or npm, but for this tutorial, npx is used. This will create a React app for us.

npx create-react-app react-select

Change the directory and get inside to the project folder. You can always clean the project just a little bit. Remove the files you do not required for this project.

cd react-select

Install Tailwind CSS

Install TailwindCSS and its peer dependencies via npm, and then run the init command to generate both tailwind.config.jsand postcss.config.js.

npm install -D tailwindcss postcss autoprefixer
npx tailwindcss init -p

Configure your template paths

Add the paths to all of your template files in your tailwind.config.jsfile.

module.exports = {
  content: [
    "./src/**/*.{js,jsx,ts,tsx}",
  ],
  theme: {
    extend: {},
  },
  plugins: [],
}

Add the Tailwind directives to your CSS

Add the @tailwinddirectives for each of Tailwind’s layers to your ./src/index.cssfile.

@tailwind base;
@tailwind components;
@tailwind utilities;

Start using Tailwind in your project

Start using Tailwind’s utility classes to style your content and it will reflects the changes you make to the app.

Install React-Select Library

Now, this is important step. We need to install React-select package. For that simply run the following command.

npm i react-select

Once it is installed, you can now import the react-select module any where in our project. For simplicity it is imported in src/App.js file.

Now create a function that will handle our selected value. Name it setHandle and call it on the component. It will change the current value once user click to the dropdown.

import "./App.css";
import React, { useState, Component } from "react";
import Select from "react-select";

const Hotels = [
  { value: 1, label: "Coral Beach Maldives" },
  { value: 2, label: "Ilaa Beach Maldives" },
  { value: 3, label: "Finolhu" },
  { value: 4, label: "Arena" },
  { value: 5, label: "Kaani Beach Hotel" },
];

function App() {
  const [selectedOptions, setSelectedOptions] = useState(null);

  const setHandle = (e) => {
    setSelectedOptions(Array.isArray(e) ? e.map((hotel) => hotel.label) : []);
  };

  return (
    <div className="mx-auto container py-8">
      <h1 className="text-sm">Select Hotels</h1>
      <div className="flex flex-wrap items-center lg:justify-between justify-center">
        <div className=" px-2	">
          <Select options={Hotels} onChange={setHandle} isMulti />
        </div>
        <div>{selectedOptions}</div>
      </div>
    </div>
  );
}

export default App;

An array named Hotels is created, it then pass the hotel list to the dropdown. Hotel names is displayed when a user clicks on the dropdown and select element with the help of the react-select library.

There are many other properties available and common props you may want to specify include:

  • autoFocus – focus the control when it mounts
  • isDisabled – disable the control
  • isMulti – allow the user to select multiple values
  • isSearchable – allow the user to search for matching options
  • name – generate an HTML input with this name, containing the current value
  • onChange – subscribe to change events
  • options – specify the options the user can select from
  • placeholder – change the text displayed when no option is selected

React Multi Select Dropdown

Multi select option is one of the popular properties provided by this library. let us understand how this is used in a React project. It is actually very easy, simply you need to add isMulti prop to select various value in a select dropdown.

<Select options={Hotels} onChange={selHandle} isMulti />

Thats all for now! You can find code for this tutorial in this GitHub repo

How to Add Tailwind CSS to Your Reactjs Project

Tailwind CSS to ReactJS project

Tailwind CSS is a utility-first CSS framework which is used to make your website more responsive and beautiful. It is well known modern CSS frameworks which helps to speed up the development and styling process significantly. If you’re new to Tailwind CSS please follow the official documentation of Tailwind CSS and find a good starting point at the project’s homepage at TailwindCSS.

Setting up your React project with Tailwind CSS is so simple and comprises only very few steps. In this tutorial you will learn step-by-step approach of installing Tailwind CSS into your React project and get started using Tailwind’s CSS classes for styling.

Step 1: Creating Your React Project

Creating your new React.js project is the very first step. The easiest way to create a new project is to use the create-react-app script on the command line.

npx create-react-app react-app-with-tailwind

Now, cd into the working directory.

cd react-app-with-tailwind

If everything goes well, you should be able to see your react project on the web browser when you run the following command.  

npm run start

Step 2: Install Tailwind CSS

Now install tailwindcss and its peer dependencies via npm, and then run the init command to generate both tailwind.config.js and postcss.config.js.

npm install -D tailwindcss postcss autoprefixer
npx tailwindcss init -p

Tailwind will create two files. You need to make small changes so it will works well for our Reactjs project.

  • tailwind.config.js
  • postcss.config.js

Step 4: Configuring Template Files

You need to specify the path to our Reactjs project files by adding the following configuration setting inside tailwind.config.js. Make sure to add the paths to all of your template files in your tailwind.config.js file.

module.exports = {
   content: [
     "./src/**/*.{js,jsx,ts,tsx}",
   ],
   theme: {
     extend: {},
   },
   plugins: [],
 }

Step 5: Add the Tailwind directives to your CSS

Now add the @tailwinddirectives for each of Tailwind’s layers to your ./src/index.css file.

@tailwind base;
@tailwind components;
@tailwind utilities;

That’s all. You’re good to go! Let’s make use of Tailwind’s CSS classes within our main React component in App.js.

Step 6: Use Tailwind CSS In Your React App

Add the following code to App.js. Start the development web server by using the following command. Now you should be able to see the following result in the browser.

<div className="container mx-auto bg-gray-200 rounded-xl shadow border p-8 m-10">
      <p className="text-3xl text-gray-700 font-bold mb-5">
        Welcome!
      </p>
      <p className="text-gray-500 text-lg">
        React and Tailwind CSS in action
      </p>
    </div>
npm run start

You can find code for this tutorial in this GitHub repo

Best Free VS Code Themes 2022🤩

Best Free VS Code Themes 2022

It is already halfway through 2022 and if you are still looking for any VSCode themes, then here is the list of some of the most popular VS Code themes for 2022 so far.

List of the top 5 VSCode themes – My choice:

  1. Atom One Dark Theme
  2. GitHub Theme
  3. Night Owl Theme
  4. JellyFish Theme
  5. Sublime Material Theme

Atom One Dark Theme

One of the best dark theme port in the marketplace. Atom’s iconic One Dark theme for Visual Studio Code is so popular among developers who loves dark mode.

It has visually pleasing styles and well-blended color schemes, therefore it is considered as one of the most used themes, nearly 3.3 million download in the market place as of today.

Here are some of the stats:

  • No. of Installs:  3,279,542 installs
  • Rating:  4.81/5 (102)
  • Current version: v2.2.3 | 1/4/2021| Free

GitHub Theme

It is popular theme for developers who prefer GitHub’s classic themes. It comes with various new styles, simply you need to select any available theme during installation process. You can choose one of these themes.

  • GitHub Light Default
  • GitHub Light High Contrast ✨ new ✨
  • GitHub Light Colorblind ✨ new ✨
  • GitHub Dark Default
  • GitHub Dark High Contrast
  • GitHub Dark Colorblind ✨ new ✨
  • GitHub Dark Dimmed

There are also two older themes. Note: They might not get updated frequently and are kept for legacy reasons:

  • GitHub Light (legacy)
  • GitHub Dark (legacy)

Here are some of the stats:

  • No. of Installs:  4,349,035 installs
  • Rating: – (120)
  • Current version: v6.0.0 | 2/11/2022 | Free

Night Owl Theme

This theme is fine-tuned for those of us who really like to code late at night. It comes with both dark (Night Owl) and light theme (Light Owl). The color choices, background, and styling are perfectly suitable for developers who are having difficulties in low-light circumstances. ✨

Night Owl

Light Owl

Here are some of the stats:

  • No. of Installs:  1,463,301 installs
  • Rating: – (119)
  • Current version: v2.0.1 | 7/4/2021 | Free

JellyFish Theme

It is also a beautiful theme. The font (Hermit) and colors used by the theme is easy on the eyes. The colors used by this theme for highlighting code are Aqua Blue, Purple, Dark Yellow, and Pinkish-Red.

Here are some of the stats:

  • No. of Installs: 75,788 installs
  • Rating: – (5)
  • Current version: v0.0.4 | 2/8/2022 | Free

Sublime Material Theme

This is simply a port to align the style of the theme with the default VSCode chrome that cannot be changed atm. It has both dark and light theme options, however it was last update long time ago, in 2016.

Dark Theme

Light Theme

Here are some of the stats:

  • No. of Installs: 568,813 installs
  • Rating: – (25)
  • Current version: v1.0.1 | 11/27/2016 | Free

There are lots of amazing themes in the marketplace and these are just few. Must have themes at least in my opinion. Maybe you have a better choice and if you have any let us know your favorite theme that make you more productive.

If you want to know about best VSCode extensions for 2022 then please read this article.

Top 11 Best VS Code Extensions you Need in 2022!

DigitalOcean New Pricing: July 2022

digital ocean

Prices effective starting July 1, 2022

Users using DigitalOcean Droplets, Snapshots, Load Balancers, Floating IPs, and Custom Images will experience a change in prices starting from July 1, 2022. Details are below.

DO droplet

Introducing a new $4 Droplet 

Droplet priced at $4/month with 1 vCPU, 512MB memory, 500GB bandwidth, and a 10GB SSD. The new Droplet is ideally suited for developers and teams learning new skills and creating proofs of concept and serves as a low-cost, effective graduation path from application development to production deployment.


Load Balancers

New monthly price for load balancers will be $12 per month per node.


DO loadbalancer

DigitalOcean Kubernetes

Managed Kubernetes

Billed for the underlying resources used by their Kubernetes worker nodes, which could include Droplets, Block Storage, and Load Balancers. A Kubernetes cluster can be deployed for as little as $12 per month.

Only public outgoing transfers are considered for bandwidth billing. Transfer limits are calculated by pooling the transfer from all droplets on the account. Overages above pooled transfer will be charged at a rate of $0.01/GB.


Snapshots

New monthly price for Volume Snapshots is $0.06 per GiB per month and Droplet Snapshots is $0.06 per GB per month.


DO Spaces

floating ips

Floating IPs

Floating IPs will be free when assigned to a Droplet and will cost $5.00 per month when reserved but not assigned to a Droplet


Custom Images

Custom images are free to upload and charged at $0.06 GB per month to store.


DO custom image

DO bandwidth

Bandwidth Overages

No changes to bandwidth overage pricing. Each Droplet includes free outbound data transfer, starting at 500 GiB/month and scaling up. Outbound data transfer is shared between all Droplets each billing cycle. Additional transfer is billed at $0.01 per GiB.


Spaces

No change to Spaces pricing. The base rate of a Spaces subscription is $5.00 per month and gives you the ability to create multiple Spaces.

The subscription includes 250 GiB of data storage (cumulative across all of your Spaces). Additional storage beyond this allotment is $0.02 per GiB.

Spaces subscriptions include 1,024 GiB of outbound data transfer (from Spaces to the internet), which is shared between all Spaces. Additional outbound transfer is $0.01 per GiB.


DO blSpaces

DO backups

Backups

No change to backups pricing. Enabling backups for a Droplet adds 20% to the cost of the Droplet.


Volumes

No change to Volumes pricing. Volumes cost $0.10 GiB per month and range from 1 GiB to 16 TiB (16,384 GiB). Charges accrue hourly for as long as the volume exists.


digitalocean volume

app platform

App Platform

No changes to App Platform pricing. Starts at $5.00 per month (for one container).