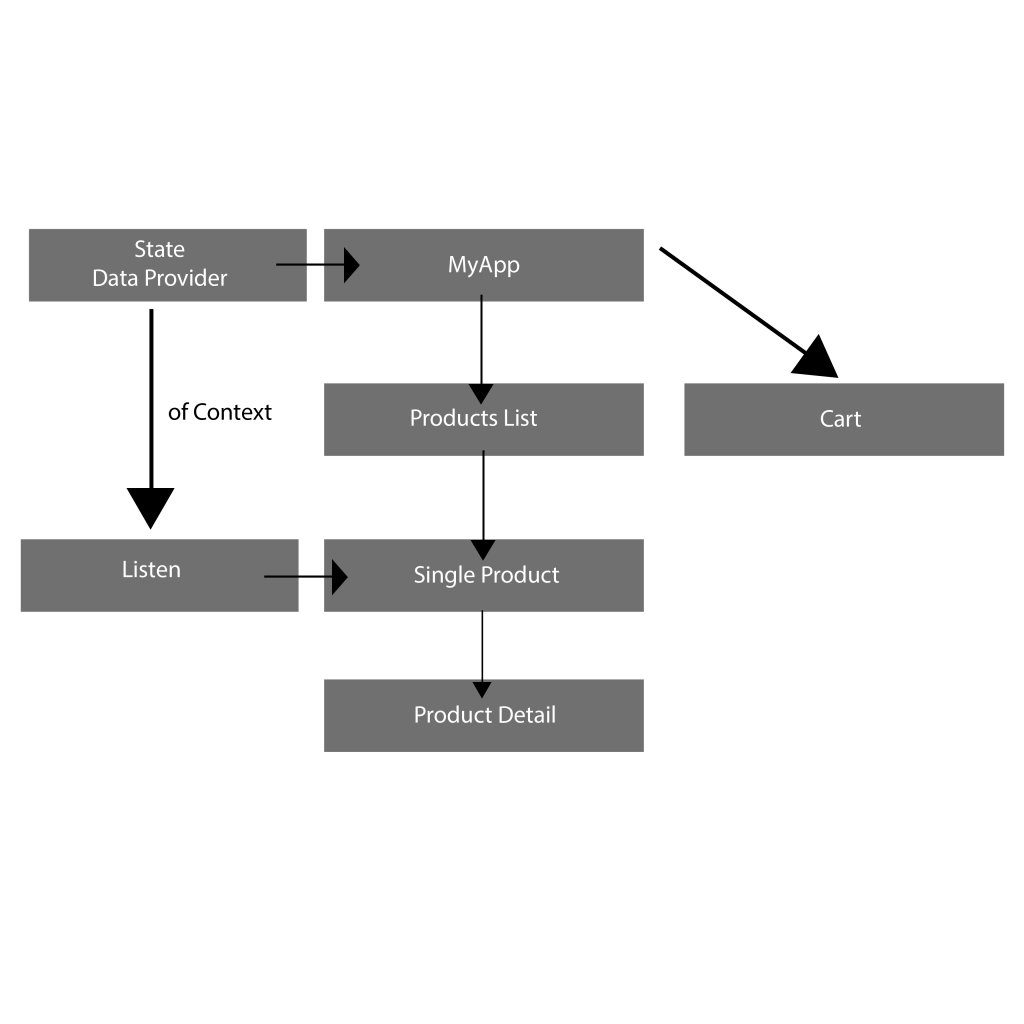
What is DigitalOcean Droplets?
DigitalOcean Droplets are Linux-based virtual machines (VMs) that run on top of virtualized hardware. These droplets are new virtual servers. These virtual servers must be configured such that it provides security and usability for the application.
Basic security measures are always important as a startup of any project, and over time it is beneficial to develop a more tailored security approach which suits the specific needs of your environments and applications. Here are basic security measure you can take care of when you do initial setup and deployment process for DigitalOcean droplet.
These concepts are complex and advance topics, hence this tutorial will not cover everything regarding DigitalOcean Droplets configuration for each methods.
Let’s find more…
Step1: Use SSH KEYS
Secure Shell (SSH) is popular encrypted protocol used to communicate with servers. As a server side admin, you’ll likely SSH into your servers because it is more secure way to configure servers and databases.
With SSH keys, a private and public key pairs are created for the purpose of authentication. The private key is kept secret and secure by the user, while the public key can be shared.
When interacting with Digital Ocean plate form, You have two options either SSH keys or password
SSH key is More Secure Way
Reasons: SSH Keys are larger bit length.
Passwords are typically 8-16 characters which is easy to break.
SSH keys are 4096 bit characters long which is difficult to crack.
SSH keys are completely randomized.
SSH keys are large number of prime numbers thus it cannot be easily social engineered.
To get SSH key of someone, literally you need to access his physical computer.
Connecting to Server Using SSH Keys
To configure SSH key authentication, you must place your public SSH key on the server in its proper directory. When your client first connects to the server, the server will ask for proof that you have the associated private key. It generates a random value and send it to your SSH client. Your SSH client will then use your private key to encrypt the response and then send the encrypted reply to the server. The server then decrypts your client’s reply using your public key. If the server can decrypt the random value, then it means that your client possesses the private key and the server will let you connect without a password.
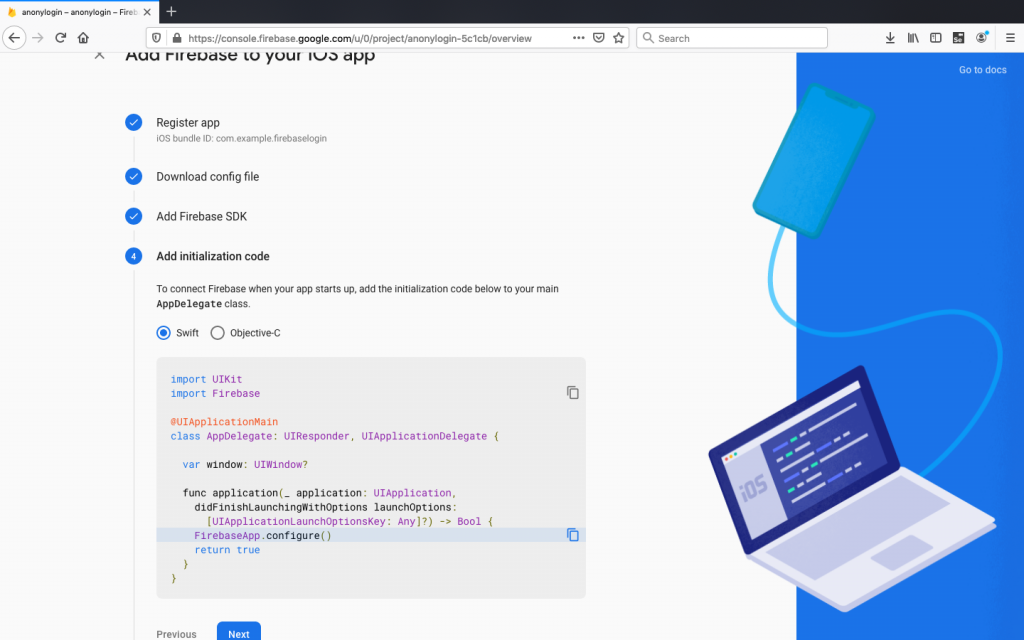
ssh-keygenBy default your key pair is saved is in ~/.ssh/ on Linux and /Users/your_username/.ssh on Windows and macOS. Simply copy your public key, which is named id_rsa.pub by default.
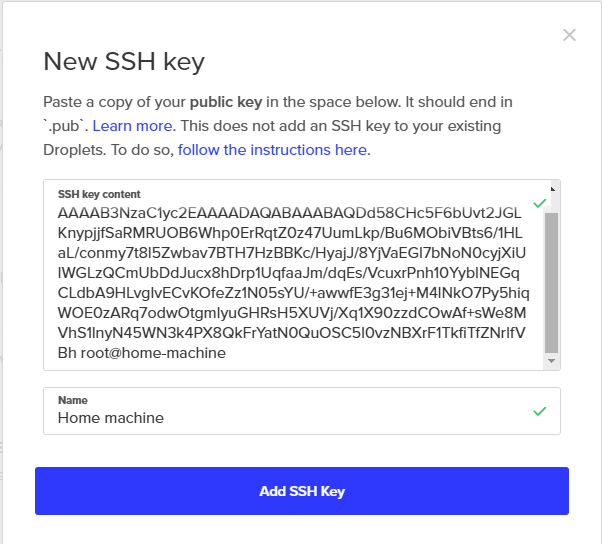
From the Account section, in the Security tab, find the SSH keys section. Click Add SSH Key to open the New SSH key window. Paste your public key into the SSH key content field, give it a name, then click Add SSH Key.
Step 2: Firewalls
Firewalls have basic level protection however it is essential for securing your DigitalOcean Droplet by restricting port access.
Firewalls restrict access to selected IP addresses. This is really helpful in granting ssh and MySQL access. In addition, it also helps to prevent certain users from certain countries to get access to the droplet or website.
You can configure firewall rules such that it helps to open and close ports for outside world.
eg: HTTP request (port 80)
MySQL request(port 3306)
DigitalOcean provides you two different types of firewalls
- Operating system specific firewall and
- DigitalOcean firewall
Operating System Level Firewall Code
sudo ufw app list
sudo ufw allow "Nginx Full"
Firewall at the Droplet Level Setup
To do Droplet level firewall simply follow these steps.
From DigitalOcean control panel, click Create in the top right to open the create menu, then click Cloud Firewalls to open the firewall create page. Configure the cloud firewall with the following options:
- In Name, enter
inbound-ssh-only. - In Inbound Rules, leave the single default rule for SSH.
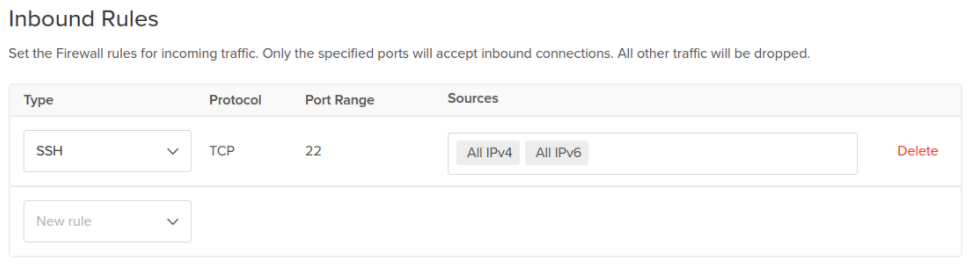
Remember security is all about securing layers. So enable both options rather than one.
Step 3: Virtual Private Clouds
Virtual private clouds has features which allow large outer casing for all droplets. It is technically not a firewall but an extra layer which help to protect servers. Rules are applied to the group at once rather than applying firewall rules to each individual droplets.
Service Auditing
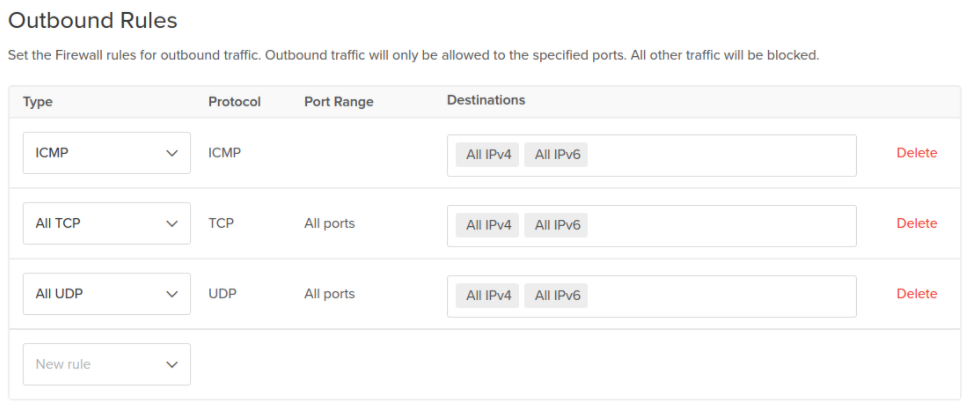
sudo ss-pluntIn Outbound Rules, keep the default rules, which permit all traffic to any destination on any port.
Click Apply to Droplets, add the tag you created with the new Droplet. These tags can be useful when you create additional Droplets in future, adding the same tag to them will automatically add them to this cloud firewall as well, simplifying scaling in the future.
Step 4: Unattended Updates
This method has downside. If we let auto update on then it updates number of packages which may leads to break any library. In this case it will be nearly impossible to find which caused the issue. Therefore before doing update process, remember to know all the libraries and packages will get updated.
Step 5: Backup
It is common scenario, we always take backup regularly but forget to test it. A backup that has been never tested is a theory. Taking backup is not a disaster recovery plan. A backup you think is going to work but not when the time comes then you have two problems. Don’t trust on one entity. So take backup offsite.Doing external backup is necessity
DigitalOcean has backup and Snapshot option.
- Backup is weekly which is large in size
- Snapshot is kind of diff
Step 6: SSL/TLS Encryption
Data is harvested by apps, companies and platforms. These data are sold to different companies. To minimize such illegal activities we have to use some type of secure way to communicate over the internet.
SSL/TLS protocol encrypts internet traffic, making secure internet communication between the users. These encryption protocols hide raw data from any third parties.
Step 7: Isolated Execution Environment
Isolated Execution is a software reference implementation of the security through isolation concept. It is not targeted at stopping malware from running or avoiding its insertion in the user’s machine; it rather provides a contained environment where malware can run without affecting the whole system.
- Historically this is a good execution approach
- In reality it is better to separate each component
- Application server should be kept separately from database server
- For example, If something happens to application server, we still able to keep database server safe without touching it
- Application Server: Public network
- Database Server: Private network
- Do not put your database publicly facing to the internet
Step 8: Service Auditing
Even with all the security best practices, a new vulnerability can cause harm to your server. That’s where regular monitoring helps.
Service auditing or security auditing is a process of tracking and reviewing activities on your server. It is important to have audit policies where it states events you want to monitor, system log, history and how frequency you want to conduct the audit.
Conclusion
Security is an important key factor. It is important to have your Droplets safe and secure from harmful hackers to avoid security breaches. So, there you go. These are 8 ways you can make your Droplet secure.


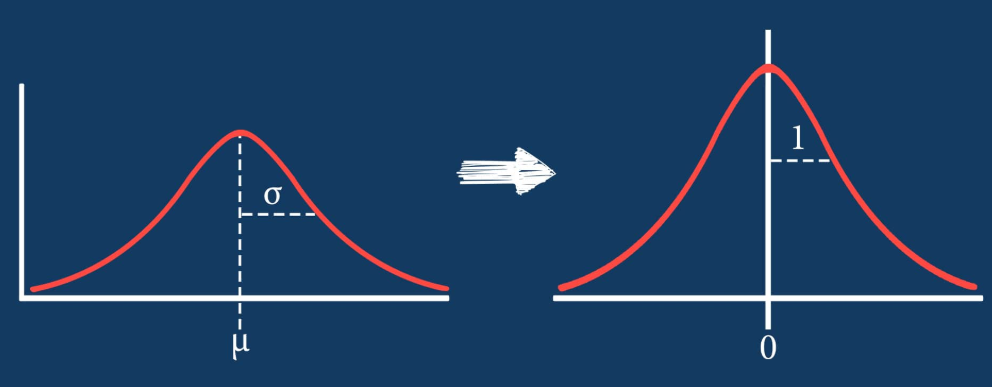
![\[X_{new} = \frac{ Xi-min(X)}{max(X)-min(X)}\]](https://letmefail.com/wp-content/ql-cache/quicklatex.com-7c25e0d84a7575027d5eb9f4e3375a14_l3.png "Rendered by QuickLaTeX.com")
![\[ X_{new} = \frac{Xi-X_{mean}}{Standard Deviation} \]](https://letmefail.com/wp-content/ql-cache/quicklatex.com-a990c2b6a2d746eb6642adf6e47634f4_l3.png "Rendered by QuickLaTeX.com")