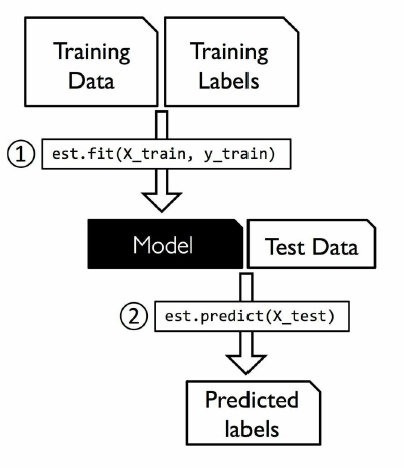
State management is one of the most important parts of any application. Understanding state management is incredibly important as current trend heavily focuses on robust way to manage state of the application as data are constantly read or modified by the users.
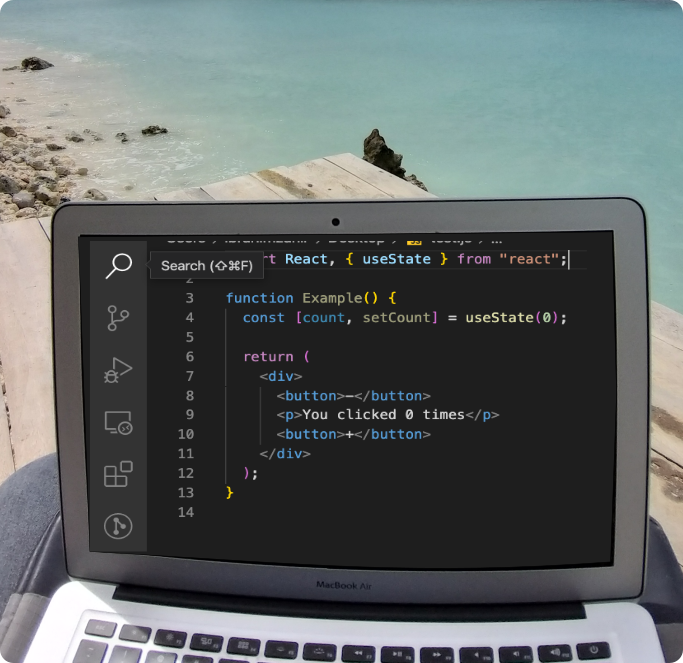
In this example we are going make simple counter app with two buttons in order to understand the state management of a react application. We will implement counter button functionality using useState Hooks.
So without further ado let’s create a react app by running the following command.
npx create-react-app my-app
cd my-app
npm start
After little bit of clean up, this is our App.js file looks like as of now.
We can only use useState Hooks inside of a function component. This is not possible in a class components. We can only mix classes and function components with Hooks in a single tree. There for we must to use function components to use Hooks.
Only Hooks at the top level
Do not call Hooks inside loops, conditions or nested functions. Always use Hooks at the top level of your React function before any early returns. Hooks must call in the same order each time a components renders. Thats what allow React to correctly preserve the state of Hooks between multiple useState and useEffect calls.
function Form() {
  // 1. Use the name state variable
  const [name, setName] = useState('Mary');

  // 2. Use an effect for persisting the form
  useEffect(function persistForm() {
    localStorage.setItem('formData', name);
  });

  // 3. Use the surname state variable
  const [surname, setSurname] = useState('Poppins');

  // 4. Use an effect for updating the title
  useEffect(function updateTitle() {
    document.title = name + ' ' + surname;
  });

  // ...
}
So from this example above, how React knows which State corresponds to which useState call?
Well, React relies on the order in which Hooks are called.
// ------------
// First render
// ------------
useState('Mary')           // 1. Initialize the name state variable with 'Mary'
useEffect(persistForm)     // 2. Add an effect for persisting the form
useState('Poppins')        // 3. Initialize the surname state variable with 'Poppins'
useEffect(updateTitle)     // 4. Add an effect for updating the title

// -------------
// Second render
// -------------
useState('Mary')           // 1. Read the name state variable (argument is ignored)
useEffect(persistForm)     // 2. Replace the effect for persisting the form
useState('Poppins')        // 3. Read the surname state variable (argument is ignored)
useEffect(updateTitle)     // 4. Replace the effect for updating the title
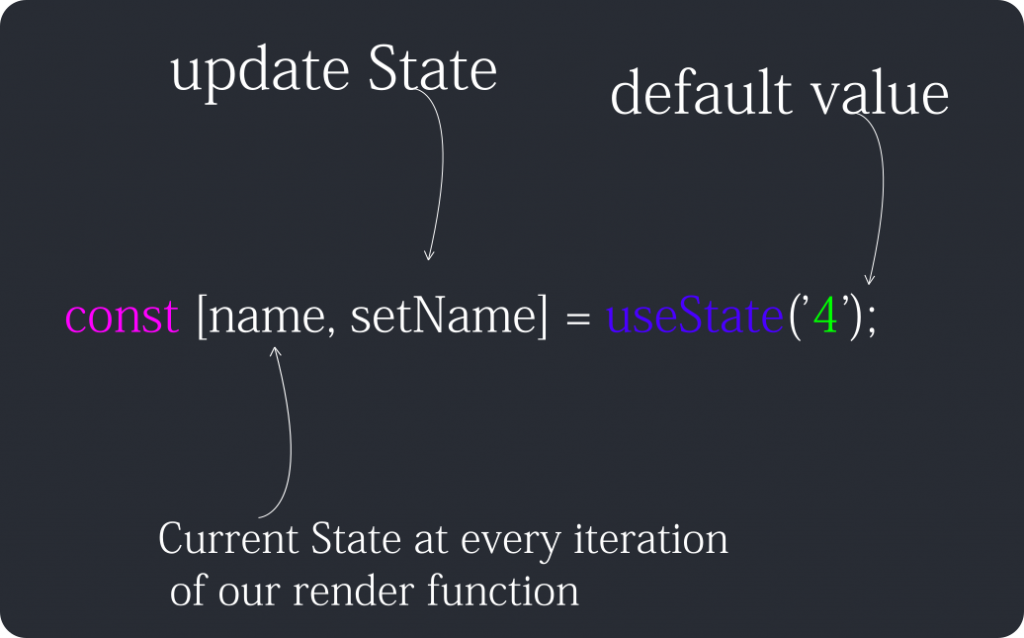
Let’s go back to useState and how to use it.
To use useState Hooks, all we need to do is to call useState function and pass the default state inside the parameter. useState return arrays of values. As we know array always have two values.
Now focus on setCount value and how we set the value inside the component. To do that, we create onClick function inside the button.
For the first time ever I had opportunity to go for a multi-day fishing trip with a group of friends by a local fishing boat. This trip was 6 days long, spent roughly 100 hours in the middle of ocean, within the range of 20-50 nautical miles. This was totally a different experience in my life and during the trip I tried to learn something on supervised learning.
So let’s go…
Supervised learning models learn from any given labeled data. They are known as training data.
Training data contains different patterns.
The algorithm will learn underlying patterns during the training process.
In testing phase, training data set helps models to predict a desired outcome for unforeseen data.
Supervised Learning Algorithms
k-Nearest Neighbors
Linear Regression
formula for linear regression, Y= ax+b
Logistic Regression
formula for logistic regression, y = ln(P/(1-P))
Support Vector Machines (SVM)
Decision Trees and Random Forests
Neural Networks
Advantages of Supervised Learning
Supervised learning is easy to understand.
Number of classes or parameter will be known before model is deployed.
Challenges of Supervised Learning
It requires some amount of expertise to structure accurately.
Training a proper models can be very time intensive.
Human errors in the datasets can cause poor algorithms.
It cannot cluster or classify data on its own.
Supervised Learning Models Can Be Used in:
Image and object recognition: Supervised learning algorithms can be used to identify objects in a videos or images.
Predictive analytics: It provides deep insights into various business data points. Helps companies to take decisions more easily and accurately.
Customer sentiment analysis: Easy to extract and classify important pieces of information from large volumes of data such as emotion, intent and context.
Spam detection: Classification algorithms is used to recognize patterns or anomalies in a dataset.
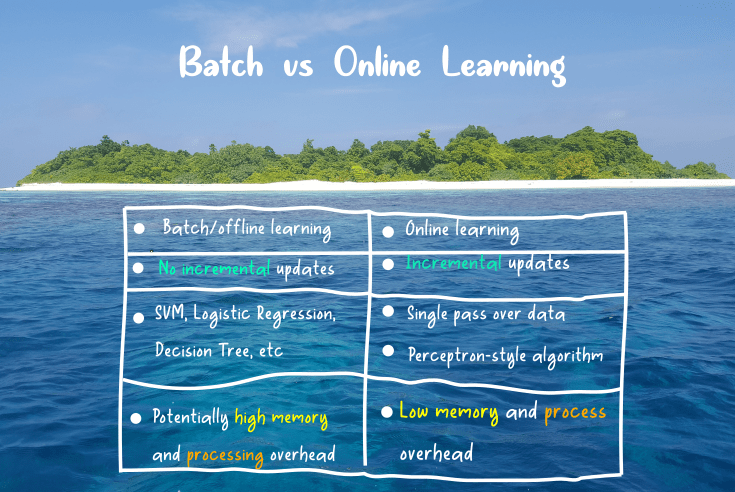
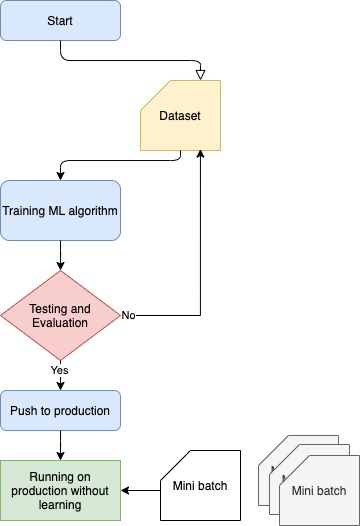
Strategies for machine learning system are classified into two main categories. They are Batch Learning and Online learning. In batch learning, models learn offline while in online learning data flow into the learning algorithm in stream of pipelines. In this article, you will learn:
Gentle introduction of batch learning.
Problems in batch learning.
Solving batch learning problems using online learning method.
So let’s begin…
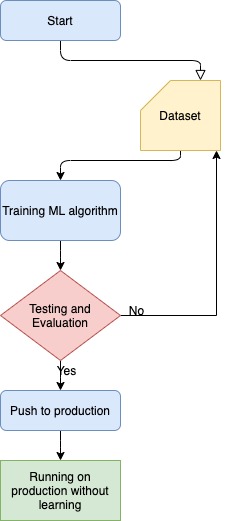
What is Batch Learning?
Data preprocessing is an important step in machine learning projects. It includes various activities such as data cleaning, data reduction, splitting dataset (training and testing dataset) and data normalization process. To train a well accurate model, a large set of data is required. In batch learning process we use all the data we have for the training process. Therefore, the training process takes time and requires huge computational power.
What is happening under the hood?
After model is fully trained in the development process it will be deployed into the production. Once model is deployed, it will use only the data that we have given to train it. We cannot feed new data directly then let it learn on the fly.
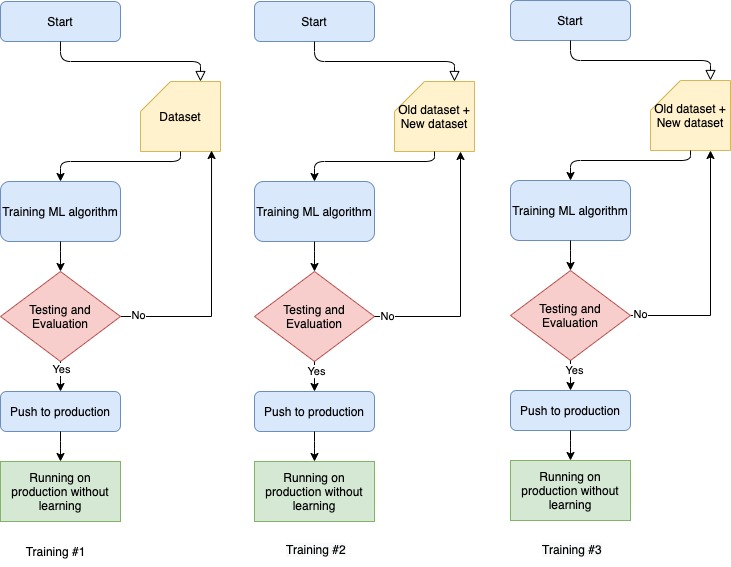
If we want to use new data then we need to start from the scratch. We need to bring down the machine learning model and use new dataset with old data and then train it again. When model trained completely on the new dataset, we then deploy it again to the production.
This is not a complex process perhaps in most of the cases, it might work without any major issues.
If we want to run the machine learning model, in every 24hours or in every week, then training the model from the beginning will be very much time consuming and also expensive. Training a machine learning model with new and old dataset not only requires time and computational power, but also requires large disk space and disk management which may again cost money.
This is fine for small projects but it gets tough in real time where the data is coming from various end points such as IoT devices, computers and from servers.
Training #
Dataset
Diskspace (TB)
1
1,000,000
100
2
2,000,000
200
3
3,000,000
300
Disadvantages of batch learning
The negative effects of large batch sizes are:
Model will not learn in the production. We need to train the model every time with new data.
Disk management is costly. As dataset grows then it requires more disk spaces.
To train a model with large amount of data set costs time and computational resources.
Online learning
To solve issues we face on batch learning, we use a method called online learning. In online learning, it tends to learn from new data while model is in production. Small batches of data will be used to train the model which are known as mini batches. We will look more into online learning in another article.
Conclusion
In this article we have looked into batch learning strategy and how it works. W’ve highlighted the disadvantages of batch learning and how online learning is used to overcome issues we face in batch learning. Hope you understand something on batch from this article.
There are mainly 8 key steps to consider in machine learning projects.
Frame the problem and understand the big picture.
Get relevant data.
Explore the data set and get insights.
Prepare and clean the data set, expose the underlying data patterns to the algorithms.
Explore different models and identify the best ones.
Fine-tune the models and combine them into a great solution.
Present the solution.
Launch, monitor, and maintain the system.
Let’s understand more…
Frame the Problem and Understand the Big Picture
Define business objective.
How the model could be used?
Identify existing solutions for the problem we want to solve?
Which machine learning method we choose (supervised, unsupervised, reinforcement learning, online or offline, etc.)?
How we measure model performance? Does the model able to achieve our objectives?
Identify the minimum performance needed to reach the business objective?
What are similar problems and use cases? Can we reuse experience or tools?
Does human expertise better than a computer algorithm?
List all the possible assumptions and verify them.
Note: automate as much as possible in every steps in the process.
Get Relevant Data
Note: automate as much as possible so we can easily get fresh data.
List the data you need and how much you need.
Identify the data sources. Where can you get data.
Check how much storage requires and create a workspace.
Check for legal obligations before accessing any data storages. Get authorization if necessary.
Convert the data to a friendly format where we can manipulate easily.
Ensure sensitivity of the information.
Check data type (time series, sample, geographical etc) and its size.
Sample a test set, put it aside, and never look at it.
Explore the Dataset and Get Insights
Note: Having industry expert’s opinion and insights would always be beneficial.
Create a copy of the data sheet. Sampling it down to a manageable size would be greatly helpful for data exploration process.
Keep a record of our data exploration. We can use Jupyter or any other notebook for machine learning projects.
Study each attribute and its characteristics.
Identify the target attributes if the model is supervised learning.
Visualize the data.
Study the correlations between each attributes.
Identify the promising transformations which can be useful.
Identify and collect extra data that would be useful.
Document what we have learned.
Name
Type
% of missing values
Noisiness and type of noise
Possibly useful for the task?
Type of distribution
–
categorical
–
stochastic
–
Gaussian
–
int/float
–
outliers
–
uniform
–
bounded/unbounded
–
rounding errors,
–
logarithmic
–
text
–
–
–
–
–
structured
–
–
–
–
Prepare and Clean the Dataset
Notes: Keep original dataset intact. Work with copies. That way we can keep original dataset safe.
Write functions for all data transformations. So we can:
Easily prepare a dataset for fresh data.
Apply these transformations in future projects.
Clean and prepare test set.
Clean and prepare new data instances when our solution is live in production.
Make it easy for hyperparameters process.
Data cleaning: Removing outliers is often important even though it is optional. Fill missing values (e.g., with zero, mean, median…) or ignore such columns and rows.
Feature selection is again optional but highly recommended: Drop the attributes (features) that is not useful for the task.
Feature engineering, where appropriate: Discretize continuous features. Decompose features (e.g., categorical, date/time, etc.). Add promising transformations of features (e.g., log(x), sqrt(x), x^2, etc.). Aggregate features into promising new features.
Feature scaling: standardize or normalize features.
Explore Different Models
Notes: If we have huge data set, it is good idea to sample smaller training sets so we can train many different models in a reasonable time (however this could penalizes complex models such as large neural nets or random forests).
Train many quick models from different categories (e.g., linear, naive Bayes, SVM,
Random Forests, neural net, etc.) using standard parameters.
Measure and compare their performance.
Using N-fold cross-validation compute standard deviation and mean of the performance measure on the N folds.
Analyze the types of errors that the models make.
What data would a human have used to avoid these errors?
Have a quick round of feature selection and engineering.
Identify most promising models.
Fine-Tune the System
Notes: Use as much data as possible as you move toward the end of fine-tuning.
Don’t tweak the model after measuring the generalization error: It will start overfitting the test set.
Fine-tune the hyperparameters using cross-validation.
Try Ensemble methods. Combining your best models will often perform better than running them individually.
Once you are confident about your final model, measure its performance on the test set to estimate the generalization error.
Present the Solution
Document everything we have done.
Create a presentation.
Highlighting the big picture is important.
Explain the business objective.
Mention model performance and also show other models results
Present key learning points in a beautiful visualizations.
Describe what worked and what did not.
List assumptions and limitations of the model.
Launch the Model
Do proper testing and launch the model in production with production data inputs.
Monitor system performance at regular intervals and trigger alerts when it drops.
As data evolve models performance will be affected. Beware of slow degradation too.
Measuring performance may require a human pipeline (e.g via a crowdsourcing service).
Also monitor inputs’ quality
Retrain models on a regular basis on fresh data.
Learning resources:
Learning resources: Hands‑On Machine Learning with Scikit‑Learn, Keras, and TensorFlow: Book by Aurelien Geron
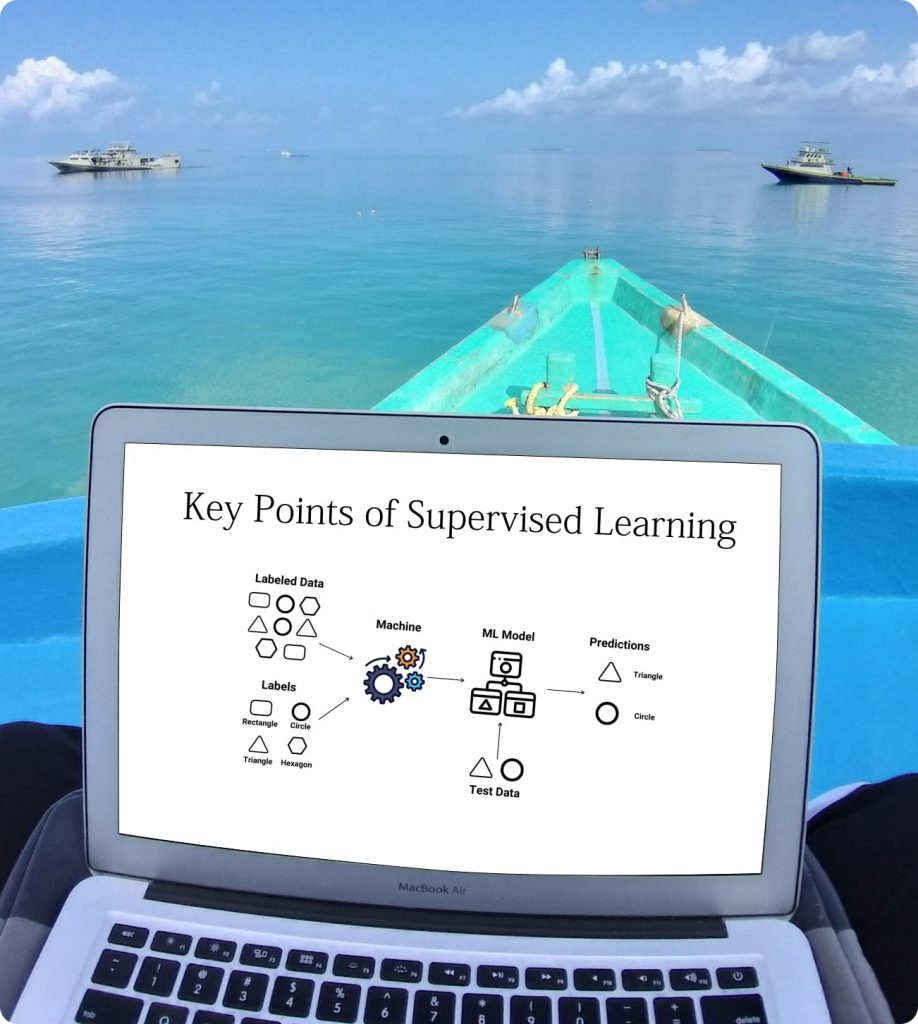
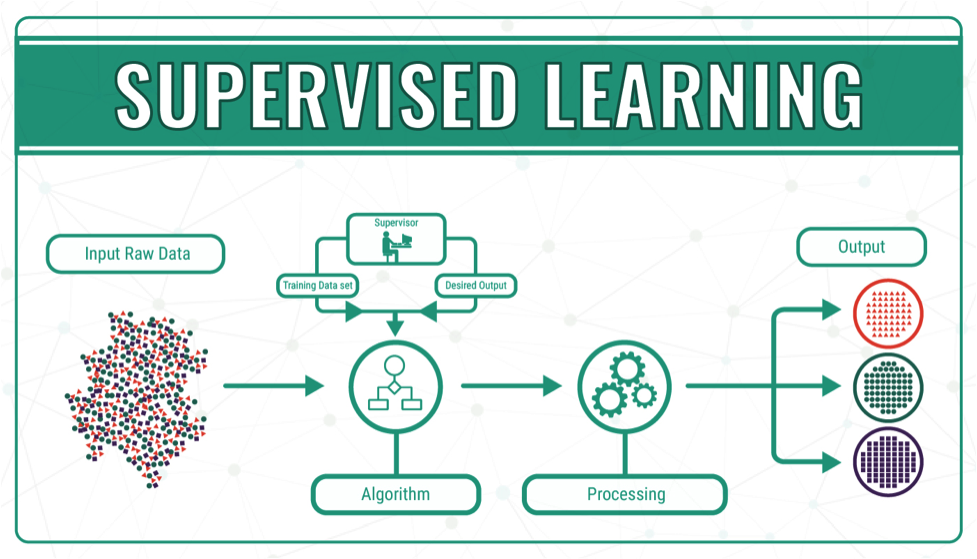
Supervised learning is one of the most common paradigm for machine learning problems. The algorithms used in supervised learning are easily understandable, so it is more common.
When we teach kids, often we show flash cards, objects and several examples. They try to learn new things during that process. We then show similar things to kids and ask different kind of questions in order to understand the learning progress.
The same procedure will be applied during supervised learning. We train algorithms using large data sets. Some data are labeled with the correct answers. These labels or targets are known as features. Therefore we know the right answer before we train any model.
Supervised learning mostly consists of classification and regression. However there are other variant as well.
Let’s understand more…
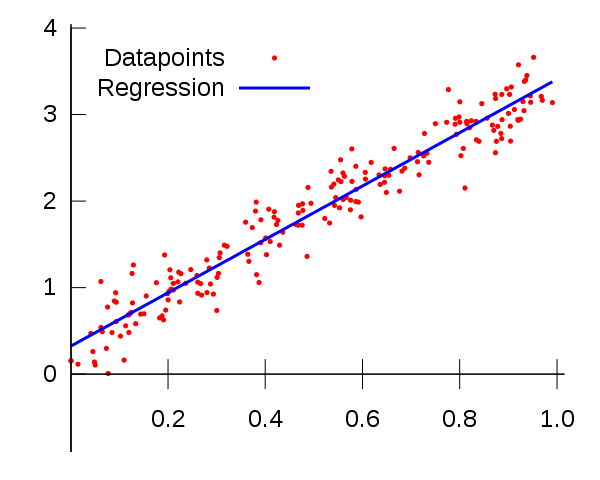
Regression
Predicting the price of a car for a given feature set (milage, color, brand etc). Some regression algorithms can be used for classification as well and vice versa. For example, Logistic Regression can be used for classification. It can output a value that corresponds to the probability of belonging to a given class (eg., 20% chance of being spam).
Classification
Classification is the process of predicting the class of given data points. Some examples of classification include spam detection, churn prediction, sentiment analysis, classifying hand written characters and so on.
Sequence Generation
Given a picture, predict a caption describing it. Sequence generation can sometimes be reformulated as a series of classification problems (such as repeatedly predicting a word or token in a sequence).
Object Detection
Given a picture, draw a bounding box around certain objects. This can also be expressed as a classification problem (given many candidate bounding boxes, classify the contents of each one).
Image Segmentation
Given a picture, draw a pixel-level mask on a specific object.
Most Common supervised learning Algorithms are:
Logistic Regression
Linear Regressions
K-nearest neighbors
Decision Tree & Random Forest
Neural Networks
Support Vector Machines
Training Process
Training dataset consists of both inputs and outputs. The model will be trained until it detects the underlying patterns and relationships between the input data and the output labels. The accuracy will be measured through the loss function, adjusting until the error has been sufficiently minimized. That is the point where it reaches to global minima point.
Over time, models try to learn, thus accuracy will normally be improved. When the training process is completed, these models are used to make new predictions on unseen data.
The predicted labels can be either numbers or categories. For instance, if we are predicting house prices, then the output is a number. So we called it regression model. When we are predicting spam emails using email filtering system, we have two choice whether email is spam or not. Therefore the output is categorical. This type model is known as classification model.
Training Process With a Real Example
Let us understand the training process with an example. For example we have a fruit basket which is filled up with different types of fruits. We want to categorize all fruits based on their category.
Our fruit basket is filled with Apples, Mango and Strawberries. For the models we will label fruits with corresponding unique characteristics of each fruits which make them unique by their type.
No
Size
Color
Shape
Name
1
Big
Red
Circular shape with a depression at the top
Apple
2
Big
Yellow
Rounded top shape with a curved convergent shaped to the bottom.
Mango
3
Small
Red and Green
Oval shape with rough surface
Strawberries
Now, the dataset is ready. It consists of different parameters called features and labels. Algorithm will learn the underlying pattern and output the results. Initially the output will not be so accurate but, as training time increase usually the model gets better and better. Once the model reaches to its best accuracy level, we feed new dataset called test dataset. This way we can make sure its learning progress and the accuracy.
Conclusion
In supervised learning, we train a machine learning algorithm using large set of data points. Some of the data points are labeled with target output. Our aim in supervised learning is to learn a model from labeled training data that allows us to make predictions about unseen or future data.
Learning resources:
Python Machine Learning: Book by Sebastian Raschka
Deep Learning with Python FRANÇOIS CHOLLET
Hands‑On Machine Learning with Scikit‑Learn, Keras, and TensorFlow: Book by Aurelien Geron
DigitalOcean Droplets are Linux-based virtual machines (VMs) that run on top of virtualized hardware. These droplets are new virtual servers. These virtual servers must be configured such that it provides security and usability for the application.
Basic security measures are always important as a startup of any project, and over time it is beneficial to develop a more tailored security approach which suits the specific needs of your environments and applications. Here are basic security measure you can take care of when you do initial setup and deployment process for DigitalOcean droplet.
These concepts are complex and advance topics, hence this tutorial will not cover everything regarding DigitalOcean Droplets configuration for each methods.
Let’s find more…
Step1: Use SSH KEYS
Secure Shell (SSH) is popular encrypted protocol used to communicate with servers. As a server side admin, you’ll likely SSH into your servers because it is more secure way to configure servers and databases.
With SSH keys, a private and public key pairs are created for the purpose of authentication. The private key is kept secret and secure by the user, while the public key can be shared.
When interacting with Digital Ocean plate form, You have two options either SSH keys or password
SSH key is More Secure Way
Reasons: SSH Keys are larger bit length.
Passwords are typically 8-16 characters which is easy to break.
SSH keys are 4096 bit characters long which is difficult to crack.
SSH keys are completely randomized.
SSH keys are large number of prime numbers thus it cannot be easily social engineered.
To get SSH key of someone, literally you need to access his physical computer.
Connecting to Server Using SSH Keys
To configure SSH key authentication, you must place your public SSH key on the server in its proper directory. When your client first connects to the server, the server will ask for proof that you have the associated private key. It generates a random value and send it to your SSH client. Your SSH client will then use your private key to encrypt the response and then send the encrypted reply to the server. The server then decrypts your client’s reply using your public key. If the server can decrypt the random value, then it means that your client possesses the private key and the server will let you connect without a password.
ssh-keygen
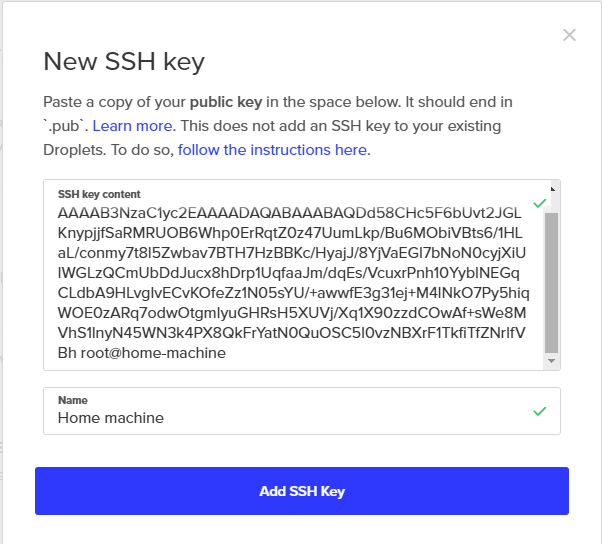
By default your key pair is saved is in ~/.ssh/ on Linux and /Users/your_username/.ssh on Windows and macOS. Simply copy your public key, which is named id_rsa.pub by default.
From the Account section, in the Security tab, find the SSH keys section. Click Add SSH Key to open the New SSH key window. Paste your public key into the SSH key content field, give it a name, then click Add SSH Key.
Step 2: Firewalls
Firewalls have basic level protection however it is essential for securing your DigitalOcean Droplet by restricting port access.
Firewalls restrict access to selected IP addresses. This is really helpful in granting ssh and MySQL access. In addition, it also helps to prevent certain users from certain countries to get access to the droplet or website.
You can configure firewall rules such that it helps to open and close ports for outside world.
eg: HTTP request (port 80)
MySQL request(port 3306)
DigitalOcean provides you two different types of firewalls
Operating system specific firewall and
DigitalOcean firewall
Operating System Level Firewall Code
sudo ufw app list
sudo ufw allow "Nginx Full"
Firewall at the Droplet Level Setup
To do Droplet level firewall simply follow these steps.
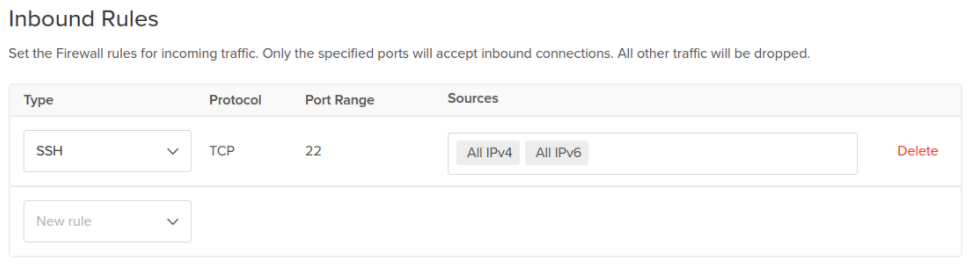
From DigitalOcean control panel, click Create in the top right to open the create menu, then click Cloud Firewalls to open the firewall create page. Configure the cloud firewall with the following options:
In Name, enter inbound-ssh-only.
In Inbound Rules, leave the single default rule for SSH.
Remember security is all about securing layers. So enable both options rather than one.
Step 3: Virtual Private Clouds
Virtual private clouds has features which allow large outer casing for all droplets. It is technically not a firewall but an extra layer which help to protect servers. Rules are applied to the group at once rather than applying firewall rules to each individual droplets.
Service Auditing
sudo ss-plunt
In Outbound Rules, keep the default rules, which permit all traffic to any destination on any port.
Click Apply to Droplets, add the tag you created with the new Droplet. These tags can be useful when you create additional Droplets in future, adding the same tag to them will automatically add them to this cloud firewall as well, simplifying scaling in the future.
Step 4: Unattended Updates
This method has downside. If we let auto update on then it updates number of packages which may leads to break any library. In this case it will be nearly impossible to find which caused the issue. Therefore before doing update process, remember to know all the libraries and packages will get updated.
Step 5: Backup
It is common scenario, we always take backup regularly but forget to test it. A backup that has been never tested is a theory. Taking backup is not a disaster recovery plan. A backup you think is going to work but not when the time comes then you have two problems. Don’t trust on one entity. So take backup offsite.Doing external backup is necessity
DigitalOcean has backup and Snapshot option.
Backup is weekly which is large in size
Snapshot is kind of diff
Step 6: SSL/TLS Encryption
Data is harvested by apps, companies and platforms. These data are sold to different companies. To minimize such illegal activities we have to use some type of secure way to communicate over the internet.
SSL/TLS protocol encrypts internet traffic, making secure internet communication between the users. These encryption protocols hide raw data from any third parties.
Step 7: Isolated Execution Environment
Isolated Execution is a software reference implementation of the security through isolation concept. It is not targeted at stopping malware from running or avoiding its insertion in the user’s machine; it rather provides a contained environment where malware can run without affecting the whole system.
Historically this is a good execution approach
In reality it is better to separate each component
Application server should be kept separately from database server
For example, If something happens to application server, we still able to keep database server safe without touching it
Application Server: Public network
Database Server: Private network
Do not put your database publicly facing to the internet
Step 8: Service Auditing
Even with all the security best practices, a new vulnerability can cause harm to your server. That’s where regular monitoring helps.
Service auditing or security auditing is a process of tracking and reviewing activities on your server. It is important to have audit policies where it states events you want to monitor, system log, history and how frequency you want to conduct the audit.
Conclusion
Security is an important key factor. It is important to have your Droplets safe and secure from harmful hackers to avoid security breaches. So, there you go. These are 8 ways you can make your Droplet secure.
This tutorial will explain how to create simple CRUD operation in Laravel 8 using Livewire and Jetstream packages. In this project we will build a simple blog which displays posts. So lets begin…
Laravel Jetstream
Laravel Jetstream is starter kit for Laravel ecosystem which provides an elegant login, registration, email verification, two-factor authentication, session management, API via Laravel Sanctum and optional team management features.
Livewire
Livewire is a full-stack framework for Laravel based applications which helps to create dynamic interfaces simple, without leaving the comfort of Laravel.
Tailwindcss
Tailwindcss is utility CSS framework that helps to build modern websites without ever leaving your HTML. Tailwindcss will come by default when you install Laravel application.
With the help of all these powerful technologies, we will show how to add a database to your project and do all CRUD stuffs using the application. In addition, we will also show basic server-side validation when we store the data into the MySQL database.
Steps include in this Project
Step 1: Initial set up, Install Livewire and Jetstream
Step 2: Database Configuration
Step 3: Model Migration
Step 4: Create Livewire Components
Step 5: Prepare Blade View
Step 6: Create Routes
Step 7: Start Development Server
Initial Set Up, Install Livewire and Jetstream
Let’s install Laravel fresh application using terminal. You can use any name. We are using laravel-jetstream-blog.
Now change the directory into newly created project then install Laravel jetstream.
cd laravel-jetstream-blog

composer require laravel/jetstream

php artisan jetstream:install livewire
At this point you will achieve Laravel user authentication part with the help of Jetstream. You will see Login and Register button in your app.
Now install nmp packeges and compile all the assets. Use both the npm commands as follow.
npm install && npm run dev
Database Configuration
Next, we connect our app to the database. To connect with database we need to make some configuration on the .env file.
You can use any name for DB_DATABASE, DB_USERNAME and DB_PASSWORD. Remember to change DB_HOST and DB_PORT if you are using Docker for this project (Refer docker tutorials).
It is time to create our first model. To create a model we can simply use terminal and execute the following command. Here we are creating Post model. You can give any name for the model.
php artisan make:model Posts -m
In the Post model, we will add table values such as title, body and the slug in the $fillable array.
<?phpnamespace App\Models;

use Illuminate\Database\Eloquent\Factories\HasFactory;
use Illuminate\Database\Eloquent\Model;

class Posts extends Model
{
    use HasFactory;

    protected $fillable = [
        'title',
        'body',
				'slug'

    ];
}
Next, make our first migration to the database. When we run the migration command, new migration will be placed in your database/migrations directory. We can use any name for migration. Each migration filename contains a timestamp that allows Laravel to determine the order of the migrations:
php artisan make:migration create_posts_table
Then configure the migration table for Post, so add the table properties in the database/migrations/create_post_table.php file.
<?php

use Illuminate\Database\Migrations\Migration;
use Illuminate\Database\Schema\Blueprint;
use Illuminate\Support\Facades\Schema;

class CreatePostTable extends Migration
{
    /**
     * Run the migrations.
     *
     * @return void
     */
    public function up()
    {
        Schema::create('posts', function (Blueprint $table) {
            $table->id();
            $table->string('title', 100);
            $table->string('body');
            $table->string('slug');
            $table->timestamps();
        });
    }

    /**
     * Reverse the migrations.
     *
     * @return void
     */
    public function down()
    {
        Schema::dropIfExists('posts');
    }
}
Create Livewire Components
At this point we can create our first Livewire components. To create our files we run this command. It will generated two files, one in Http and another in resources directories.
Now open Post class in the Livewire folder and define the post methods. Basically we will have all CRUD operations such create, update and delete posts in this file.
<?php

namespace App\Http\Livewire;

use Livewire\Component;

use App\Models\Posts;

class Post extends Component

{

public $posts, $title, $body, $slug;

public $isModalOpen = 0;

public function render()

{

$this->posts=Posts::all();

return view('livewire.post');

}

public function create(){

$this->resetForm();

$this->openModalPopover();

}

public function openModalPopover()

{

$this->isModalOpen = true;

}

public function closeModalPopover()

{

$this->isModalOpen = false;

}

public function resetForm(){

$this->title='';

$this->body='';

$this->slug='';

}

public function store(){

$this->validate([

'title' => 'required',

'body' => 'requuired',

'slug' => 'required',

]);

Post::updateOrCreate([

'id'=>$this->post_id],

[

'title'  => $this->title,

'body'   => $this->body,

'slug'   => $this->slug,

]);

session()->flash('message', $this->post_id ? 'Post updated' : 'Post created');

$this->closeModalPopover();

$this->resetForm();

}

public function edit($id) {

$post = Post::findOrFail($id);

$this->id = $id;

$this->title = $post->title;

$this->body = $post->body;

$this->slug = $post->slug;

$this->openModalPopover();

}

public function delete($id){

Post::find($id)->delete();

session()->flash('message', 'Message deleted Successfully');

}

}
Prepare Blade View
Now let’s open post blade file, so that we can display all the data in the UI.
It will show data in tabular forms where users can take actions to update or edit post data.
To achieve that, simply insert the following code in resources/views/livewire/post.blade.php file.
Now it is time to create our first route. It enables navigation for the Livewire app. Remember to import all Livewire classes. In this case Post class and define the route method. To do so, open resources/web.php file.
<?php

use Illuminate\Support\Facades\Route;
use App\Http\Livewire\Post;

Route::get('posts', Post::class);
Start Development Server
Now run the development server. So, use php artisan command along with the serve tag to invoke the Laravel development server.
php artisan serve
You can test the app by using the given url on the browser’s address bar.
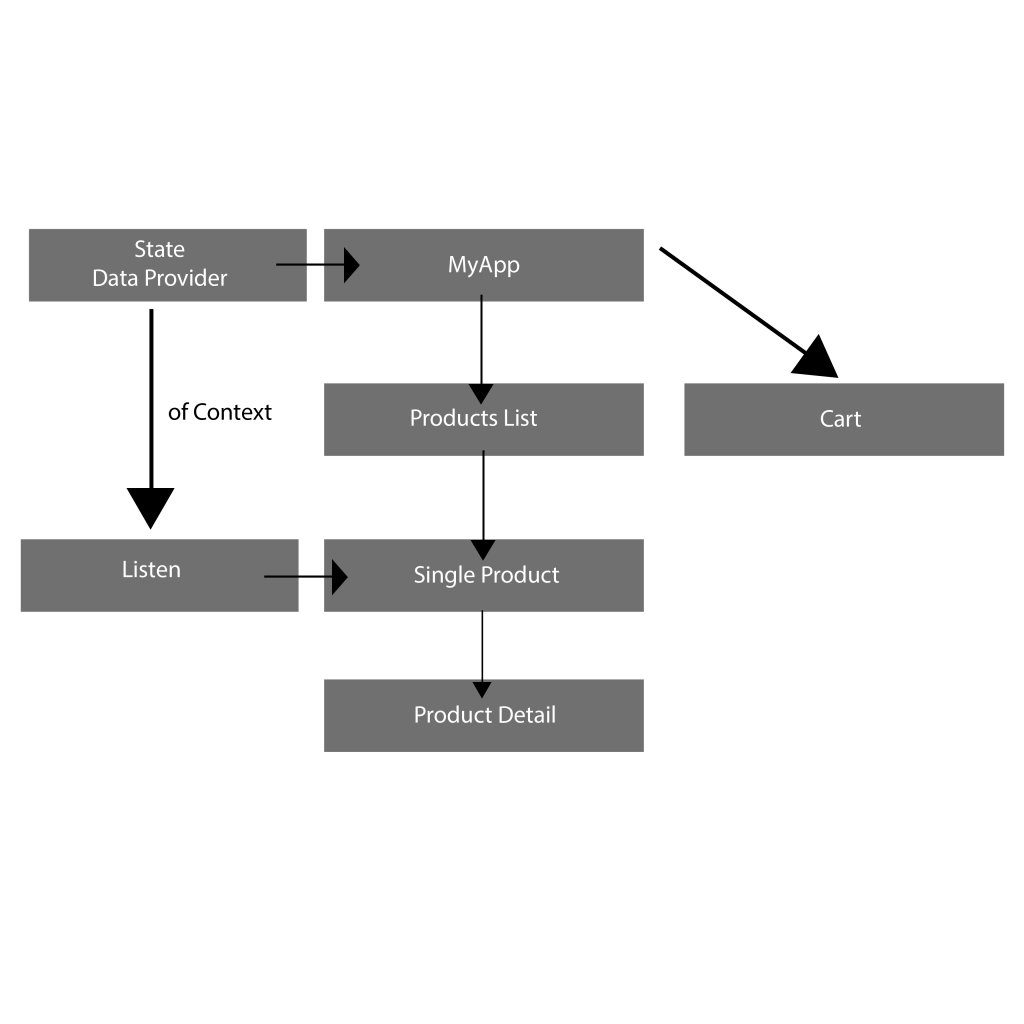
In typical scenarios, we need to create a constructor if we want to send data from one widget or one screen to another. Let’s say we are building an e-commerce app and we have the following screens in our application.
Assume we have few images on the Grid Tile in Products Screen. When we click one of the image, users will be sent to Product Detail Screen. When we want to send data to Product Detail Screen, the typical method is to create a constructor and then pass the data.
This method is called on the fly route. This method is perfectly fine but it has some downside.
Named Route
When the application grows, as requirements increases, we need to create many such on the fly route which is difficult to maintain. Specially new developers may face difficulty to understand which routes and screens the app has.
To solve this problem we have to use Named route in Main Screen. It will be easier to find all the routes and screens that the application has.
Another problem of having on the fly route is often unnecessary data has to be passed through multiple pages or screens. We have different navigations within multiple screens and we sometime want to pass data within these screens. In this case we have to pass unnecessary data in every widget down in the tree. The problem is, sometime all the screens not necessarily need those data in the widget itself to display data. These screens simply want to forward data to another widget. To understand the concept better see the following example below.
Let’s say we want to add price field in the Product Detail Screen. So we create a constructor.
We make a GestureDetector widget on Product Item Screen and make the image clickable. When we click the image, user will then be routed to Product Detail Screen. Value for price will be passed into the ProductDetailScreen as shown.
Remember we don’t directly display the price value in Product Item Screen. We only need to pass the value to Product Detail Screen. Because of this method unnecessary data will be used in different pages or widgets.
Unnecessary rebuilds of the major parts of the widgets causes performance issues. So no need to rebuild the entire app when just simple tiny widget needs an update.
Therefore we need a better approach. This is where Named route and State management come into play.
How to Use Named Route?
To make Named routes, first create a route table in the MainScreen. Register route name and then import corresponding files.
import 'package:flutter/material.dart';

import './screens/product_detail_screen.dart';
import './screens/products_overview_screen.dart';

void main() => runApp(MyApp());

class MyApp extends StatelessWidget {
  // This widget is the root of your application.
  @override
  Widget build(BuildContext context) {
    return MaterialApp(
      title: 'Shop App',
      theme: ThemeData(
        primarySwatch: Colors.blue,
      ),
      home: ProductOverviewScreen(),
      routes: {
        ProductDetailScreen.routeName: (ctx) => ProductDetailScreen(),
      },
    );
  }
}
Use pushNamed route in the Product Item Screen. Then use id as argument. This value is important because, it will be used to retrieve data in the Product Detail Screen. You may have noticed, we are passing only id value. But in the previous method (On the fly route method, we need to pass all the required field as argument).
Now simply remove the constructor in the Product Detail Screen that we created earlier and then use route path. Then extract id value so that we can use all the required data for each corresponding id.
When we add Data provider in MyApp widget, all child widgets will be able to listen to that provider. For that we need to listen by placing a listener on any widget we want to listen. By doing so, only that widget gets rebuild as data get update.
Install provider package and add in the pubspec.yaml file. Now we are able to use provider package which give access to provider and state management.
Now create products provider. This is just dummy data but, you can use your own data.
class Products with ChangeNotifier {
  List<Product> _items = [
    Product(
      id: 'p1',
      title: 'Red Shirt',
      description: 'A red Shirt- Bitch',
      price: 34.99,
      imageUrl:
                   'https://live.staticflickr.com/4043/4438260868_cc79b3369d_z.jpg',
    ),
    Product(
      id: 'p4',
      title: 'Pad',
      description: 'A red Pad',
      price: 19.99,
      imageUrl:
          'https://live.staticflickr.com/4043/4438260868_cc79b3369d_z.jpg',
    ),
  ];

  List<Product> get items {
    return [..._items];
  }

  void addProduct() {
    //_items.add(value);
    notifyListeners();
  }
}
Now we start listening by providing in different widgets of our app. Simply import it and provide it at the highest possible point of the widgets. In this case, we provide it is in MyApp widgets.
void main() => runApp(MyApp());

class MyApp extends StatelessWidget {
  // This widget is the root of your application.
  @override
  Widget build(BuildContext context) {
    return MultiProvider(
      providers: [
        ChangeNotifierProvider(
          create: (ctx) => Products(),
        ),
      ],
      child: MaterialApp(
        title: 'Shop App',
        theme: ThemeData(
          primarySwatch: Colors.blue,
        ),
        home: ProductOverviewScreen(),
        routes: {
          ProductDetailScreen.routeName: (ctx) => ProductDetailScreen(),
        },
      ),
    );
  }
}
Here we are using ProductsGrid class simply to make 2 column grid for the products.
Here is code for ProductDetailScreen. In this class we have to use Products model so that we can use each product properties such as name, title and description.
There you go. Now you know how to create named routes in flutter. This is just small app with just only few screens. But named routes could be more beneficial in large apps with multiple screens. So hope you understand something from this tutorial.